THIS LITTLE CLASS OF MINE
  • Home
  • Contact Me
  • Lesson Plans

Model Magic Roses

5/16/2018

0 Comments

 
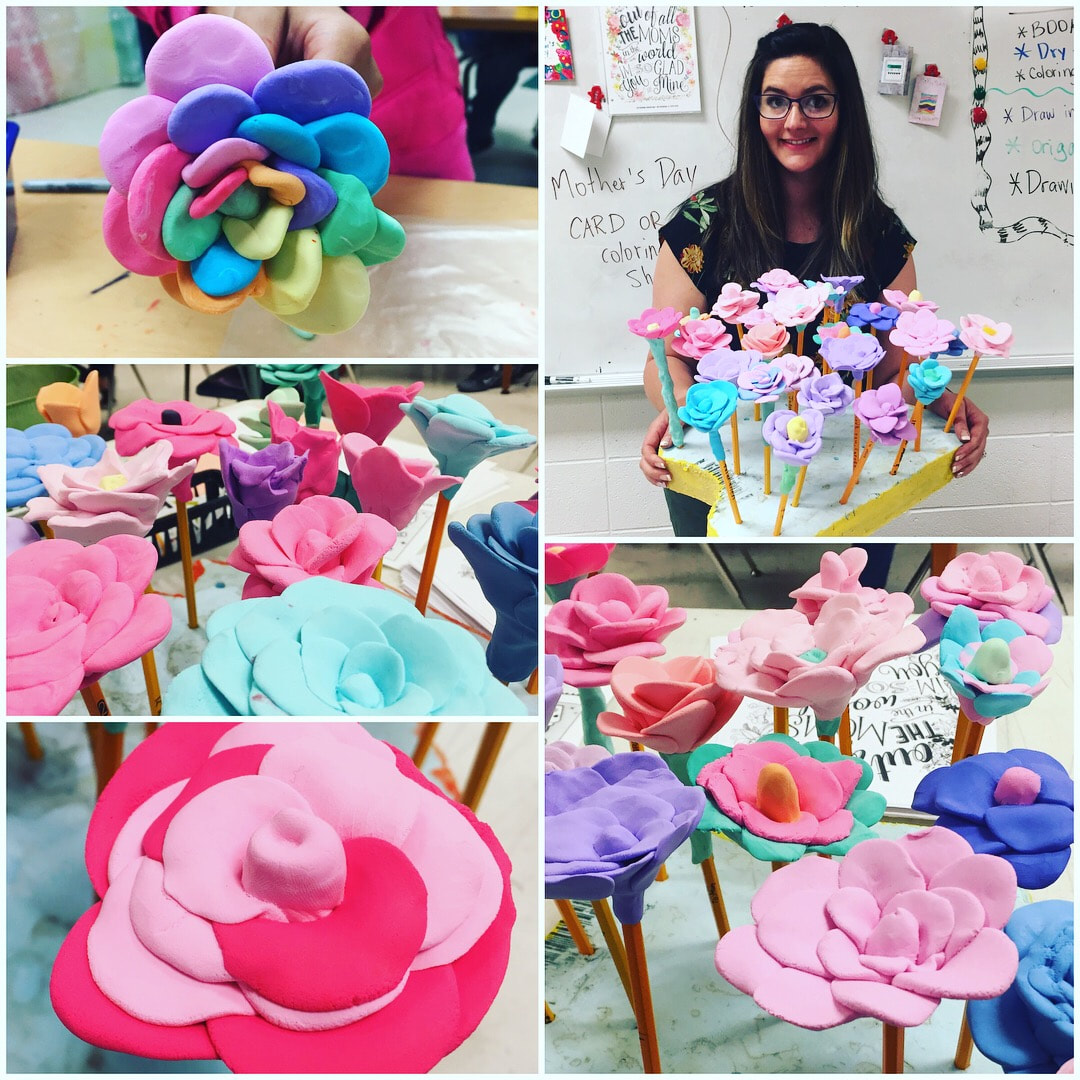
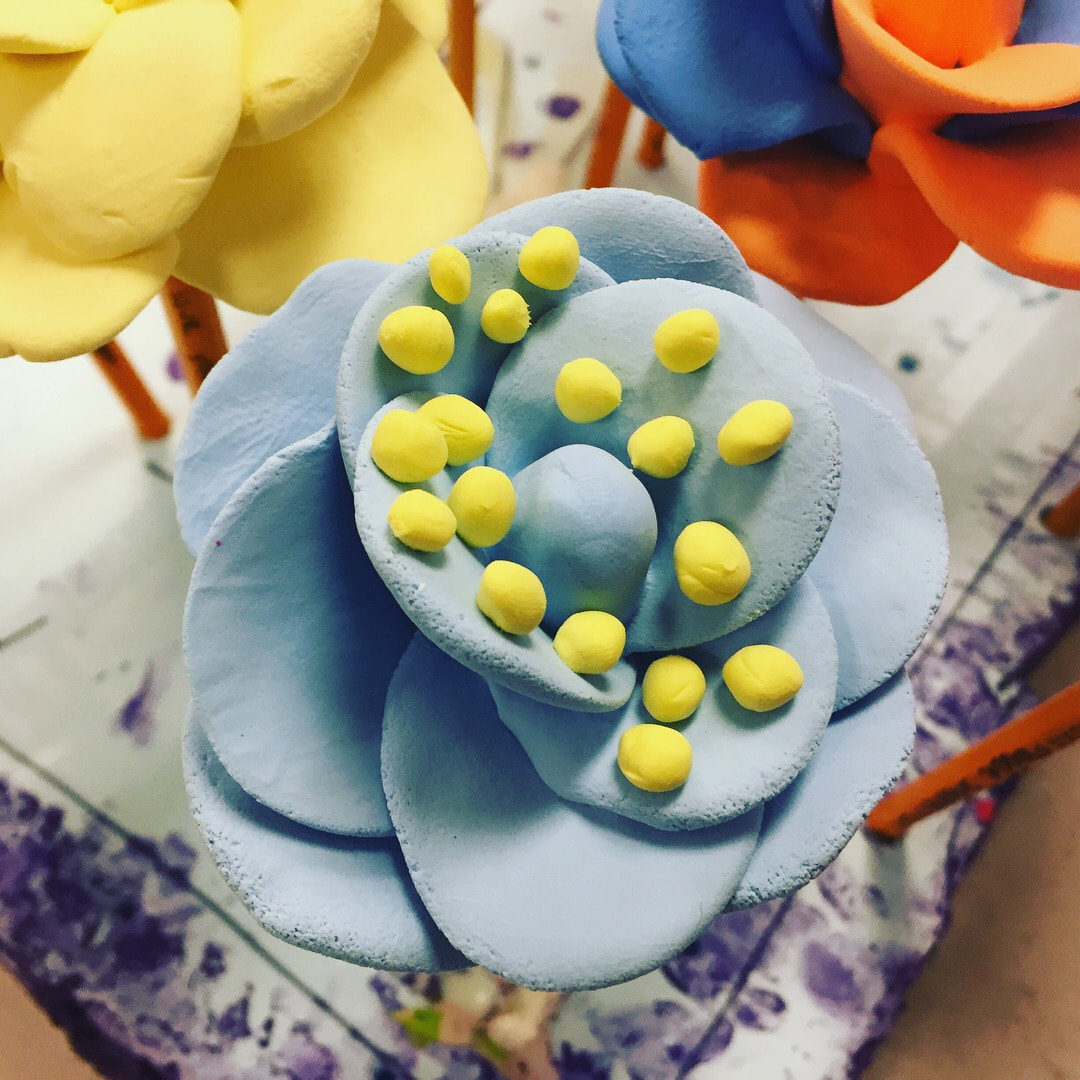
A friend donated TONS of No. 2 pencils to me this year so I thought it would be fun for my students to make a pencil topper. Most of the boys were okay with it after I encouraged them to make it as a 'Mother's Day' gift if they didn't want to keep it. In order to send them home a day or two before Mother's Day, the Model Magic roses needed to stand for a few hours, so I pressed them into pieces of foam that I used as decor in my art room. At the end of the day, I asked students to return them to me (or first thing in the morning). 

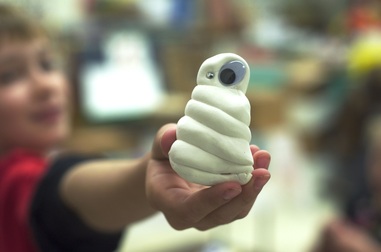
Each student received an individual mini package of white Model Magic and a No. 2 pencil. They used Mr. Sketch markers to color the model magic. 

​I made a video with the instructions. You can watch it here!
Picture
Picture
Picture
Picture
Picture
0 Comments

Metal Bugs

1/14/2018

0 Comments

 
Picture
I am guilty of pinning a LOT of ideas on pinterest, but never actually making anything from my pinsperation boards. I have a HUGE roll of aluminum that I have been hoarding for a while. It was pretty expensive so I didn't want to waste it on any old thing. While I was pondering how it could be used in a project, I ran across an old pin and I knew it was perfect for my 5th and 6th graders. 

Nichole Haun's color scheme bugs were perfect for my students. We had already gone over color schemes pretty extensively so we didn't focus on that too hard for this project, I mentioned color schemes, but I didn't spend a ton of time on the instruction going over color schemes again. 

​ I did use part of her video for the metal tooling steps, which I will share below. 

My students really enjoyed this project and I did too because it wasn't crazy messy....and it involved a lot of different media we don't use very often....also, MANY students were highly successful. I was sick throughout the entire process so I didn't take any 'in progress' photos, I only have finished products to share, but I hope you find some inspiration here. 
Day 1
We started by practicing some bug sketches. I made up a packet of visuals for each student (4 packets per table, shared amongst all the classes). Students could pick a bug from the packet, but they needed to choose something a little harder than a lady bug, because some of the bugs are pretty simple. They needed to practice on a dry erase board and then they could start on the real paper which was 6X9. 

I had cut the aluminum metal roll into roughly 6X9 sheets. Some were a little bigger, some a little smaller. I encouraged students to draw the insect as big as possible on their paper so they would not waste too much of their aluminum. They did not need to draw thin little antennae or skinny little leg segments, as we would add those later with wire, but they did need to study the bug enough to remember those parts. 

Once they had a good sketch, they brought it to me so I could tape their sketch to a piece of metal. I tried to match up the sketch with the right size piece of metal. If they drew their bug too little, I made them try again. A few kids had the idea to draw the body and the wings separately, like with dragon flies and butterflies, and those turned out great. 

Some classes were not giving me much detail in their insects so I showed them Austin's butterfly and it helped inspire some kids to try again when I gave them a little more specific feedback. 

To transfer the bug to the metal, students followed the directions in Nichole's video. We only watched part of it, as they would not be cutting it out or coloring it today. 

​Supplies:
6x9 paper
dry erase boards and markers
pencils
colored pencils (to transfer to aluminum)
thick sheets of aluminum (I buy from school specialty)
felt
plastic metal tool (i tried to find a link to this but I can't figure out what to search for)

Picture
Day 2
I was absent for day 2 of this project. So I had to leave a sub plan. Here are the instructions that I left for the sub. 
Today’s lesson involves making a paper collage, which will be the frame for the insects we started last time. Students will need to use a color scheme for their frame. The possible color schemes are listed on the board on the west wall and we have been discussing color schemes for a while so they should be able to pick one quickly and easily.
Project Steps

  1. Explain that students will be making a collage. A collage is a design made by cutting and gluing shapes to a paper.
  2. Students will use scissors and glue sticks to complete their designs and if they need extra glue sticks, they can get more from the container at the front of the room. If they want to some of the papers, that is fine as I taught them some easy folds at the beginning of the year like the kite, hat and samurai fold.
  3. As they cut out shapes, they need to put their scraps in the paper pal or in the paper store tub for others to use. The paper store tubs are labeled and the big background papers are spread out on the table at the front.
  4. Don’t leave the scraps in the table top tubs as those are filled with small ‘good squares’ that we will be using all day. You will need to point out where the paper is for the paper store and send them up 1-2 tables at a time to go shopping for paper for their background. While some are shopping, the others can go through the tubs on their table to pick out colors for the collage. Some of the table top tubs may not have all the colors they need for their collage, it is up to you if you want to let them go to other tables, I would probably let them if they ask but not if they just want to wander around.
  5. When students have finished their collages, they will put them in the drying wrack, but students need to make sure their NAMES ARE ON THE BACK. I put pencils on the tables for this purpose.
  6. If their collage is really simple, encourage them to go back and add more small shapes and details so that it will look interesting with their insect on top. They can’t just glue 3 small squares and call it finished. Encourage them to use patterns and they can overlap various shapes if it looks interesting. If they want to cut out a leaf shape, they might want to fold the paper so that it is symmetrical and lightly draw it with a pencil before cutting it out.
  7. If they finish early, they may get a coloring sheet or a free sheet or origami, but they must stay busy while others are finishing.
  8. I left a sweet book on my desk if you find that the classes are finishing quickly and you want to read it either at the beginning or the end. Please try to maintain the schedule, there are only 2 minutes between classes so if you get off track it throws the whole day off.

Tips about the drying wrack for the sub:
  • Try to only put one class on each side of the drying wracks.
  • When the class leaves, put a note on top so that it is labeled with the teachers name or the class code so I will know which class it is when I take them out.
  • You will have to turn the drying wrack around after each class leaves so the next class will have an easily accessible side to put their papers in.
  • Always start filling the drying wrack from the bottom so that everyone’s paper will fit.
  • After two classes, trade out an the full drying wrack by setting it on the floor and put an empty one on that table so it is easy to fill up again with the next two classes.
  • All six sides will be completely full by the end of the day and with the biggest classes, you might have to double up some shelves so they will all fit.

​Supplies
2X2 squares of construction paper and other specialty paper like scrapbook paper
12X12 and 9X12 background paper
glue sticks
scissors
pencils

Day 3 
After being gone and very sick, I was finally back to finish up the project. Today, I demonstrated how to cut out the insects, how to add wire or pipe cleaners and how I would hot glue their bugs to their background. 

Students used skewers and chop sticks to wrap wire, like is shown in the video. They used permanent markers to color their bugs and scissors to cut them out. I had students save their metal scraps by wrapping them up in their old bug sketch, which still had a little tape on the edges, they made a little envelope so save it for later. Then they used glue dots to attach the wire. When they had everything ready, they brought the bugs up to the front where I was waiting with my glue gun to attach their insects. 

I was still not feeling great so I made a little video to help explain the process for getting wire and using glue dots. I think I had another video but I can't find it so I think I deleted it.....

Supplies
permanent markers
scissors
glue dots (I needed about 4X this many)
​wire (twisteeze, pipe cleaners, stovepipe wire)
hot glue gun and hot glue
​chopsticks for wrapping wire
Picture
Picture
Picture
I draped twisteeze wire over my loom so that it would be displayed easily! Worked like a charm.
0 Comments

Radial Symmetry Paper Relief Project

9/3/2017

2 Comments

 
Picture
 While it was a little challenging to teach ORIGAMI folds at the end of the day on a Friday (the Friday at the end of the first full week is hard for kids and teachers because we are all just done by the end of the day). Once the kids got back from the weekend, they were much more able to grasp the basic folds.

First, I used the Power Point from Art with Mrs. Nguyen to help explain the difference between RADIAL Symmetry and Linear Symmetry which has only one line of symmetry, like a butterfly. Then, we used her youtube video (and I demonstrated while holding up a 12X12 piece of paper) how to fold each of the 3 folds that are used in the Powerpoint: hat fold, kite fold, and samuri fold. Students practiced with 6X6 squares of newsprint.

I polled the class to see who was an 'expert' who had done a little origami and who was a complete newbie. Since I have never taught any origami folding to my students, many of them were complete newbies. I explained that the three folds we were practicing would help them to create many basic origami things using the books later---but if learning the process by watching me felt hard---don't despair because I actually think it is easier to use the books (I pointed to a bunch of books that I checked out from the library) because they have photos of each step and arrows that show which direction to fold the paper. Also, if they couldn't see how to fold the paper, they could always ask an expert sitting nearby and that might help too!

Some kids got the folds right away, while others really struggled. I think I even had a few kids cry....I hate crying the first week...it sets a bad tone for the rest of the year. I told them that as a teacher, I think origami is hard to teach---it is like tying your shoe, until you 'get' it, it is so hard, but once you get it, it is much easier and you can do it without even thinking. For students, this is really challenging, and frustrating and eventually, they can get it, but it takes practice. 

After practicing the basic folds with the newsprint, I gave everyone a 12X12 black square and had them fold it in half both ways like a card and diagonally both ways (like the beginning of the samurai), to show all the lines of symmetry so that they could start to plan out their designs. Then we wrote our names on the back. 

Students had about 5-8 minutes to start their designs, many of them chose to glue some flat pieces to the background to get it started. I gave them a big tub of 2X2 squares, a mixture of neon origami paper cut down, scrap construction paper and other scrap paper. This is the tough part about this project....you need a LOT of 2X2 paper. I had actually started cutting the squares last year in anticipation of the project and probably spent a good 3 hours cutting more throughout the week so that students would have enough of each color to make their designs balanced. In the TpT lesson plan I bought, she used 3X3 squares, which would probably go a lot farther---we used the smaller ones so it took a little more for each design. 

We used glue sticks to glue the paper down. 

***NOTE: I have taught this lesson in the past in one day....I did not teach the origami folds and I did not use a powerpoint. We focused more on making it balanced with the colors and we used really simple 3D shapes. When I handed out the background paper, I had pre-folded it into 4 even quadrants and I told them to make it balanced---whatever you do in one quadrant, you do in all the quadrants. Sort of like a quilt square. Students were highly successful---but it was a ONE DAY lesson.....I let them take it home the same day and I did not grade it. Here is a blog post with examples (I can't find my images anywhere)

Picture

Day 2

​I reviewed the folds quickly by pointing out the big 12X12 versions I had tacked to the whiteboard. I also printed out the handouts that came with the TpT lesson---and had those available for students to refer to if they forgot one of the folds. I gave them the entire day to work on creating a symmetrical design. I showed them a couple of examples as a reminder that the design had to be balanced and it had to be 3D. I also mentioned that they could use other types of folds to make it 3-D, not just the ones that I taught them.

Since these had to be put in the drying wrack, I encouraged them not to make them too tall as things could get ripped off pretty easily. Also, students needed to give their designs the SHAKE test. Pick it up and shake it to make sure nothing falls off before taking it to the drying wrack. 

If students could not find the right paper color to finish their design, they were allowed to go to other tables, but they were not allowed to fight over the paper (I had paper wars in a couple of classes with kids hoarding the neons and not sharing) and they weren't allowed to go to another table just to talk to a friend, they could only grab what they needed and get back to their spot. They liked the freedom and independence to move around the room! I would rather them get the right colors than just glue random stuff down in order to hurry and be done quickly. 

Early finishers were allowed to help a friend or try out the origami books. I always have origami for early finishers, but I hope that by showing them a few basic moves, they will be more willing to try it on their own as they will have a little confidence and some background knowledge. I explained the difference between the practice newsprint paper and the REAL origami paper--mine is white on the back---and it can be very expensive so don't waste it!! 

I noticed lots of kids naturally spinning their big 12X12 papers and noticing the optical illusion effects. Certain colors and the neon papers on the black background were tricking their eyes in really neat ways. 
Picture
Picture
Picture
Picture
This one wasn't really radial design, but I loved it so much!!

Day 3 Spinners 

​Day 3
Most kids were ready to put the finishing touches on their designs---some needed an entire third day for the project, while others just needed a minute or two to finish or fix pieces that had fallen off. This was the day I mentioned that I would be sending them home at the end---rather than stuff them back into the drying wrack and wait for me to grade them, I was worried they would fall apart if they were all stuffed into my cabinet over Labor Day, it would be better for them to take them the same day. I explained the grading---if the design was balanced and used all three of the folds I taught them they get a 3, if it isn't balanced or they don't use any 3D paper techniques it is a 2 or 1. Most kids got a 3, but a few got a 2.5 or a 2 if they didn't use any of the folds I taught them.

I also explained how I pick artwork for my art displays. I pick a few from each class for each project and hang a big display in the cafeteria. I try to pick something from every student between now and Christmas. And if I pick theirs, they get it back later. Everyone else gets to take theirs home today. I told them please don't have their feelings hurt if I don't pick theirs this time, I can't pick them all, sometimes I already have another design similar to the one they made and I have to pass over theirs.

Okay, I really didn't want to start a whole new project for the ones that were done, but in most classes, about half were completely done or only needed 5-10 minutes. So, I made 6X6 black squares so the kids could use their origami and design balancing skills to make a MINI radial spinner to take home. Very first class, a kid asked, "do we HAVE to make one?" YES!! You have to make one if you finish with the big one. The big one is graded, so it is a priority, I need it first. The same kid was the one that exclaimed, 'THIS IS AWESOME!" about his mini spinner. 

To make the mini spinner, you fold it in half like a card both ways and diagonally both ways, just like we did the big one and the samurai fold. Don't forget to fold it, because a couple of kids forgot and theirs would not spin without the center point on the bottom from the folds, it is like the point on a top, it helps it spin. Also, if anyone had trouble with their spinning, it was because they had glued paper on the bottom of the design and it was like a brake---it created too much drag and theirs would not spin.

After folding the black paper, use the origami folds to make it balanced and symmetrical. I gave them a mini lesson about the color wheel. Opposites like blue-orange, red-green, and purple-yellow (also pink+green) give off a more powerful visual effect when spinning, if you put them side-by-side on your design. Also, if you use white paper (with the black background), it is the opposite of black and it looks really cool. A girl used orange on black and we could see a blue dot that wasn't actually there! When the designs spin, you see shapes that aren't actually there. Our next project will be an optical illusion, so this is a great intro!

Students loved making the spinners. IF they had time, they could even make two! 4 samauri folds in the middle made a great handle. When they were finished, they spent time practicing their spinning on the floor or the table. The fidget-spinner obsessed kids were in heaven. Let's be honest, the neon paper looked amazing...I wish I would've had a blacklight because it practically glowed in the dark. Next time I do this project, I will definitely bring a blacklight and buy a LOT more neon paper. 

Update: I had a 500 pack of FLUORESCENT ORIGAMI paper from School Specialty. I cut it down to 2X2 so it would stretch amongst all of my students for this project. It is kind of expensive but really, really vibrant.
Picture
Picture
If you wanted to simplify for younger students, and do this project with everyone, THIS would be a highly successful design. Make a pattern of diagonally folded papers.
Picture
Picture
2 Comments

Newspaper Shoes

5/23/2017

19 Comments

 
I randomly stumbled across this post about a newspaper shoe challenge and realized it was the perfect way to use up some extra newspaper I had accumulated at the end of the year. I numbered off each student and placed them into random groups of 3-4 and told them that they had one class period to design a shoe that fit on one person on the team, using only newspaper and tape (eventually allowed a little yarn and staples too). I gave them a little sketch paper, scissors and pencils.

Each year, I try to implement some sort of group activity. I had a poster of paper folding techniques, most did not utilize it. So I started demonstrating at least how to roll one big sheet into a cylinder, and then use that to form the main parts of the shoe, that helped. I also mentioned that if they were making a high-heel, they should build up the heel so it would hold up in the fashion shoe. Also, they could make 2 shoes if they had time.

They had to figure the rest out for themselves. This was a great team-building activity!

I allowed them to work until the last ten minutes, when we had  fashion show and I awarded the winning team with art trophies (mini pencils spray painted gold). The fashion show consisted of me playing Call Me Maybe into my bull horn (via my iPhone) while kids walked the runway (a couple of rugs) in front of the class to show off their shoe. I picked the winner based partly in design and partly on teamwork. 
Picture
Picture
Picture
Picture
Picture
Picture
19 Comments

Cardboard Masks

4/4/2017

0 Comments

 
Picture
When planning for this project, I scoured the internet for a tried and true lesson plan and template to follow.

What should students do first?

What is the most important students needed to know when working with hot glue and cardboard? 

A lesson plan like that just doesn't exist.

I had to start from ground zero with this project.
While I did use a few things I found online to help with the planning, for the most part, this is an original project. 

PipdoArt has a few great african mask pictures on instagram. Creatively Hamish is currently creating steampunk superhero helmets that are absolutely incredible.

It was artroomadventures who mentioned the artist AJ Fosik.
Bingo.
That was the most perfect artist to reference for this project, and her 7th and 8th graders have some amazing masks on her instagram feed.

​ It was exactly what I needed to inspire the project to move forward in a way that would make sense and be relevant for my young artists. 

Picture
Day 1
We began the unit by looking at the artwork of AJ Fosik. First, I showed my 5th and 6th graders an artist profile video on VIMEO. Then I made a slideshow of pictures of his work. We talked about 3D and how that is different than drawing.

I explained that students would be creating a mask sculpture that could be inspired by folk art, mythical creatures, or animals. I showed them a couple of examples of masks and folk art artifacts that I have on my shelves (a totem pole, a couple of oaxaca animals, African and Maori masks). I used a Chinese Dragon as a reference for my example. I had tons of Zoo Book Magazines that students could use as references. 

​I explained that folk art means that is usually hand made and only found in certain regions, usually created by tribes of people.

Then students had time to begin planning their masks.

I encouraged them to separate their sketchbook page into 4 sections, and draw 3-4 ideas and select the BEST idea for the project.

They should think about creating their masks symmetrically and then color the one they plan to use.  

Picture
Day 2
(Once students have had a chance to draw) Today we talked about symmetry and using cardboard to create their masks. I explained that they might want to consider making the 'eye hole' for the mask where the mouth is, like on a mascot or a costume, so that it can be bigger than a humans head and extend above their own head....also, it is much easier to cut one hole behind the mouth than to cut two identical eye holes. Most students listened to this advice. 

Today, students used thin newsprint to create a symmetrical template for their mask. They had to fold the paper in half, and draw half of the mask along the fold. It helped that they had recently done this on a previous project! 

Once they had made the template, I was waiting for them at the cardboard store. I had them show me their template and I helped them find a big piece of cardboard that would be a good fit. Then they took the template and cardboard back to their seat and traced it and began cutting it out. This is the hardest part, cutting out the big base of the sculpture, especially if they made it very spikey or furry (like my example). I had big 'adult' scissors available for this step because it was hard to cut the cardboard for some of them. 

If they finished that, they were to put their name on the back, and they could use the mini glue guns and small cardboard to begin making things on their mask. I told them that I would share some techniques next time if they aren't sure how to start, not to worry! 
Picture

​ Day 3
Learn basics of making the mask 3-D, add details.

This was a great day for my principal to observe me! I had created a DIY video, in which I show the basics of how to make some things on the mask 3-D (Flange, hinge, pop up, tabs, etc.) It is kind of a boring video....but it helped me show them some stuff that really made all the difference in success. 

I learned really quickly that I should have had gardening gloves for the students to use while using hot glue guns. Since I have up to 36 in a class and I was trying to help some of them find bigger pieces and cut their bases, for the most part, students were on their own at the hot glue stations. I had 5 mini hot glue guns set up for them to use. I also had small pieces of cardboard and paper towel tubes. 

Most of the small details can be cut out with small scissors. If they needed to cut a hole in something, I encouraged them to draw the shape and then I used my box cutter at a cutting station to help them cut out a hole or at least make scoring lines so they could get their scissors in there. I encouraged them to add layers of cardboard to make their mask more 3-D. They could add extra fur behind the mask on lion's manes and a tongue sticking out. 

Some students created more of a helmet---which became a challenge for storage but I really like how they turned out! 

If their piece of scrap cardboard had black writing on it, I reminded them to try to make that the back--so that it would be easier to paint over the brown than it would be the writing. It would be annoying if their mask said 'Charmin Extra Soft' across the front or "Alpo". 

Day 4--- Last day for construction, if students were absent, this is their chance to get caught up. If someone is done, they can help others, or work on a free choice activity.  LAST DAY FOR CONSTRUCTION. Create a base for the mask so it can hang on the wall. Put name on back.  

For the frames, I wanted their masks to have one more layer but I didn't want to scavenge for more cardboard so I created some templates and allowed them to choose a tracer for the shape that would work best for their mask. They simply selected the template they liked (they could hold their mask up to the shape and see if it fit well) and then found that tracer and traced it on 18X24 paper. Then they could collage more paper on the frame to make it more colorful. 

Day 6---Paint mask. Go over procedures for painting. 
For the first day of painting, I really wanted them to paint the base of their sculpture. First, I told them to pull off the hot glue 'cob webs'. 

I had lots of color choices including neon and metallic colors. I encouraged them to use gold, baby blue and white first, as those might need more than one coat. 

Using tempera paint means letting some colors dry before using other colors nearby, as the paint can smear easily. Since I allowed them to refill their own paint pallet, most of my lesson was about how to get a water bucket, how to select a pallet (I have 6 classes a day so they did not get a clean pallet, they were supposed to pick more than one pallet if necessary and use the paint that was already poured out). I also had to talk about not tapping the wet brush on the side of the water container. 

I also told them not to mix more than 2 colors. We haven't spent a lot of time on color mixing, so it was a real pain if they started mixing every color in their pallet. But I DID let them mix to make tints and shades of the colors. 

SAVE BLACK FOR LAST!!!

The hardest part of this project, was transitioning between classes. Since the masks were so big, they would not fit in my drying rack. I had the custodians set up 8 FT tables in a neighboring room. Each class had 2 tables and at the end of the hour, they had to carefully take their wet project to the room and set it on the table. It was a logistical marvel. 


For ​Day 7---Paint additional layers.
Today I provided black in small cups. Students really needed to save black for last---cheetah spots, eyes, etc. look best if the bottom layer is dry and then they add the black on top. 


Day 8---Final day for painting, attach mask to the base/frame. Add any painted details to the frame. Write a reflection on the success of the project. 

Today, students needed to finish painting the mask first. Then they needed to make the frame if they did not do that previously. They also had the opportunity to add embellishments. I explained what embellishments were. They could shop at the store for those---if anyone ever asks me if I think they should attach googlie eyes...my answer is always YES! I love them! I also had TACKY glue---NO HOT glue on things like feathers and sequins. Other things in the embellishment store: paper straws (for whiskers), cotton fluff balls, plastic gems, scrap craft grass and yarn. For embellishments, I told them they could have as much as they wanted, as long as they attached it to the frame or the mask. They could not take a handful of goodies home. Sorry! I did not have enough for that! 

Once their mask and frame were complete (add some paint to the frame so it matches the mask), they were to bring the mask to me so could use my big super hot hot glue gun to attach the mask to the frame. If they wanted the mask to be removable from the frame, they should have put strips of masking tape on the back to signal that they want to eventually wear the mask and they plan to remove it from the frame. I wanted the frames so that they would make a more impactful display! 

If they had free time, I let them use up some of the paint and 12X18 paper to paint 'frames' for another project later. 

Takeaways and reflection: 

This is a project that spanned the course of 8+ class periods. Nearly 400 students created 3-D masks. 

This project incorporated critical thinking and the use of sophisticated materials that middle school aged students should have an opportunity to utilize at school. When I polled each class, most kids raised their hand that they had used a hot glue gun before.  

This project was a massive undertaking to initiate and I have spent hours scouring for cardboard, cutting it to size, and planning each station to make it safe and accessible for multiple students. Most kids are VERY careful around the hot glue because they understood the danger. 

I understand that using hot glue is dangerous, just as scissors are dangerous.

Safety is always something that I stress in my lecture when starting a new project, it is always part of instructional input when I cover the routines and procedures for a project.

Students could get a bad paper cut that would hurt just as bad as the glue gun burn, it happens, and there are risks for every single thing we use. I know that this risk falls on my shoulders and I don't take it lightly, but it comes with the territory. 

The students responded so well to this project, most kids are thrilled to walk in the door and get to work on their mask, (which does not happen with every project we do).

There are students who haven't had success on anything ever before, making the most special and wonderful creations.  To an adult, the designs may not look like much, but the thought process, the vision and the application of skills are really quite incredible, it just can't be replicated through other process like drawing or painting. 

The risk involved with using hot glue guns was quite minimal in my opinion. We did have a few minor burns, but I encouraged them to use the old gardening gloves and always put the hot glue o the BIGGEST thing they were gluing, not the tiny thing they were attaching. Also, if they got a spot of hot glue on their hand, the worst thing they could do would be to wipe it----they should rush to the sink and run cold water over it---then peel off the hot glue. 

I would definitely do this project again without many changes. It was a lot of work to get the cardboard ready and the tables set up to allow the masks to dry, but it was worth it. 

I have spent the last week hanging all 12 classes around the building and I just love them all so much! This project had a very high success rate and I am proud of the work that my creative students have put into it. 
0 Comments

Plaster Cardinals

3/10/2016

0 Comments

 
Last year I ordered several boxes of plater of paris. I've never used it with students before, but I like the fact that it sets up quickly. After finding the Paper Mache bluebird project online, I knew that multiple classes could create a bird fairly easily and I had all the supplies (except for her recipe for paper mache paste--which looks amazing to use!). 

This project took some time to plan. I decided to try it out with 4 classes so that I could see how far the plaster would go and how much of everything would be used up...also I needed to stagger the lessons so that each class would be on a different phase each day, so that I would have space on the shelves to let stuff dry. 

First, I had a parent helper cut newspaper, wire, and cardboard into usable sizes. Thank goodness for my parent helper! She also cut a couple of packages of paper towels into strips, so we could use them like paper mache. 

The MO GLEs that are addressed with this project include: PP2A6a Create a relief artwork by joining two or more surfaces (e.g. natural or manufactured clays, paper pulp, cardboard, found materials). PP1B6a: Using opaque paint, overlap brush strokes to create a smooth and even area of color. 
Picture
Picture
Picture
Picture
Picture
Picture
Picture
Picture
Picture
Picture
Day 1
Students looked at a few pictures of cardinals and sketched out a cardinal. I demonstrated how to form the body using a wadded up (don't squish it too much) 1/2 sheet of newspaper. Then, they used 1/4th of a sheet, wadding it into a ball to form the head. We taped everything together---some of my tape was not suitable for this project, it was the cheap stuff! 

Students used scraps of cereal boxes and the cardboard from sharpie boxes I've been hoarding to cut out a beak, wings, a tail and if they wanted, a little feather for the top of the head, the 'mohawk'. Those things were taped on, and the student's name was written in sharpie on the belly. 

Day 2
This was my favorite lesson of the project. Today, I put a strip of colored Twisteez wire out for each student. Without cutting the wire, I challenged them to make a bird's leg---since we would be using wire for the Cardinal's legs, I wanted to see how they approached the challenge and if they could figure it out without my direct instruction. Most of them had never worked with wire. After 10 minutes or so, I collected the wire and started a demonstration. I had a pair of pliers for each table (didn't the first day, big mistake!) to help them bend the actual wire, which was much harder to use than the Twisteez. 

I demonstrated how to fold the length of wire in half and twist it onto itself. I told about how I had to make a sculpture using wire in college and I had no clue what I was doing! I set up my iPad like a document camera and projected my demonstration on the TV so they could watch closely. Students were really engaged in the lesson--they were really 'awed' by the demo, more than with other demonstrations where their dead eyes watch me but tune out my voice, they were paying close attention, for the most part. And I felt like I was really teaching them something too. 

Then I explained that they should bend it like a long 'L' making the top sharp end the part that pokes into the cardinal....and fold the long part of the L into a sort of W, winding the wire onto itself to strengthen the toes. *I wish the wire would've been cut a TAD longer, some students didn't quite have enough wire. The goal was to make 2 legs by the end of class. Students wrote their name on a piece of tape, and wrapped it around their wire to save for next time. 

Day 3
Some students needed this day to finish making the cardboard wings, (or make the legs or body entirely if they had been absent on one of the previous sessions), they also needed to stab the legs into the cardinals, tape things down really well and basically make sure the cardinals were put together well before we added the plaster. This only took about half of one full art time, so I had an extra activity---something that we were working on, that they could pull out if they got done early, and it gave me a little time to get those caught up that were really struggling with the wire. I also encouraged everyone to use a little glue gun to help secure the legs if they were jiggly and ready to fall out. 

Day 4
Plaster. Day of reckoning. Wear old shoes, or make shoe covers out of plastic wrap. 

One of my classes is 34 students. I only have 32 chairs---so it is always a little more chaotic when we are working on messy projects. It is hard to get everyone back to the sinks....the lazy kids use the clean up time to play around, instead of pitching in and I'm running around like a maniac trying to make sure everything is ready and cleaned up for my next class.  

I demonstrated how to apply the plaster using the iPad as a camera, but it was hard to really convey to them the intricacies of how to work with plaster, how to smooth it out, etc. In one class, a boy spilled the plaster on his pants (after I STRESSED that they should wear paint smocks and he did not), he spent 3-4 minutes at the sink, wiping his pants off, and by the time he got back to the table, his plaster had hardened so much that he couldn't coat the paper towel strips. Ugh. 

It was difficult to get around to all of the students who really needed a one-on-one helper or demonstration. This project would've been 10000% more successful if I would've had ONE other person in the room to help for this part. It was just too much for me to do alone with such large classes. 

Once the plaster was done, the students needed the last 5 minutes to crumble the dried plaster off their fingers over the trash can, wash their hands, and clean up the tables. Which meant I spent that whole time running around the room, transporting the heavy, messy sculptures to the shelves, picking up discarded bags of hardening plaster, moving cover sheets, smoothing and helping finish the straggling sculptures. 

Since I was so busy, the sink area wasn't being monitored, I couldn't help kids who got plaster in their hair, there was no way to yell over the chaos----it was stressful and it wasn't fun for me. Worse, I had to move everything out of the way for the next hour, which wasn't necessarily even doing the same project. And I only had 2 minutes between classes. Forget a restroom break. 
Day 5
Students stood over trash cans, sanding off the crumbly bits of dried plaster. Then, everyone painted the cardinals red. The entire cardinal was painted red. We let the red dry. Next time, give them some thing to put the cardinal ON, while it dries because the foam trays we used for the plaster process were still coated in chalky dried plaster which sometimes stuck to the fresh paint and left white crumbs. 

--Some students would've rather changed their cardinals into blue jays or other birds...I'm not sure I would let them, as this painting process when relatively smoothly, and I don't know how we could've added a lot of painted details without adding an additional day. 

Day 6
Students used a black permanent marker to draw on the 'mask' around the cardinal's face. They colored it in black, and drew texture on the wings and tail, if they wanted to. Some students felt that their cardinals were not very realistic so I encouraged them to make it silly---I pulled out the googlie eyes and mini hot glue guns. OR they could paint the eyes with a dot of white at a painting station. I also had a yellow-orange paint for the beak, which was pretty close to a cardinal's beak color when applied over the red paint, that they could apply. I gathered a bundle of sticks from my yard, and let students choose a stick, they could perch the cardinal on the stick, but some were too heavy and spun around it like a bird in a cage----and some didn't have long enough toes to grasp the stick enough to clutch it. They tried to hot glue the feet to the stick, but that didn't work...most kids just wanted me to put the cardinal on the stick for them---but I tried to encourage them to figure it out, because I really couldn't do them all--not enough time. The sticks left bark and crumbs all over the room which was a pain. I let students take the cardinals right out the door, even with wet beaks, since I knew it would dry within an hour after class. 
Conclusion
I was disheartened to hear that several students walked right down the hall and dumped their cardinals into the trash can in the next class. How frustrating to spend so much time prepping a project that I thought they would be so proud of and enjoy, just for them to not care and be disappointed. 

I also had a student exclaim, 'That project sucked. It was boring and took way too long.' I thought his cardinal turned out well, and I had no idea that he was so annoyed by the project until after he said that. 

After the first class told me that several had trashed their projects, I gave a sob story to the other classes about how broken hearted I was to hear that---and I encouraged them to save their cardinals for family members, especially old half-blind grandma's, who will appreciate the effort and the fact that they made it, even if they can't see the flaws, someone will love it! DON"T THROW IT AWAY!!!! 
Picture

One of my professional development goals this year is to try to use more effective reflections and evaluations with my students. It is hard to find the class time to fill these out for every project. How do I know that students are being authentic, and not just writing down answers like 'nothing' or 'I don't know'. Do I give them a grade for quality responses? Do I have them re-do them if they don't give quality responses? How? When? 

​I found this great form on teachers pay teachers, and had it copied. Each form hold 4 self-reflections. 

I have had 3 classes fill out the reflections so far, and the feedback has been so-so. I wish the questions were a little more specific to the actual project, because several students didn't tell me anything to help me improve this project or the plaster process for the future. Overall, students were proud of what they had made, and I guess that is what matters in a project like this. 

After this project, I have  general sense of how much space and organization something like this takes. It is a little disheartening that the Cardinals are almost impossible to display in our school without a display case, I sent them all home, without any evidence of our month and a half spent on one project. 

Now that I have completed this project with multiple classes, I can develop a rubric based on the student reflections below, if I choose to do a project that involves plaster, paper mache, birds or 3-D because I have a baseline for my expectations and I can gauge student success on this baseline understanding of what is possible. 

Picture
Picture
Picture
Picture
Picture
0 Comments

Model Magic Mummies and watercolor cases

7/26/2013

0 Comments

 
Picture
Last fall, after seeing Kathy's Mr. Model Skeleton Tutorial, I knew I HAD to come up with something for my Egyptian Unit utilizing hundreds of watercolor cases that were in great abundance in my district. The thing I love about this project, is that I was able to repurpose something that I would ordinarily have thrown away. Normally, I just buy watercolor refills, but one teacher had purchased HUNDREDS of watercolor sets. To free up precious storage space, she was happy to give me the cases for this project. 
I spray painted the watercolor cases....I didn't have enough of any one color so I had to make a variety of colors: brown, black, gold. The students were allowed to choose which case they wanted, most wanted gold, but it was nice that some chose brown to look like wood. 

WEEK 1
-- Use heavy drawing paper (or scraps of watercolor paper) into a sized that will fit on the front of the watercolor case. I just eye-balled it and cut enough strips for every student. I made a template that was rounded on top and bottom so that they could draw inside the outlines and make it rounded on top and bottom. 

Step 1: Draw a mummy case in pencil. You could focus on symmetry, show examples of ancient Egyptian mummy cases (I went to a cool mummy exhibit in San Antonio and purchased a little mummy case with an ornate mummy inside, it was so fun to show the kids!), teach about hieroglyphics, etc. I demonstrated the basic steps on the board, drawing a face, adding arms and hands (optional: hands can be hard so students could just make an interesting necklace). I don't think any of my examples show mummy cases with the arms, but several kids did draw hands holding a staff and they turned out really great.

Step 2: Trace over the drawing with skinny sharpies or thin tip permanent markers. Color with colored pencils, make sure to use silver and gold if available. 

WEEK 2
Step 1: Create a mummy out of model magic. I had them wad up a paper towel to be the inside of the mummy, (you know, brown and crunchy like a dead body) and then make a bunch of coils to wrap around the 'mummy'. I had to let them have the cases at this point so that they could make sure it wasn't too fat or thick to fit inside. Some made their mummies really fat and the door wouldn't close, some didn't want the door to close so they made theirs sitting up. 

Step 2: Add googlie eyes with elmers glue. I told them the eyes would stay, but once the model magic dries, they eyes might fall out if they don't glue them down...same with the mummies....there is a chance the mummy will fall out of the case once the model magic dries if they don't glue it. This was my favorite part, I had a bunch of different sizes and the kids made the silliest mummies! Some only used one eye, like it was peeking out from the wrapping. 

Step 3: The model magic mummies don't take a whole hour...some students needed to finish coloring the mummy case design, some were ready to glue it on to the front of the case. Since I had them trace a template, they needed to trim off the sharp corners of the paper so it would fit perfectly on the case. Once they are completely finished coloring the case, use a brush to put glue on the surface of the mummy case, but also cover the drawing with a layer of glue so that it won't peel off. A layer of glue will help protect the drawing, creating a layer of varnish. You could also use ModPodge for this. 

--In the pictures below, you will see a giant pyramid that I constructed in my classroom for my students to go inside. I let a few at a time go in with flashlights. On the walls inside, I had glued magazine images of ancient Egyptian artwork. It was really fun!


Picture
Tim Burton's Mummy Boy was featured in a Scholastic Magazine last year. It was a great resource for this project. I love to feature contemporary artists alongside art history. 
Picture
Picture
0 Comments
    PictureWelcome!

    Mrs. Mitchell

    Art teacher from Missouri. 

    Instagram
    Add to Flipboard Magazine.

    Archives

    March 2021
    April 2020
    November 2019
    July 2019
    April 2019
    January 2019
    October 2018
    July 2018
    June 2018
    May 2018
    April 2018
    March 2018
    January 2018
    September 2017
    May 2017
    April 2017
    March 2017
    January 2017
    December 2016
    November 2016
    October 2016
    September 2016
    March 2016
    December 2015
    October 2015
    August 2015
    May 2015
    April 2015
    March 2015
    February 2015
    November 2014
    October 2014
    September 2014
    August 2014
    June 2014
    May 2014
    April 2014
    March 2014
    February 2014
    January 2014
    December 2013
    November 2013
    October 2013
    September 2013
    August 2013
    July 2013
    June 2013
    May 2013

    Categories

    All
    1st Day Of School
    1st Grade
    3d
    Abstract Art
    Alcohol Ink Tiles
    Alpacas
    Animal Art
    Animation
    Architecture
    Art Centers
    Art For Kids Hub
    Art History
    Art Hub For Kids
    Art Room
    Art Show
    Art Teacher Conference
    Bell Ringer
    Birds
    Blending
    Bunnies
    Cardboard
    Chalk Pastels
    Chalk Stencil
    Charcoal
    Choice Based
    Christmas
    Chuck Close
    Classroom
    Clay
    Club Day
    Collage
    Color Diffusing Paper
    Colored Pencil
    Colored Pencils
    Construction Paper Crayons
    Contest Art
    Creatures
    Crystal Bridges
    Design
    Dice Games
    Document Camera
    Dot Day
    Drawing
    Early Finishers
    Easter
    Emojis
    Fall
    Field Trip
    Food Art
    Foxes
    Green Screen
    Grid Drawing
    Group Challenge
    Halloween
    Haunted Houses
    Hearts
    Hermit Crab
    High School
    Human Form
    Ice Breaker
    Inspirational Posters
    Ipads
    Jim Dine
    Justand
    Killer Whales
    Kindergarten
    Landscape
    Lesson Plans
    Lettering
    Llamas
    Magazines
    Mandala
    Maori
    Markers
    Masks
    Matisse
    Metal
    Model Magic
    Mona Lisa
    Monster Trucks
    Mother's Day
    Mother's Day Card
    Mummies
    Mural
    Newspaper
    New Zealand
    Notan
    Observational Drawing
    Ocean Art
    Oil Pastel
    Oil Pastels
    Optical Illusions
    Origami
    Owls
    Painting
    Paper Weaving
    Pd
    Pencil Topper
    Perspective
    Pete The Cat
    Picasso
    Polar Bears
    Pop Art
    Portraits
    Printmaking
    Product Review
    Professional Development
    Quiver
    Reflection
    Reflective Teaching
    Room Tour
    Rooster
    Sea Horse
    Seals
    Sea Turtle
    Self Portrait
    Shading
    Shaving Cream Prints
    Shoes
    Sketchbooks
    Sloth
    Solar Eclipse
    Spinners
    Spring Conference
    Star Wars
    Statue Of Liberty
    Step-by-step
    Step By Step Drawing
    Step-by-step Drawing
    Still Life
    Stop Motion
    Story Board
    Sub Plans
    Summer School
    Symmetry
    Tab
    Teacher Appreciation Cards
    Technology
    Tempera Paint
    Tiny Food
    Tissue Paper
    Trees
    Tumbling Blocks
    Valentine's Day
    Warm Ups
    Watercolor
    Wax Resist
    Word Art
    Yellow Submarine
    Zentangle

    RSS Feed

Powered by Create your own unique website with customizable templates.