THIS LITTLE CLASS OF MINE
  • Home
  • Contact Me
  • Lesson Plans

Charcoal Owls

1/17/2018

0 Comments

 
Picture
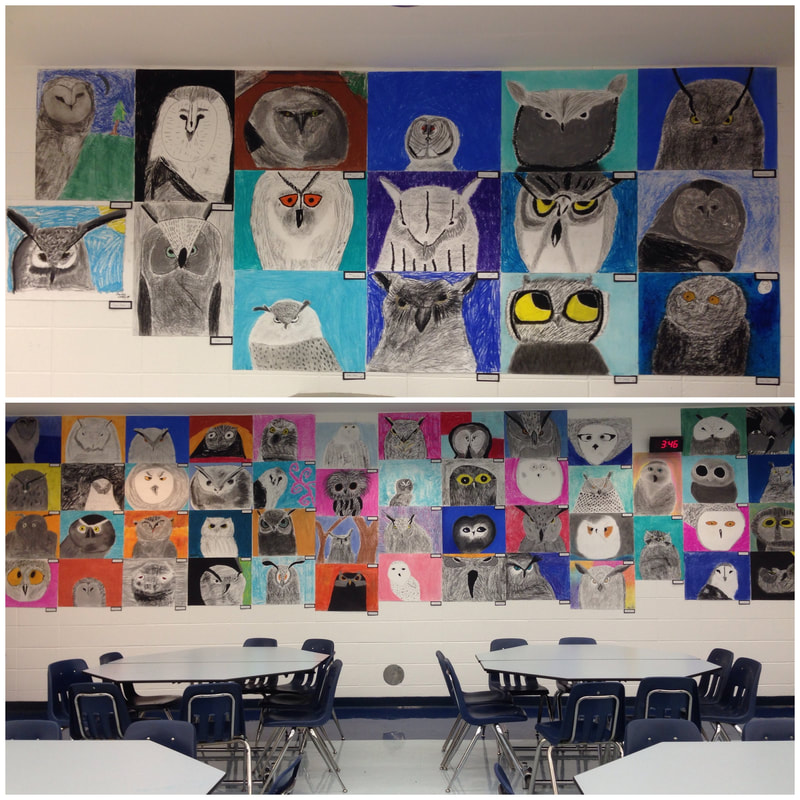
It is no surprise to my students that owls are my favorite animal. I have tons of owls all around my room, many of them gifts from former students. One of our very first projects when I transferred to the middle school was definitely going to be an owl project. This is an oldie but a goodie from 2014. I was really big into making my students use 18X24 paper that year.

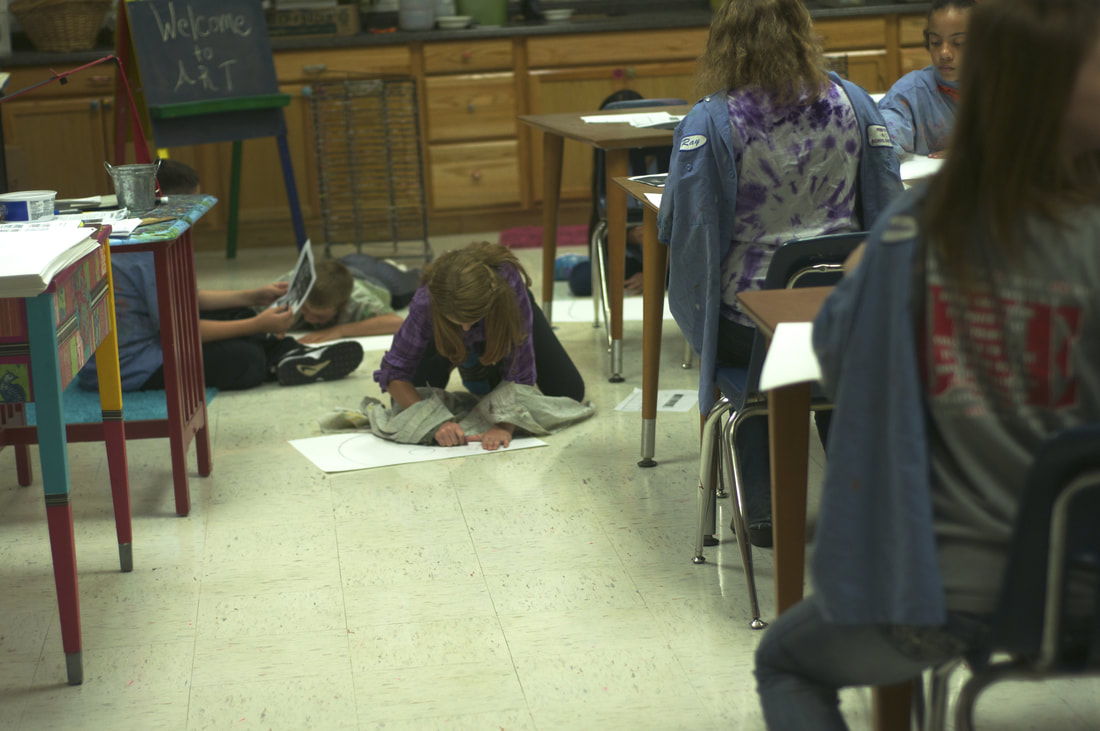
​When I look back, almost every project we did was huge like that. In order to make room, students had to work at the counter, on the floor and spread out in every direction. You could tell I was used to having smaller classes at the elementary level....now my classes are quite a bit bigger and it is harder to spread out that much. 

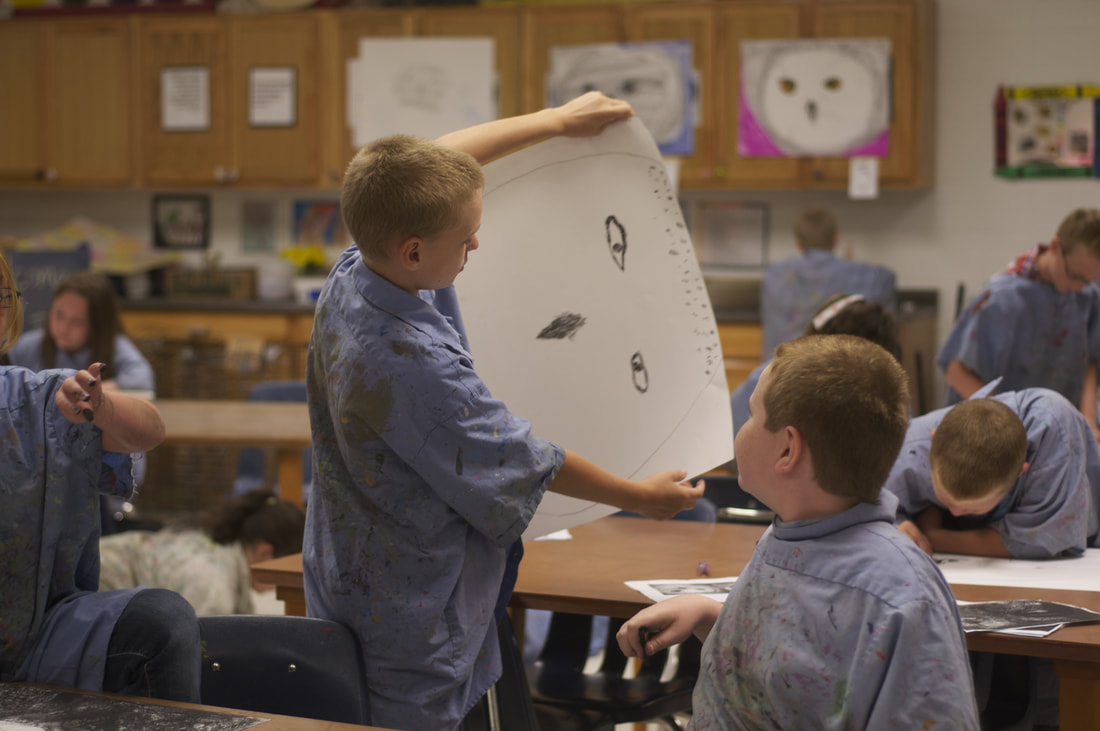
When I first moved to the middle school, I really thought we would primarily be using fancy supplies like charcoal, paper mache and acrylic paint...forget crayons and tempera....but a lot of my students were still at the same level the 4th graders I was used to so it should not have been a surprise that charcoal was really messy and somewhat foreign to them.

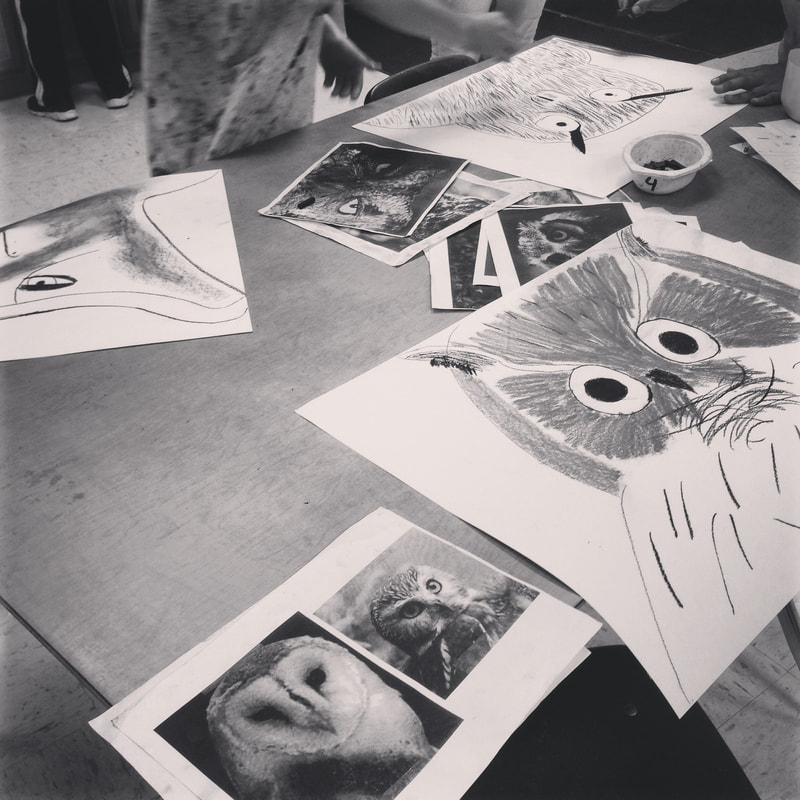
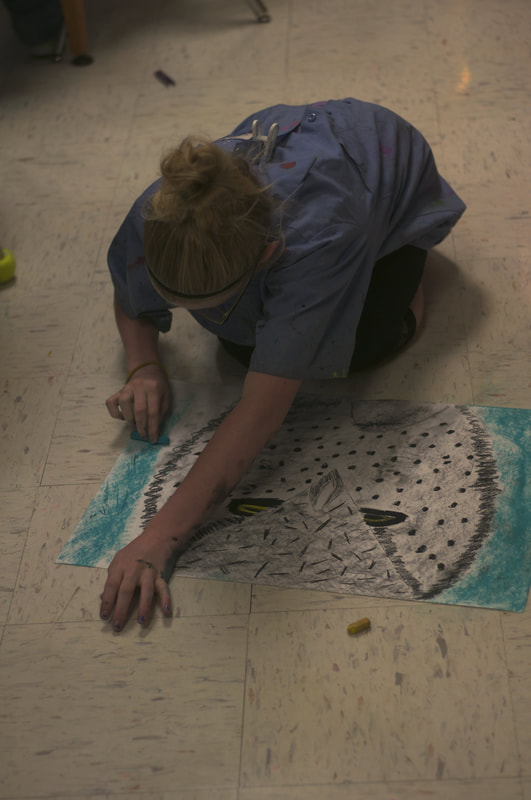
In the photos below, you will see chalk and charcoal on the floor. Yes, we made a mess. And I felt bad as the new band room wasn't finished and each day during my prep, the percussion team would use my room to practice, getting dust and crumbs all over their brand new instrument cases....Oops. 

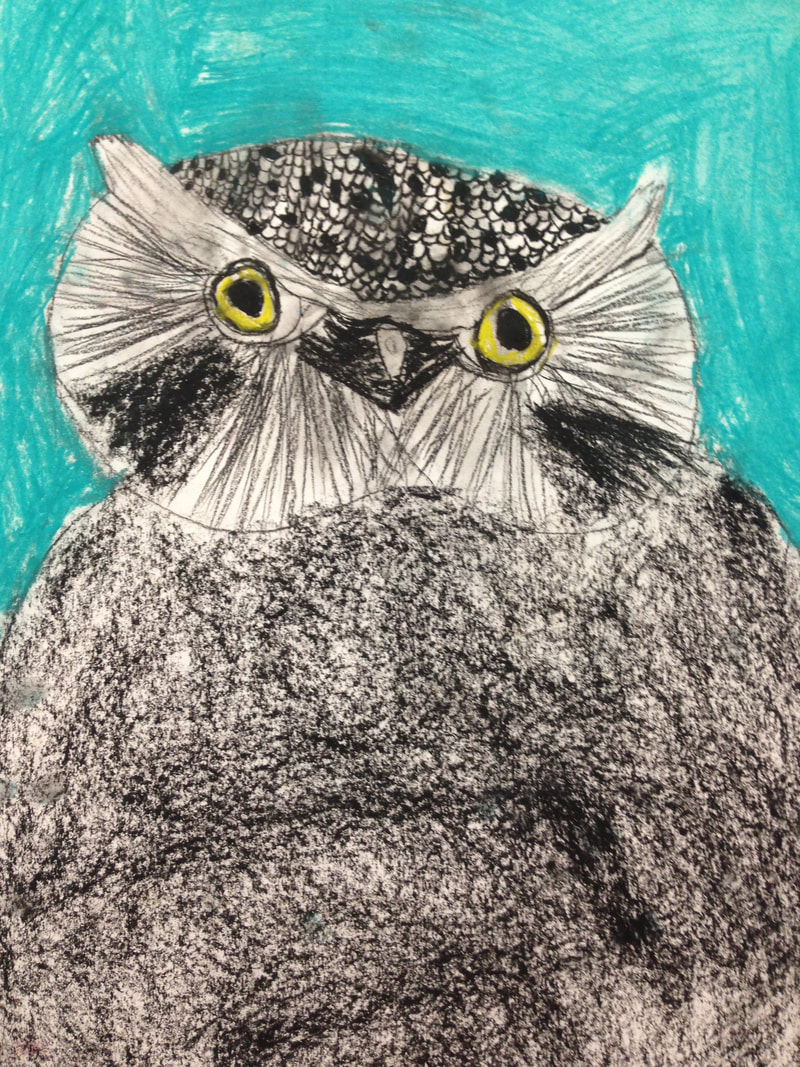
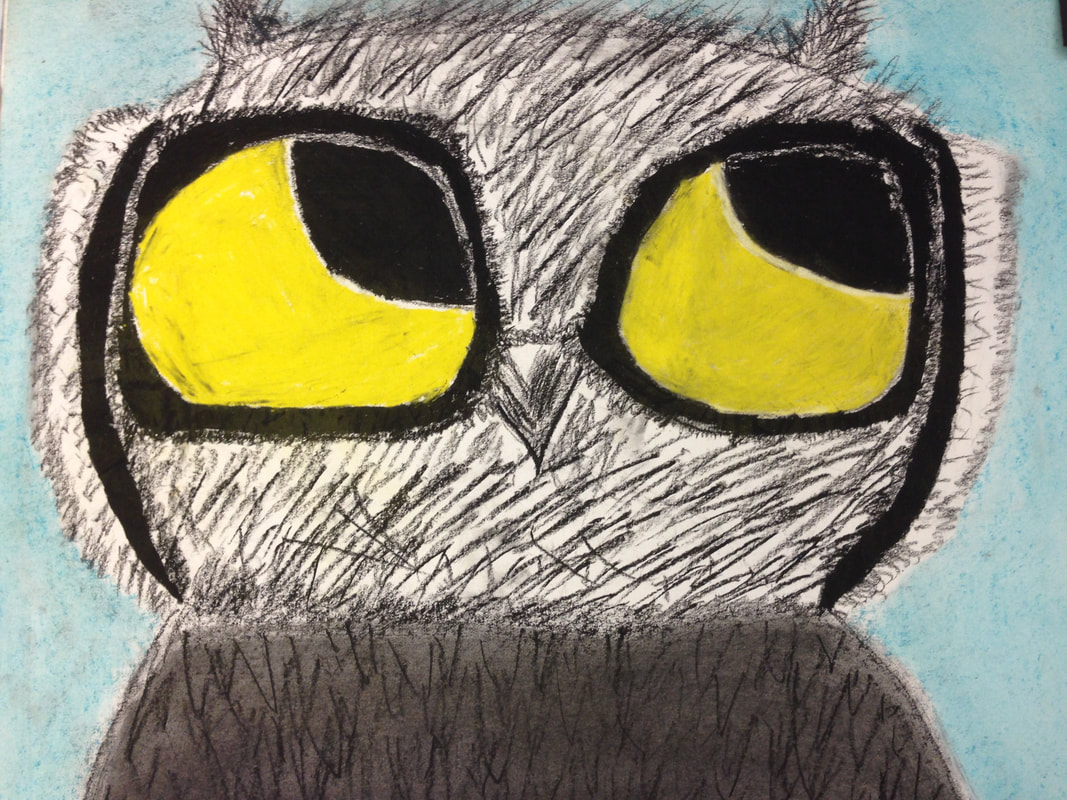
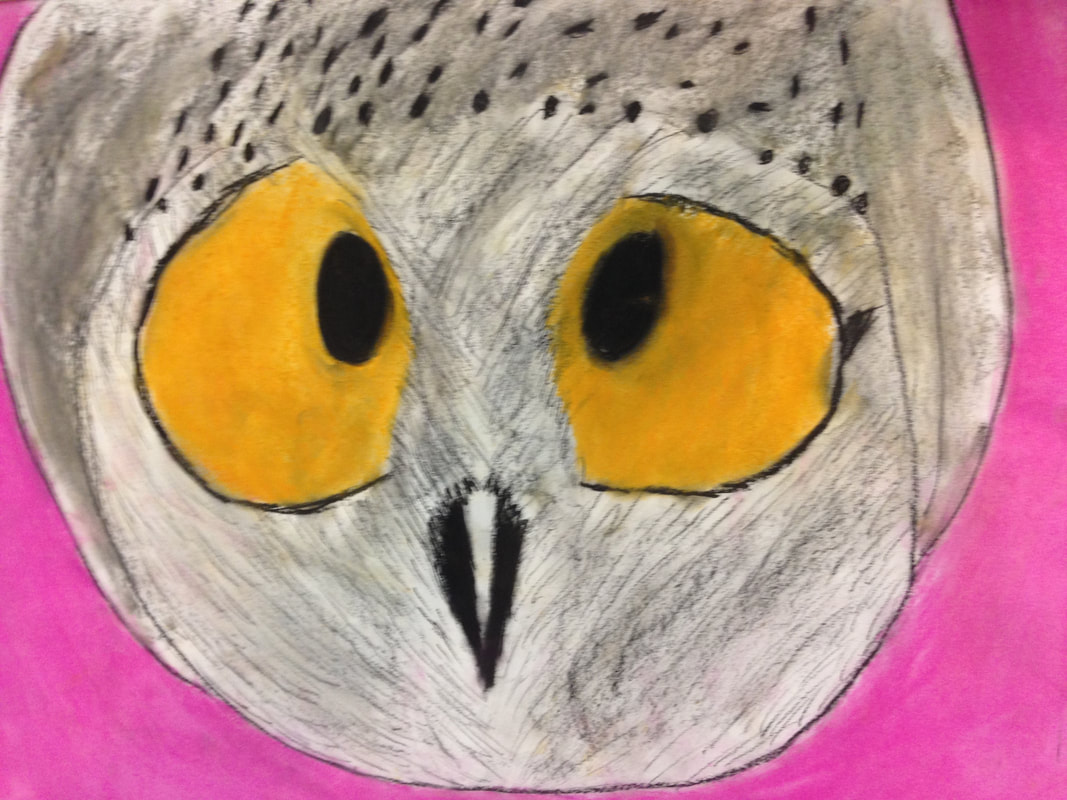
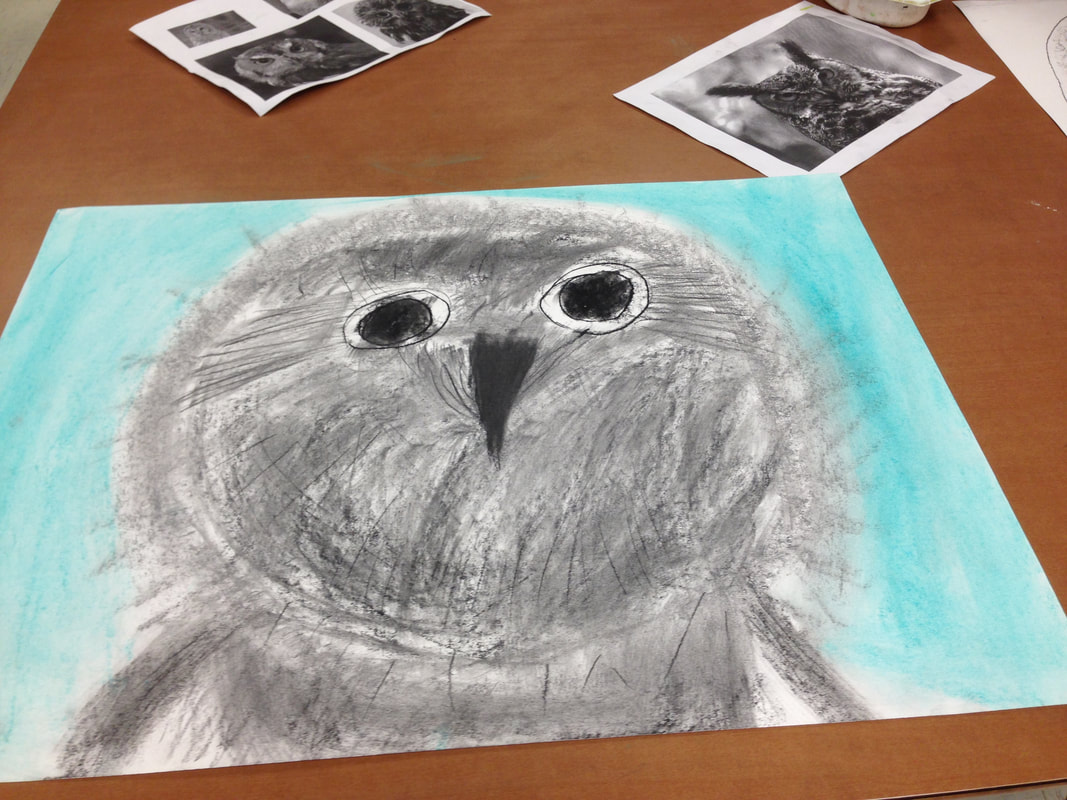
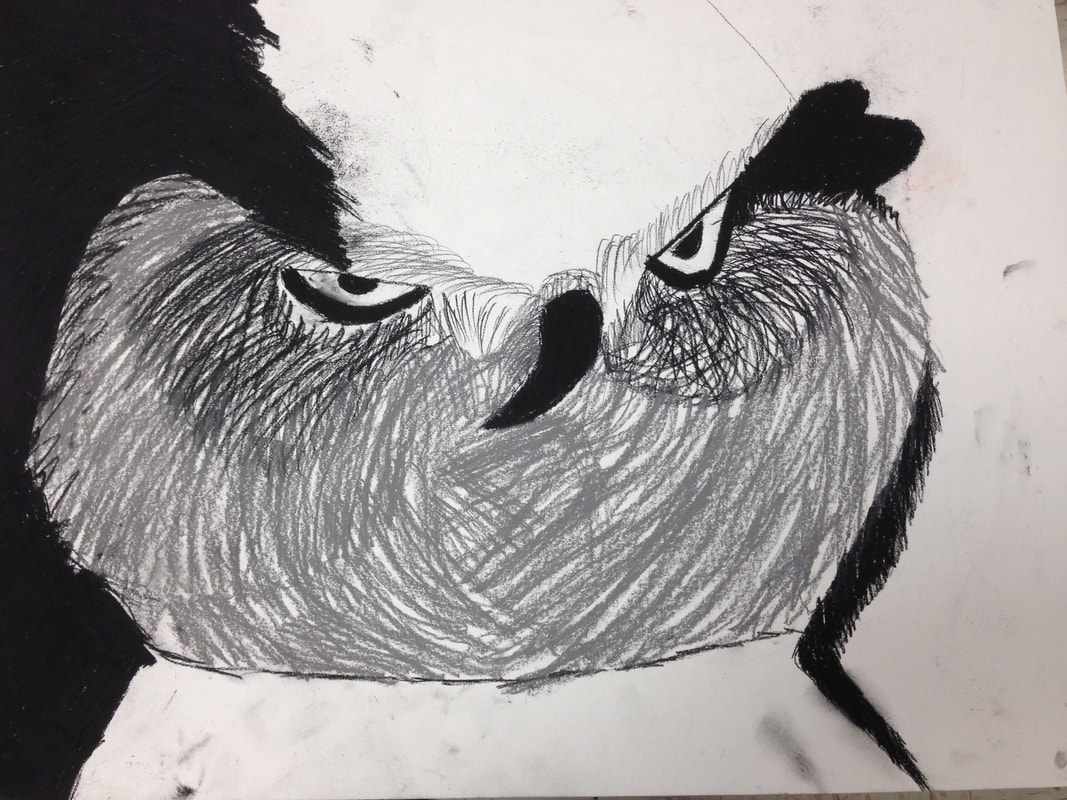
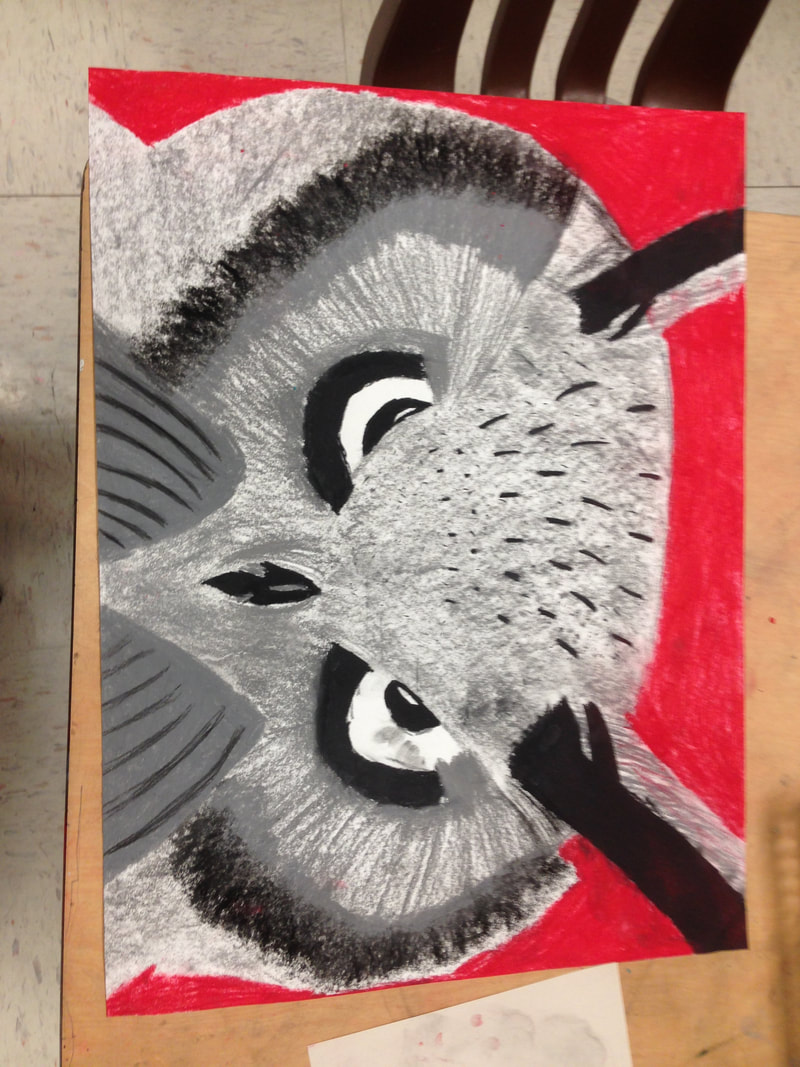
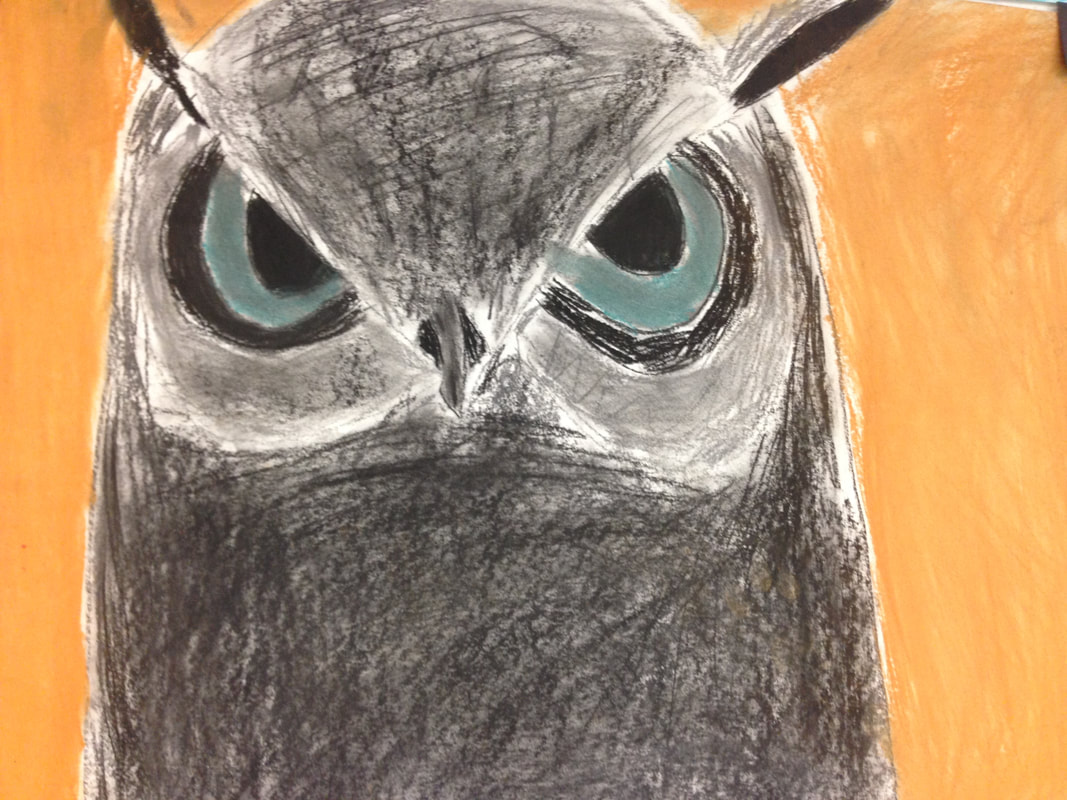
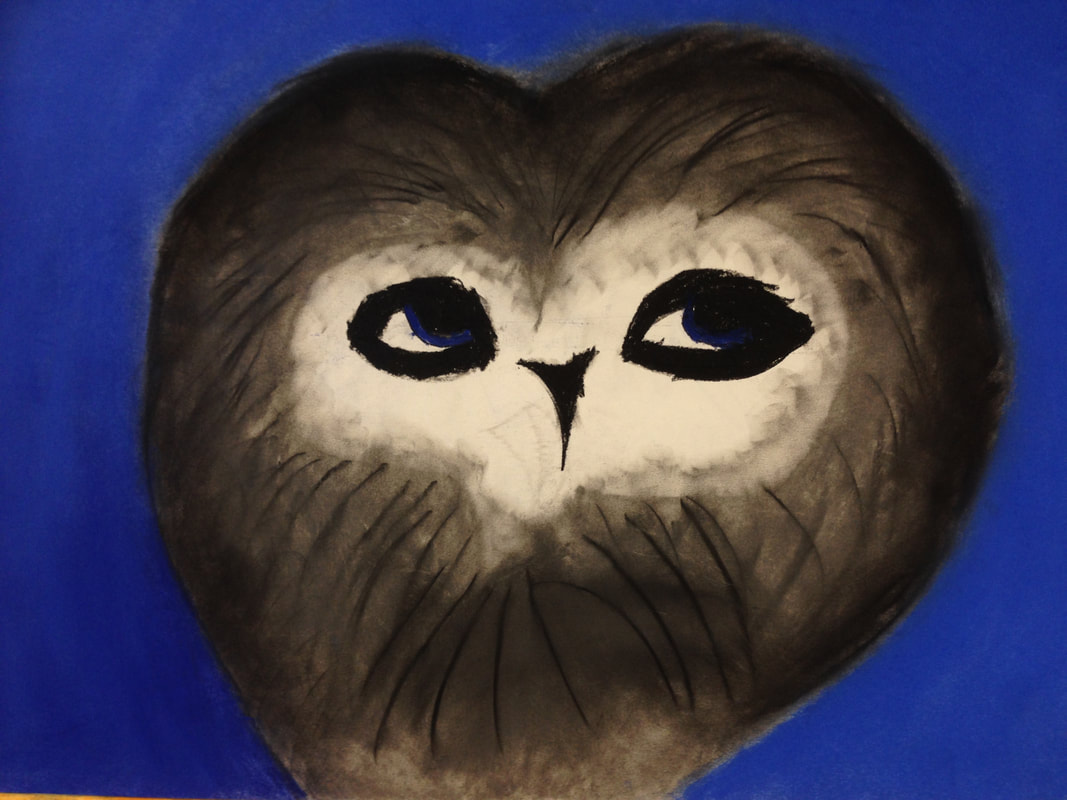
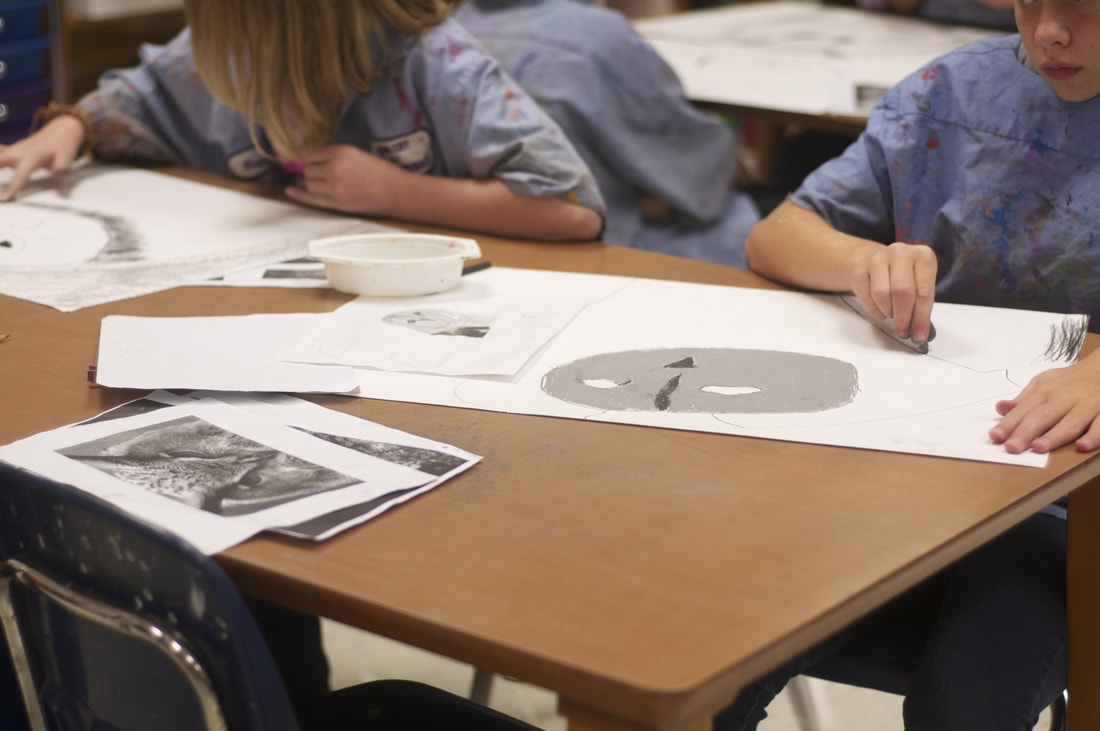
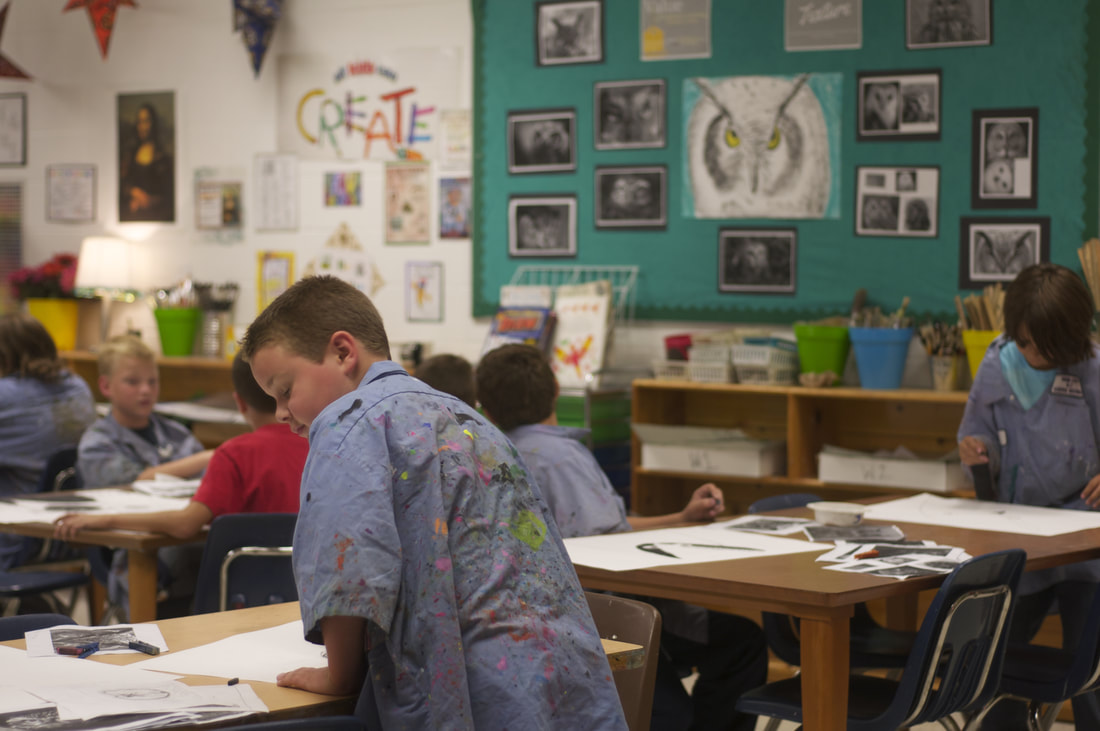
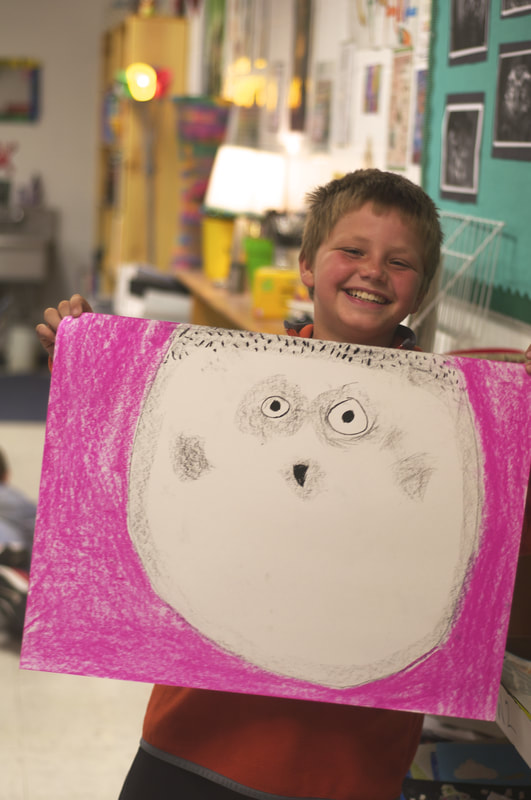
I am sure I got the idea from Art Dish with MJ. For references, I photocopied photos of owls and put packets on the tables. I also had one bulliten board with owl photos on display. The photocopies helped them recognize values and textures. We tried to stick to black and white for the bodies, yellow or orange for the eyes and one solid color for the background. 
Picture
Since I forgot to type this up in 2014, I am copying my lesson plans from that date here. 
Day 1
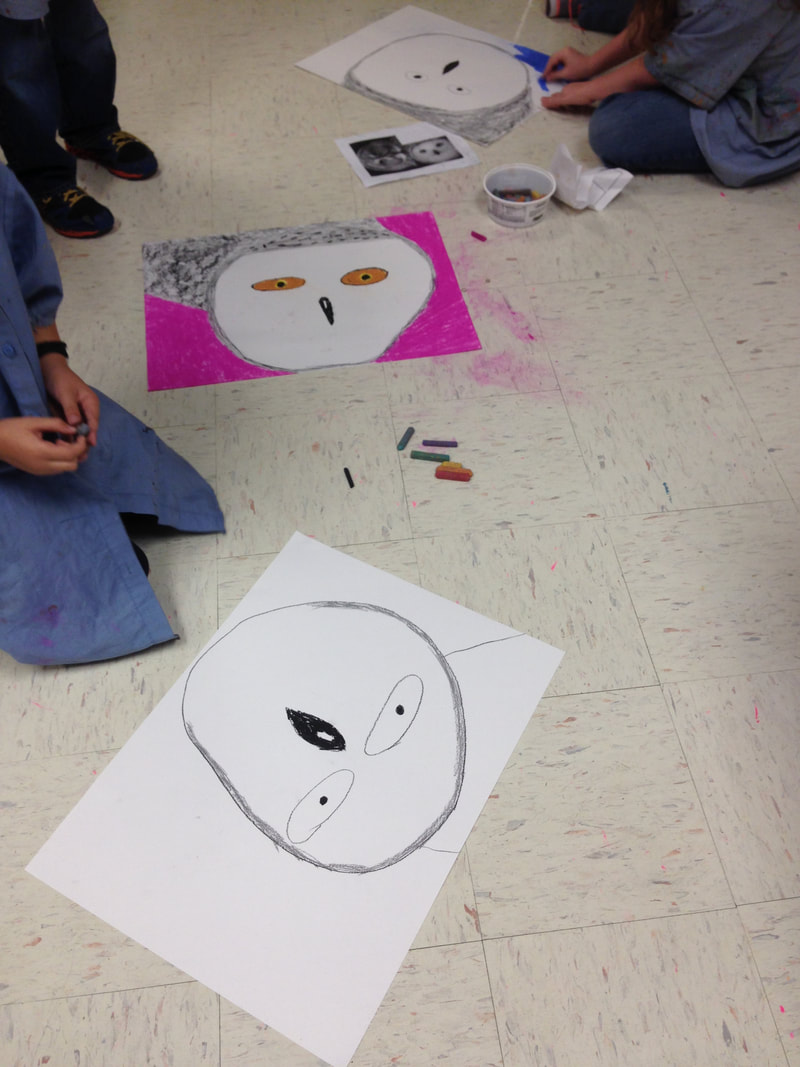
  • Seat Work: Complete the value scale from dark to light. The bottom strip. For the top strip, draw different textures, dark and light together.
  • Explain that today we will be using texture to create value.
  • Have students make a mini owl on the back of their value scales. This is a THUMBNAIL sketch of their design. Next time, we will use CHARCOAL to make the owl on BIG paper.
  • Some students MAY have time to finish landscapes, point out oil pastels and class boxes.
Objectives: Use value and texture to design an owl’s portrait. I will know I have learned this when I practice my value scale and complete my thumbnail sketch.
Supplies: Value scales, pencils, visuals of owls.
Day 2
  • Before students enter, have paint shirts at the door and encourage them to wear today, it will be super messy!
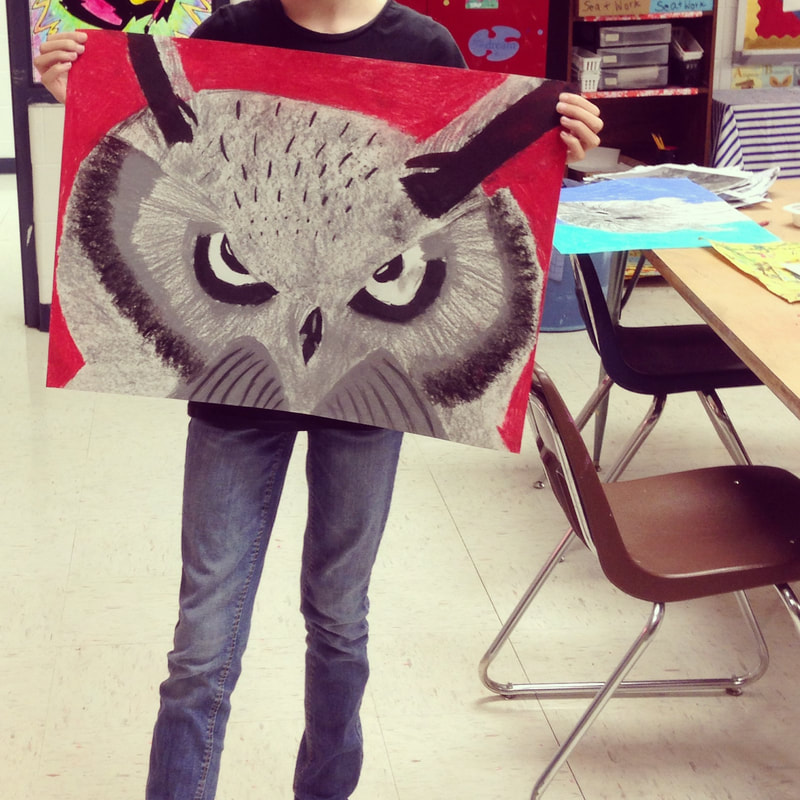
  • Use charcoal to draw an owl BIG on big paper. Try not to smear the black everywhere. Use black to make some dark areas, but also leave some areas lighter (value).  Students may want to stand today.
  • Explain how to do clean up and drying wracks, and wiping down tables, and chairs.
  • Select two (or 3) spots to use color on the paper: eyes, background and/or beak. Use CHALK PASTELS.
  • Make sure names are on back.
  • Put in drying wrack. CLEAN WELL!
Supplies: Big white paper, charcoal, colored chalk

Day 3
​Stress following procedures, remind them of some things they are doing well or could be improved. Give them a list of options for their ‘free day’. We are almost there!
  • Students should use the time today to complete their landscapes and their owls.
  • If both projects are completely finished, give them the option of adding an INK wash on the landscapes. Owls will go in the class box if they finish.
  • Clean up really well!!
Picture
Picture
Picture
Picture
Picture
Picture
Picture
Picture
Picture
Picture
Picture
Picture
0 Comments

Product Review: Play COLOR POster Paint in Solid Form

11/18/2013

0 Comments


Product review and owl lesson plan for Kindergarten

Picture
Picture
It's a marker. It's paint. It's an oil pastel.

It was hard to explain to my students exactly what we were using....but the results are kind of awesome.

Normally, this lesson is done with white paint the first week on a dark color of construction paper, like black. The 2nd week, I have students use chalk to draw the details of the owl over the top of the dried white paint. This year, I took the plunge and invested in a class set of the Play Color and Metallic Play color poster paints. We used them in place of the chalk pastels. 

The colors were so vibrant! Also, these poster paints basically eliminated the mess that chalk creates with this project. The initial investment is rather expensive, but now that I have the class pack, I can order another one and I will always have some extra in the future. 

I did remind mine NOT to twist the color all the way out. I noticed that one of the reds had been mistreated...and the tip broke off...but I pushed it back into the hollow tube and it worked okay for a while. I also show them not to rub the paint at first, it will feel wet, but it dries fast. I like these because they don't smear like oil pastels. 

I was very happy with the class pack. It was just enough for my 13 classes of K and 1st to do this project. I still have some left over, but probably not enough to do a big project like this again.  The metallic silver and gold are exceptionally nice. 

Week 1
Materials Required: black 16X10 construction paper, white crayons, white tempera paint, books about owls, owl pictures, 

Goals & Objectives: The primary goal of this lesson is for the student to use lines and shapes.
GLEs Accomplished In Lesson: 
Kindergarten
PP 3. G Create an original artwork that communicates ideas about the following themes: Outdoors (seasons, nature) EP1.A Identify and use lines 1.B Identify and use shapes, Categorize large and small 1.E Identify and use color
1st Grade
PP 1.A Fill an area with solid color/value using crayon, pencil, or marker
1.B Apply paint with a dragging, not pushing motion
EP 1.B Identify and use triangle, circle, square, rectangle and oval shapes
Categorize large and small and medium

Procedure (Guided Lesson, Instructions, etc): 
This year, I requested my librarian to order some new books about owls. As a result, there are many cute ones to choose from. I selected the book: Little Owl's Night. It is SO cute!

Project (Steps, Examples, etc):
1. Read the owl book to students. I showed everyone what they could do after painting, because the painting really doesn't take the whole art time. I show them all of the owl books in the room, I have some art centers set up with an owl magazine, a coloring page of an owl, and markers to use for that. I also have a couple of 'worksheets' about owls that they can do. Many choices. 
 2. When I distribute the paper, I demonstrate where to write their names. I have all of the papers folded 'tall and skinny' in half.....so that the back is making a peak in front of them when I set it down, and we will flip it over, and do the painting on the other side. I quickly have them write their names on the back, with a white crayon and then put on a paint shirt. I pick up all of the white crayons as soon as they are done with names...so that they don't accidentally try to draw the owl. 
3. I demonstrate on my painting, how to paint a large 'B'. Put the stem of the B on the fold. It HAS to be on the fold. Paint the curved lines of the B and fill the whole thing in solid white. 
4. Fold over gently, rub the back of the paper (one boy threw his on the ground and stomped on it….it did make a cool texture for feathers)……open it up and see a symmetrical owl…This is a really big "WOW" moment..I make a big deal of of it...ARE YOU READY FOR THIS? before I open mine up. 
5. Lastly, demo how to add a tree branch, stamp the brush for leaves, add a full or crescent ‘c’ moon, and add a few small stars. Mention that they should be careful not to totally cover the paper with white paint…it will be a snow scene and the owl won’t show up….Explain that next week, we will draw on the details, once the white paint is dry. Students need to put them in the drying wrack to dry. 
6. Pass out the paint, let students work…cleanup.


Week 2
MATERIALS
Play Color Poster Paint, glue, 12X18 paper for the frame

Procedure/Steps/Examples
1.Today we are finishing the owl. The white paint is dry. I taught students this fun owl poem:
The Owl
There’s a wide-eyed owl
With a pointed nose.

He has pointed ears
And claws for toes.

He sits in a tree
And looks at you.

Then he flaps his wings
And says, “Tu-whit, tu-whoo”

2. Since coloring the owl does not take the whole art time, I had supplies available for students to make an owl puppet. I have a cute printed mini owl that they can color and cut out and attach a puppet stick. 
3. Demonstrate how to use the Play Color Poster Paints to add the details. Draw the eyes, add a beak (I showed an easy way and a hard way), add feathers for the wings...students could put one wing and a belly or two wings. Demonstrate how to color the tree, leaves, moon, and stars. Remind them that they do not have to color the sky since it is already black like night, but if they want to make it more spooky, they can put purple and blue around the background like a spooky haze.
4. Demonstrate how to add a frame around the edges. I had 3 colors for them to choose from. Students had to glue the owl in the center, and put lines around the edges. I demonstrated how to draw the lines on the bottom, then turn the paper all the way around as they add lines to each edge. 

Assessment and Reflection: The students will use the play color poster paints to color a night owl scene according to a teacher constructed rubric. Students should be able to use the white paint, the poster paint, draw the shapes, and color essential parts of the composition with little or no teacher assistance.

0 Comments
    PictureWelcome!

    Mrs. Mitchell

    Art teacher from Missouri. 

    Instagram
    Add to Flipboard Magazine.

    Archives

    March 2021
    April 2020
    November 2019
    July 2019
    April 2019
    January 2019
    October 2018
    July 2018
    June 2018
    May 2018
    April 2018
    March 2018
    January 2018
    September 2017
    May 2017
    April 2017
    March 2017
    January 2017
    December 2016
    November 2016
    October 2016
    September 2016
    March 2016
    December 2015
    October 2015
    August 2015
    May 2015
    April 2015
    March 2015
    February 2015
    November 2014
    October 2014
    September 2014
    August 2014
    June 2014
    May 2014
    April 2014
    March 2014
    February 2014
    January 2014
    December 2013
    November 2013
    October 2013
    September 2013
    August 2013
    July 2013
    June 2013
    May 2013

    Categories

    All
    1st Day Of School
    1st Grade
    3d
    Abstract Art
    Alcohol Ink Tiles
    Alpacas
    Animal Art
    Animation
    Architecture
    Art Centers
    Art For Kids Hub
    Art History
    Art Hub For Kids
    Art Room
    Art Show
    Art Teacher Conference
    Bell Ringer
    Birds
    Blending
    Bunnies
    Cardboard
    Chalk Pastels
    Chalk Stencil
    Charcoal
    Choice Based
    Christmas
    Chuck Close
    Classroom
    Clay
    Club Day
    Collage
    Color Diffusing Paper
    Colored Pencil
    Colored Pencils
    Construction Paper Crayons
    Contest Art
    Creatures
    Crystal Bridges
    Design
    Dice Games
    Document Camera
    Dot Day
    Drawing
    Early Finishers
    Easter
    Emojis
    Fall
    Field Trip
    Food Art
    Foxes
    Green Screen
    Grid Drawing
    Group Challenge
    Halloween
    Haunted Houses
    Hearts
    Hermit Crab
    High School
    Human Form
    Ice Breaker
    Inspirational Posters
    Ipads
    Jim Dine
    Justand
    Killer Whales
    Kindergarten
    Landscape
    Lesson Plans
    Lettering
    Llamas
    Magazines
    Mandala
    Maori
    Markers
    Masks
    Matisse
    Metal
    Model Magic
    Mona Lisa
    Monster Trucks
    Mother's Day
    Mother's Day Card
    Mummies
    Mural
    Newspaper
    New Zealand
    Notan
    Observational Drawing
    Ocean Art
    Oil Pastel
    Oil Pastels
    Optical Illusions
    Origami
    Owls
    Painting
    Paper Weaving
    Pd
    Pencil Topper
    Perspective
    Pete The Cat
    Picasso
    Polar Bears
    Pop Art
    Portraits
    Printmaking
    Product Review
    Professional Development
    Quiver
    Reflection
    Reflective Teaching
    Room Tour
    Rooster
    Sea Horse
    Seals
    Sea Turtle
    Self Portrait
    Shading
    Shaving Cream Prints
    Shoes
    Sketchbooks
    Sloth
    Solar Eclipse
    Spinners
    Spring Conference
    Star Wars
    Statue Of Liberty
    Step-by-step
    Step By Step Drawing
    Step-by-step Drawing
    Still Life
    Stop Motion
    Story Board
    Sub Plans
    Summer School
    Symmetry
    Tab
    Teacher Appreciation Cards
    Technology
    Tempera Paint
    Tiny Food
    Tissue Paper
    Trees
    Tumbling Blocks
    Valentine's Day
    Warm Ups
    Watercolor
    Wax Resist
    Word Art
    Yellow Submarine
    Zentangle

    RSS Feed

Powered by Create your own unique website with customizable templates.