THIS LITTLE CLASS OF MINE
  • Home
  • Contact Me
  • Lesson Plans

Monster Truck Art

1/16/2018

1 Comment

 
Picture
 Last year, I had two really big classes. The classes had so many students that I needed another table. So, I pushed my desk into an unused classroom and asked the custodian to find me a new table that I could use for the year. This year, I am still using that extra table and I got rid of some other furniture and brought back my teacher desk. Since I didn't realize how big the classes were in advance, I moved my desk and acquired the new table on the 1st day of school. I didn't have a lot of time to re-plan my space since I needed to spend every available second crafting seating charts for every class and going over my 1st day of school routine. 

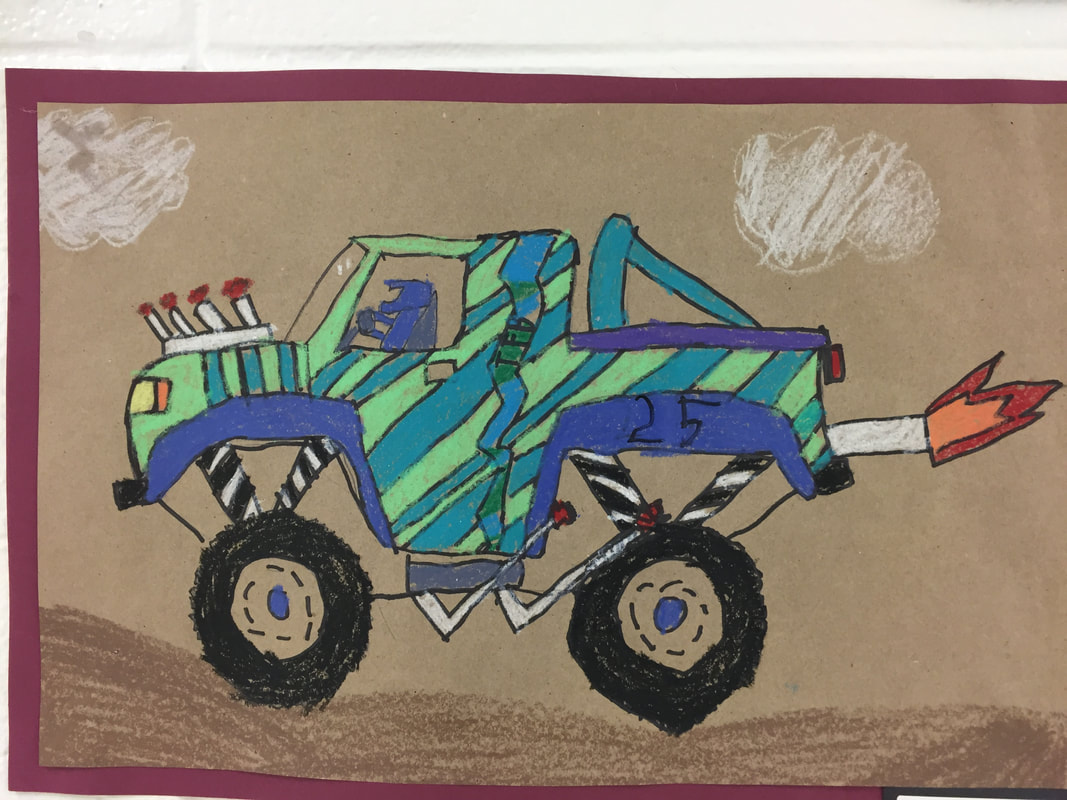
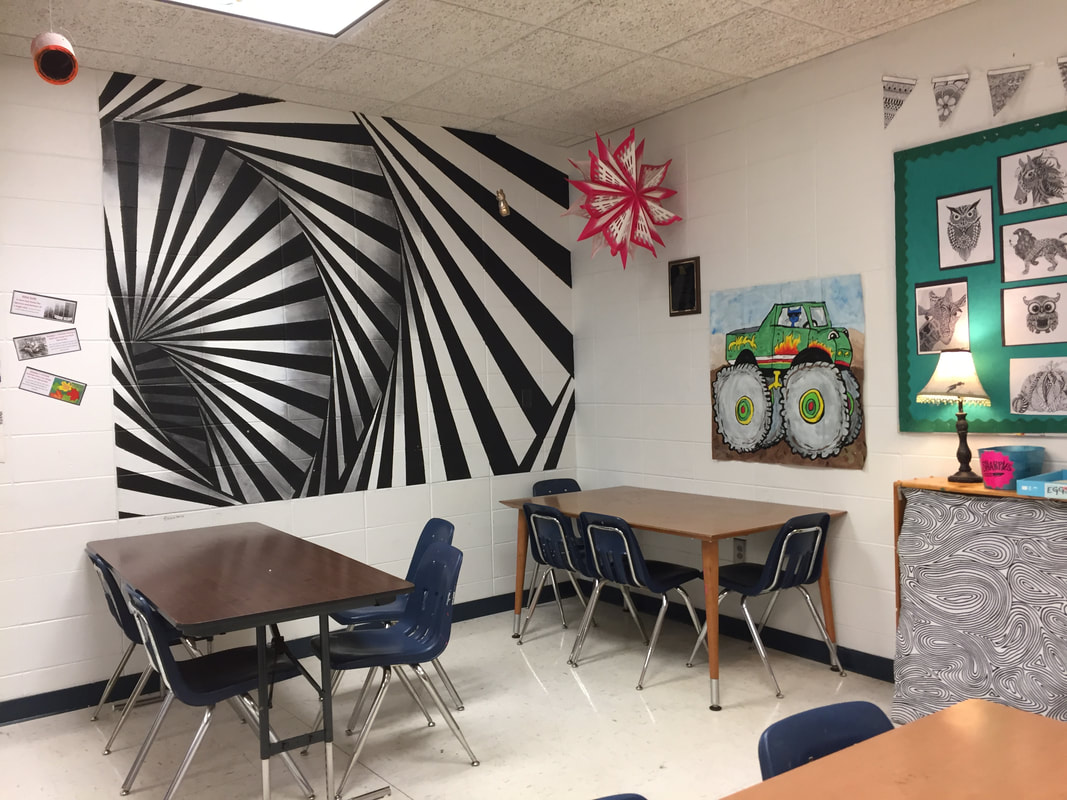
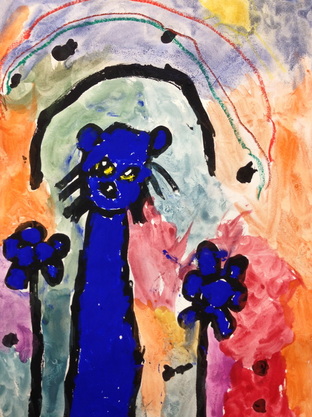
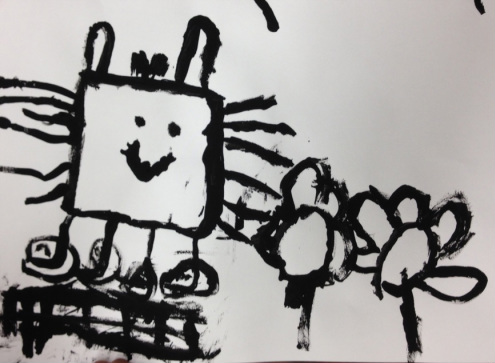
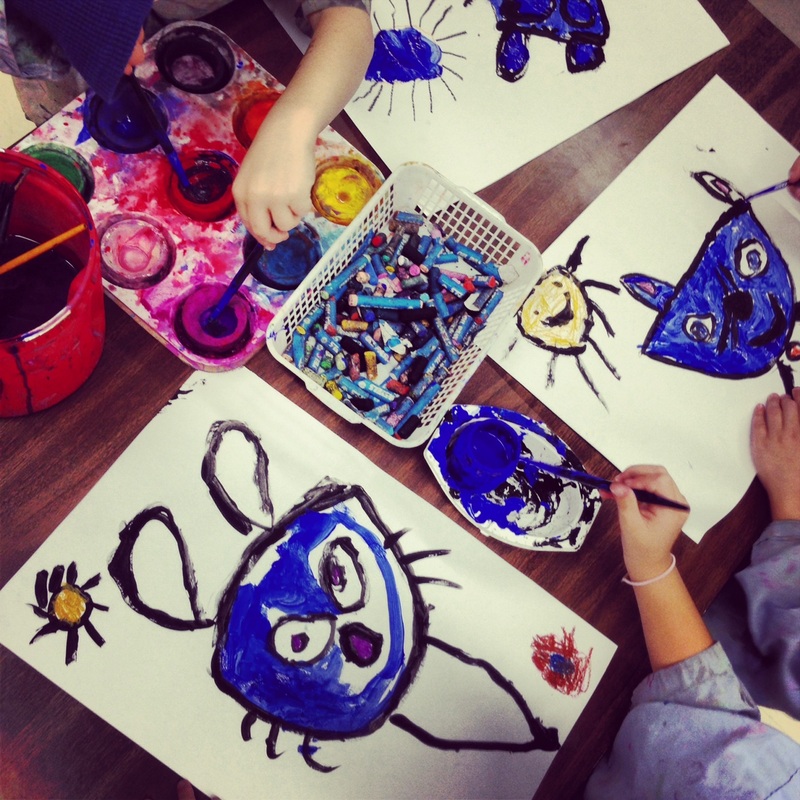
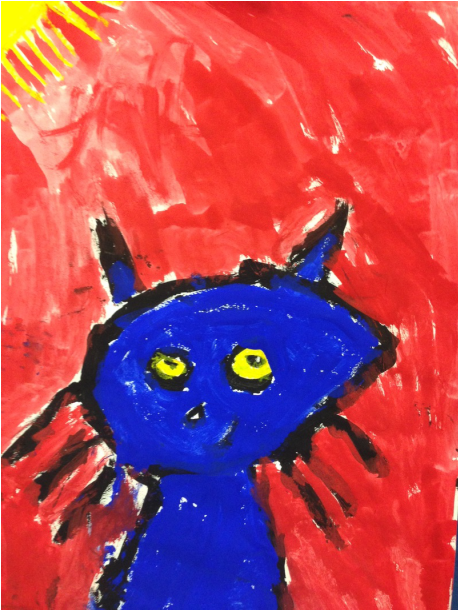
Anyway, in April a boy complained that the extra table was facing a blank wall. He requested some artwork....He was quite specific when I asked him what he thought should go there, he said: "A Cat. Driving a Monster Truck." 

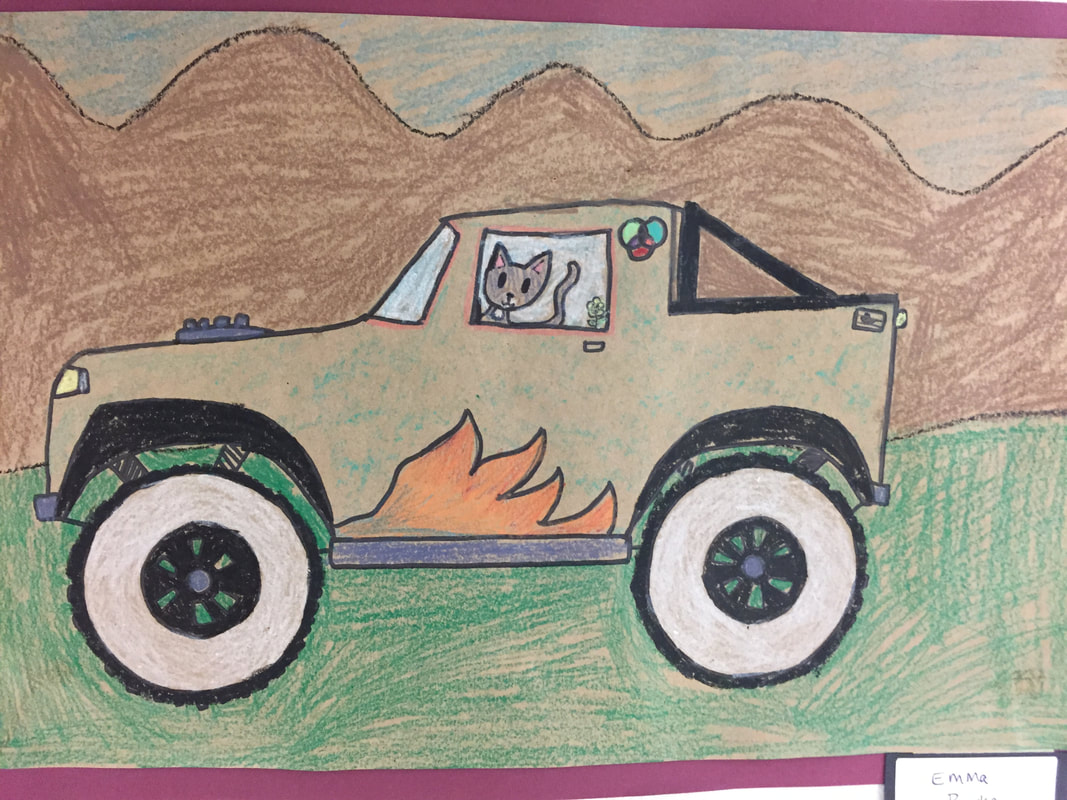
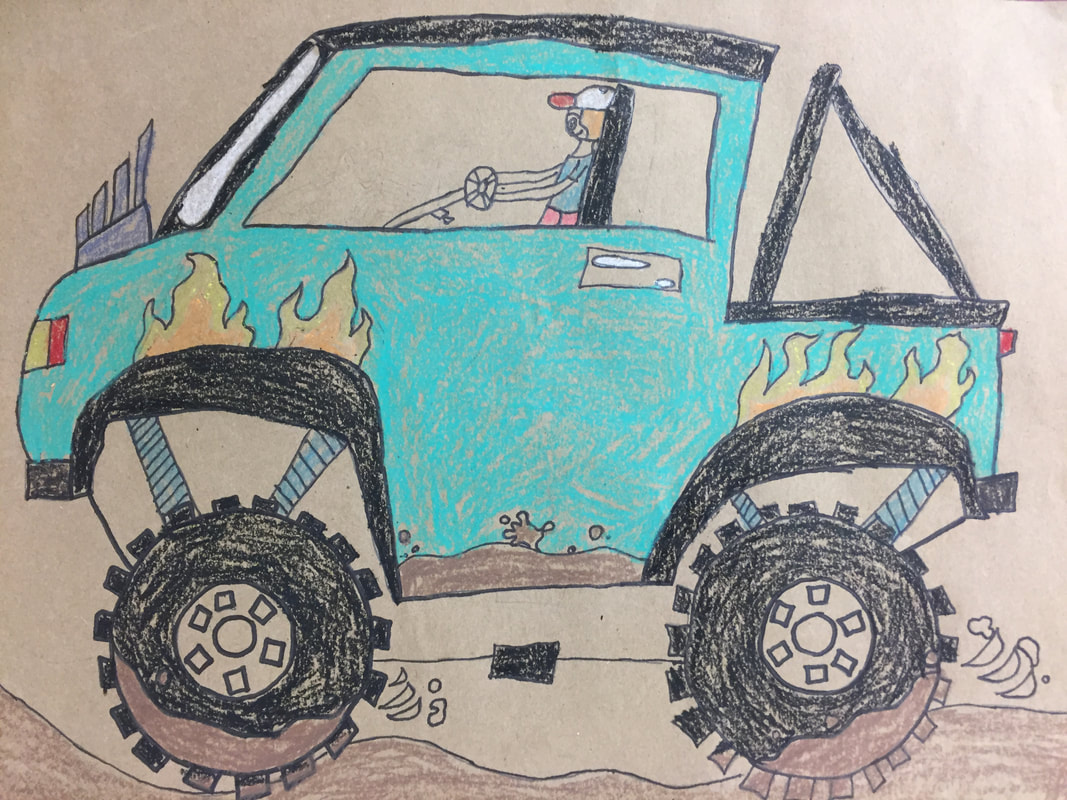
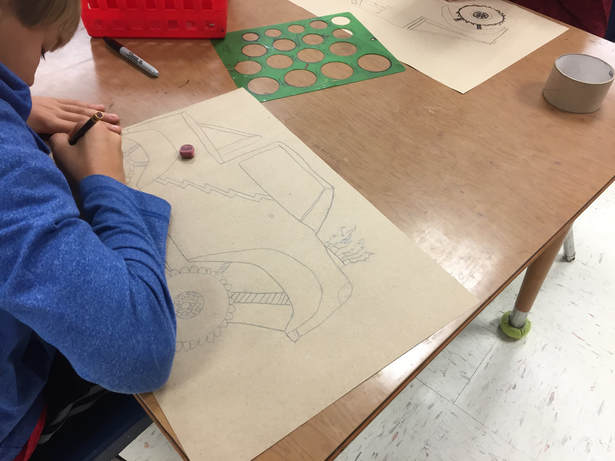
I don't think he expected me to paint one for him, but that is just what I did. It is Pete the Cat driving this monster truck. After I hung it up, we had a couple of days at the very end of the year that were weird---assemblies and stuff---so I found an Art For Kid's Hub video on how to draw a monster truck, and we made it one of our final projects of the year. I don't use art videos very often, but this was perfect and it went with my poster.

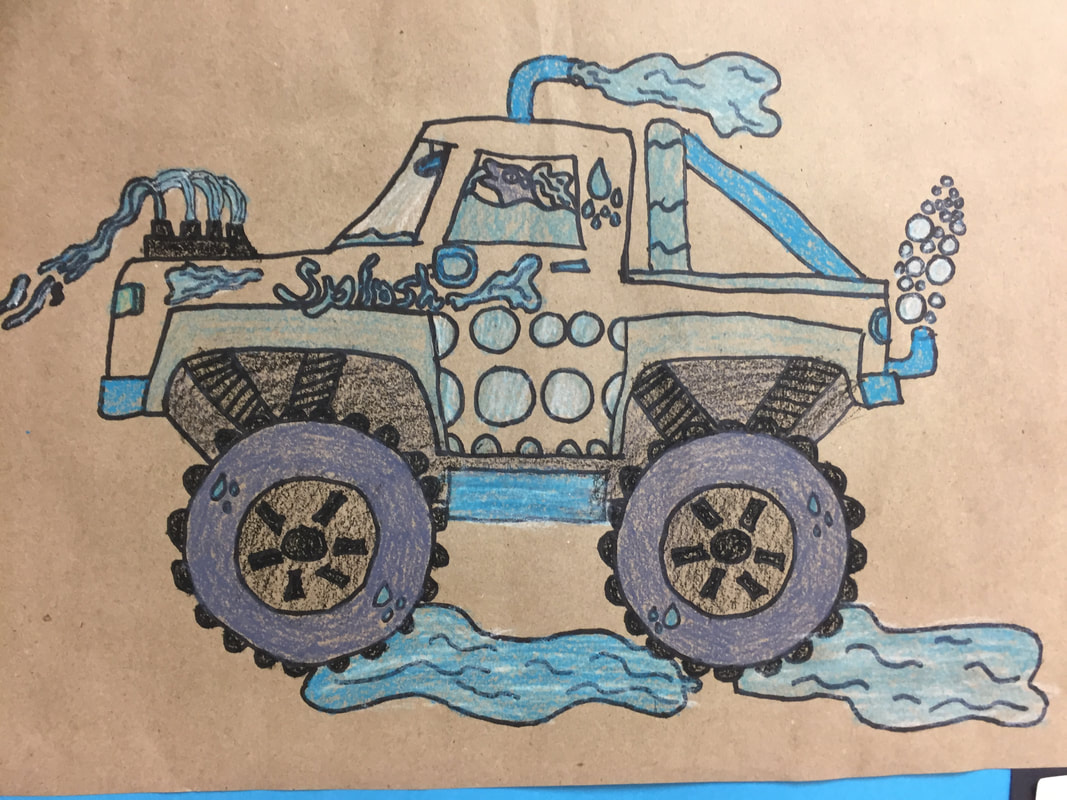
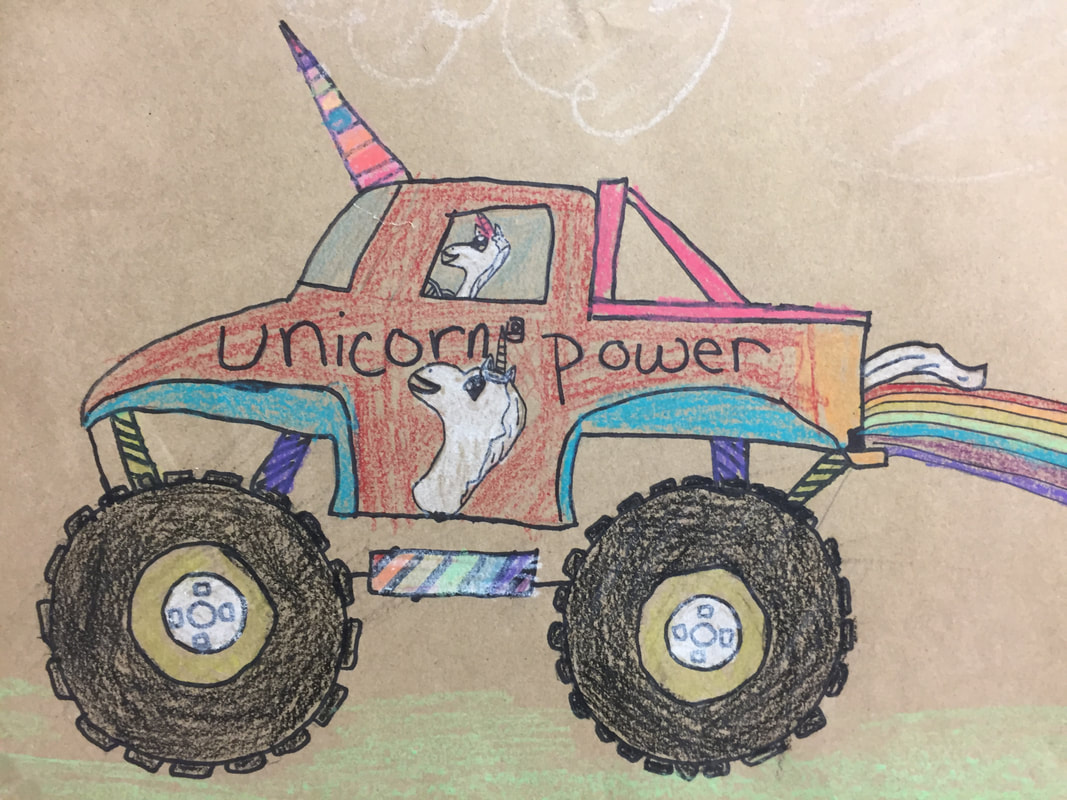
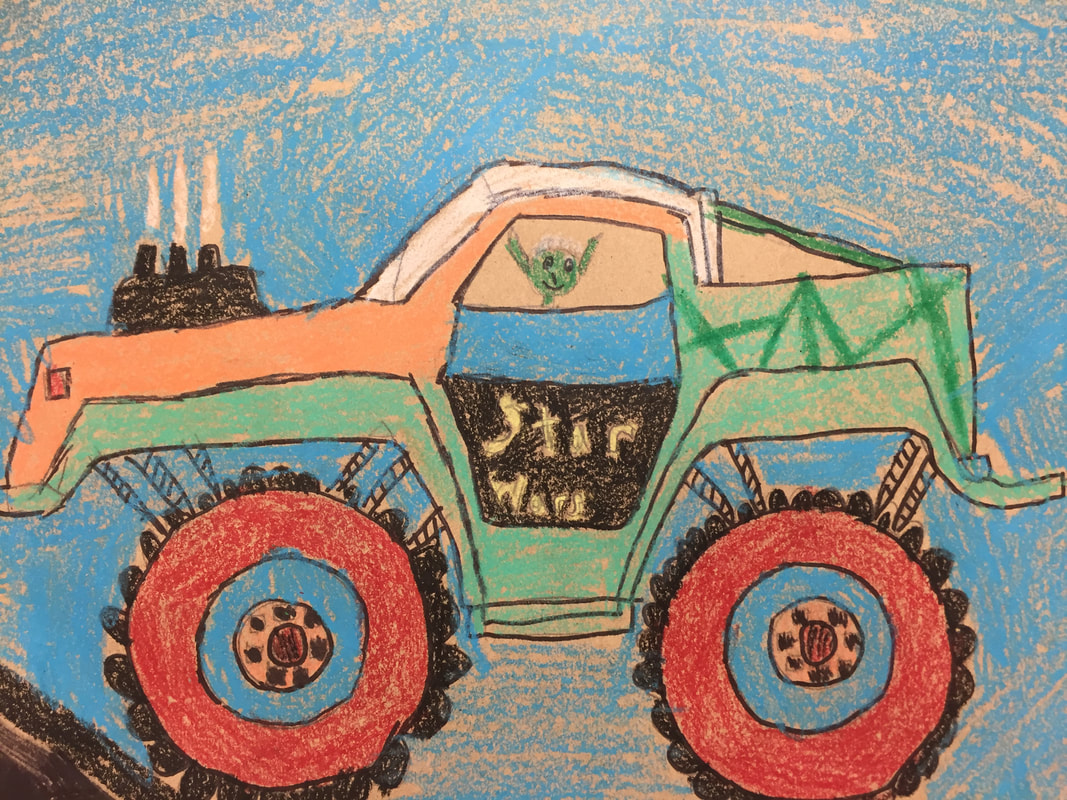
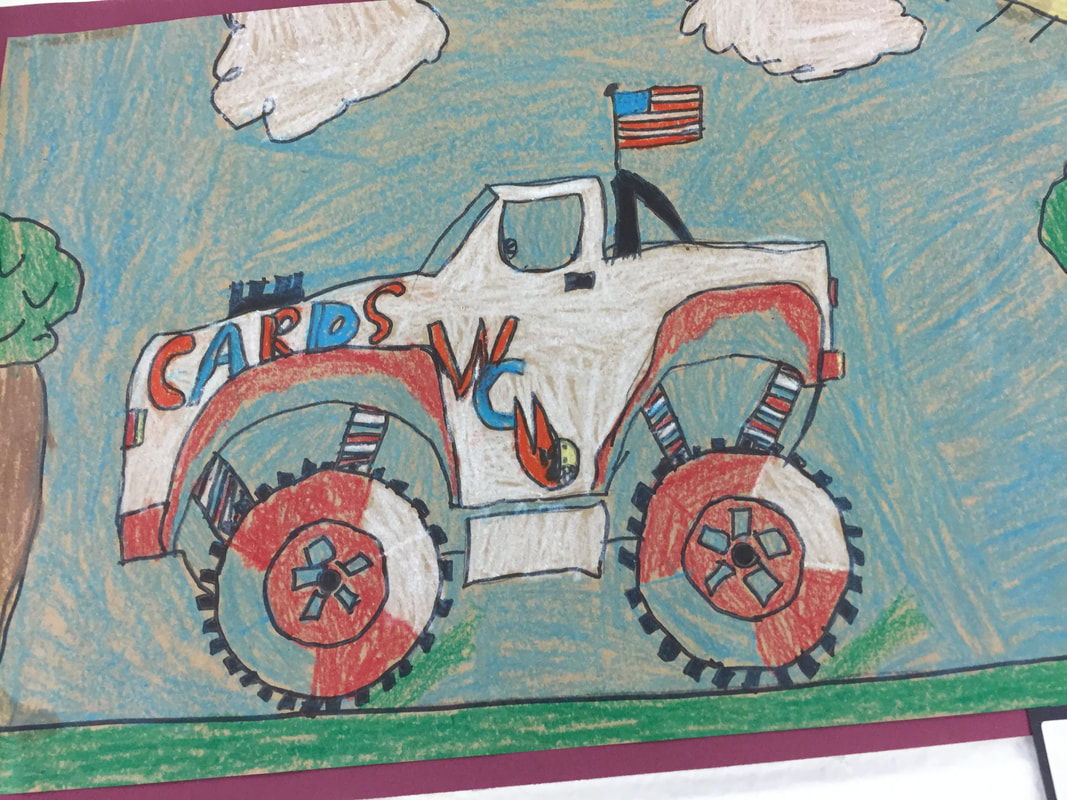
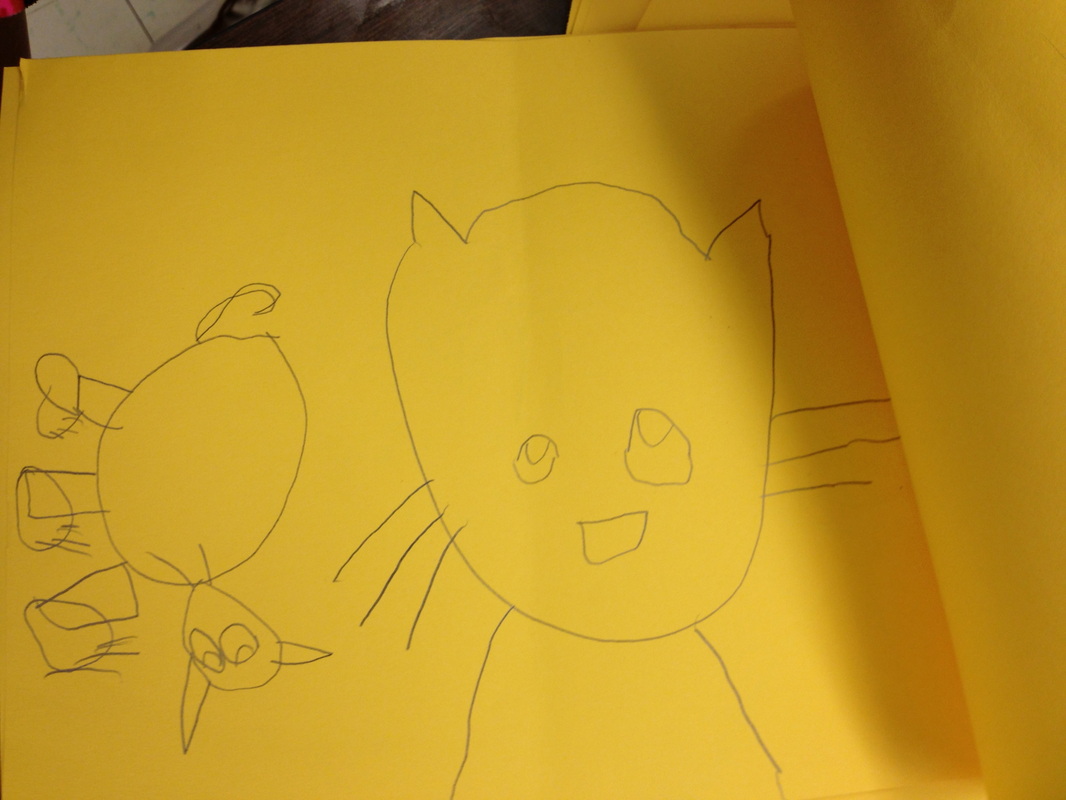
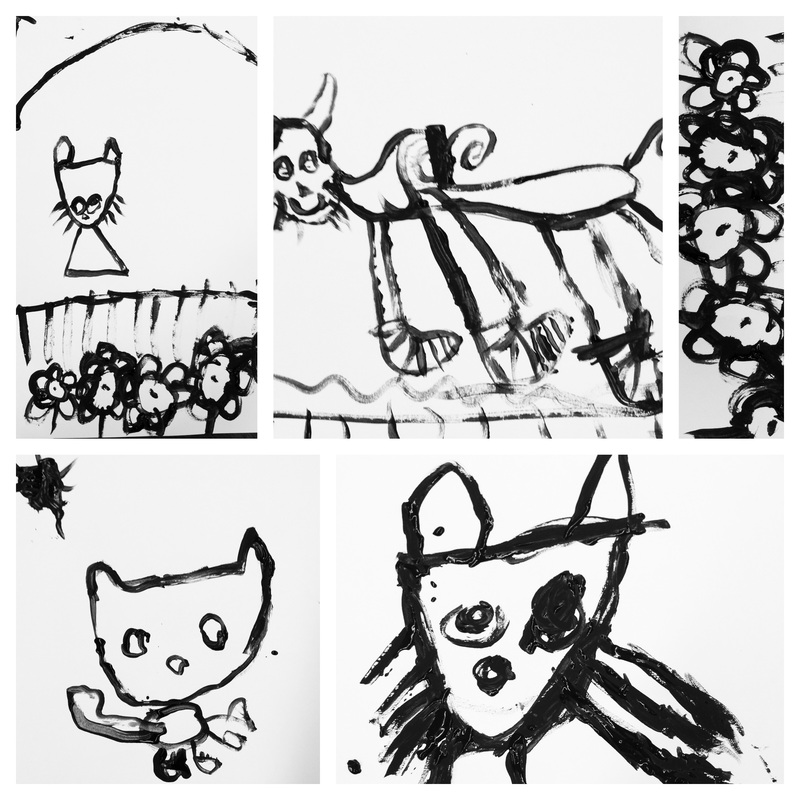
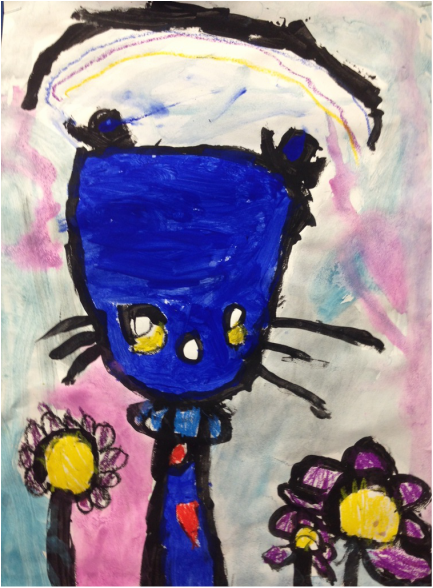
Also, kids could customize their monster truck and put whatever they wanted as the driver. They loved it! They could customize the paint job, the background, and it was a hit with boys and girls alike. 
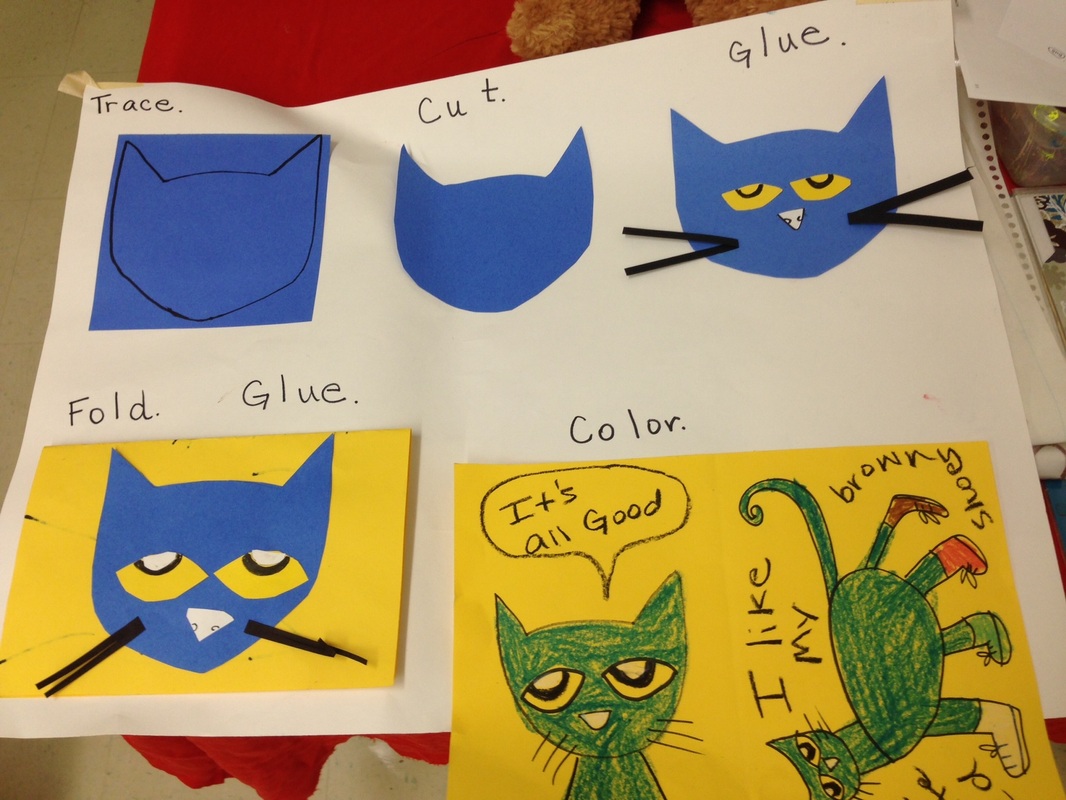
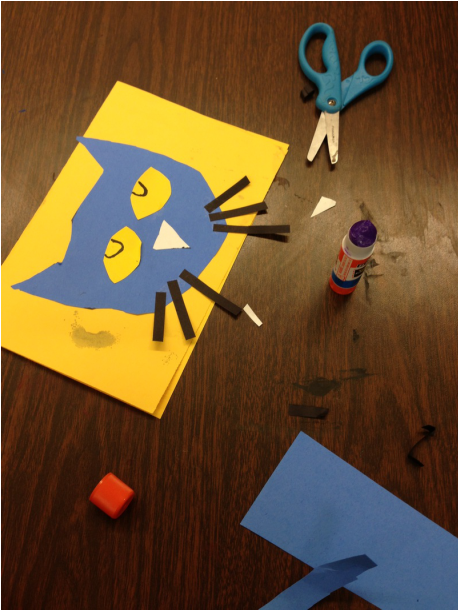
Supplies
12X18 paper (we used brown craft paper)
pencils and erasers
circle tracers for wheels (we used a tape roll for tires)
sharpies
construction paper crayons and regular crayons (for black and red)

Picture
Picture
Picture
1 Comment

Pete the Cat

10/18/2013

0 Comments

 
Picture
I searched and searched the internet for the perfect Pete the Cat lesson. I found TONS of great ideas and put them all together for one fantastic kindergarten unit. I did this in September...and I was a little disappointed at first...but then I took a deep breath...and reminded myself: IT IS ONLY SEPTEMBER, and they turned out pretty cute. However, I know this would've been a supremely successful unit a little later in the year. 

Week 1: We watched the Pete the Cat 'I love my white shoes' video on Youtube. 

I explained that we were going to be painting Pete the Cat and the kids were very excited! They love Pete!

Step 1:
Demonstrate how to draw a 'portrait of Pete' from the 'shoulders up'. I gave everyone a yellow 9X12 paper, that was folded in half like a book. 
Students drew along with me, step-by-step, drawing the head, neck, ears, eyes, nose, etc. On the other 'half' of the fold, we drew Pete's body. I explained that this would be 2 versions, or two different poses. I had a copy of the book, and I pointed out images that showed a close-up portrait, and an 'action' shot of Pete walking in his shoes. 

Students wrote their name down the fold, and slid the drawing into the middle of the table. This yellow paper is the practice paper. Students had to choose their best version for their painting, which we would be doing next. If the action shot was hard, choose the close-up portrait.  I picked up all of the yellow practice books while students put on paint shirts. 

Picture
Step 2: On the board, I taped up two sheets of 12X18 white paper. I used a small brush dipped in black paint to paint both versions of Pete: the portrait and the whole body with his shoes. I explained as I demonstrated that students needed to paint each shape large, and if they made a mistake, try to 'make it work' and DON'T paint the whole paper solid black. We can always paint over a little black blob, but if the whole face is solid black, that is harder to fix later. 
Picture
Picture
This reminds me of a little 'mine craft' cat...teehee. 
Step 3: At the end of week 1, students could look at other Pete the Cat books or practice drawing him again on a 'free' sheet. I also let some classes watch the '4 Groovy Buttons' video if we had time. 

WEEK 2: Finish painting Pete the Cat, and make a Pete the Cat book to take home. 

Step 1 Demonstrate how to color Pete's eyes with a yellow oil pastel. I also encouraged students to add any other 'tiny' details with oil pastels BEFORE we painted. If they forgot whiskers, draw them with a black oil pastel, if they wanted flowers or a sun or rainbow, draw those things with oil pastels. If they wanted pink inside the ears or ANYTHING, do it before we paint. 

Step 2 Paint Pete with blue tempera paint. I demonstrated this whole thing in front of the class and explained thoroughly, that the blue tempera was ONLY for Pete's body, not the whole paper. Some still painted the whole paper blue. It happens. 

Step 3: Use tempera cakes (watercolor would've been better), to color the sky, ground, etc. I demonstrated how to do a wash, getting the paper wet with water before putting the color on. It worked out OK, but some of the black smeared a tiny bit...that was frustrating. Watercolor would've been a little more vibrant. 
Picture
This was a LOT of supplies on the tables for the students to manage. Two kinds of brushes, oil pastels, two kinds of paint. I could've used regular blue watercolor, or blue oil pastels...but the SAX Versatemp Ultramarine blue was just too perfect for Pete. 

Step 4: When students were finished, they had a chance to make a little Pete Collage to take home the same day. YAY!

After trying to explain how to make a collage cat head, right before painting, and failing miserably to convey that the tan 'head' shape in the supply bucket was a "TRACER", mean to trace around to make a blue 'copy'....many, many, many of my 'tracers' were covered with whiskers and eyes....

I gave up trying to 'tell' and decided to 'show'....I made a poster, that I pointed to, while I demonstrated every step of this little cat head. Students could much more easily grab the supplies and complete this on their own after we were finished painting, once I had modeled HOW to do it. 

Did I mention that I have kindergarten for 50 minutes?....and in September, it seems like I need multiple activities to keep them busy. 

Once they had started the cat heads, I went around the room, and dropped off the yellow practice 'books' from the week before...students could glue the cat head to the front, and color the pictures and even write a sentence inside: I like my blue shoes. 

Picture
This poster had to be very simple for my kinders to follow....but only after I modeled each step, could they really do it. 
Picture
Picture
Picture
0 Comments
    PictureWelcome!

    Mrs. Mitchell

    Art teacher from Missouri. 

    Instagram
    Add to Flipboard Magazine.

    Archives

    March 2021
    April 2020
    November 2019
    July 2019
    April 2019
    January 2019
    October 2018
    July 2018
    June 2018
    May 2018
    April 2018
    March 2018
    January 2018
    September 2017
    May 2017
    April 2017
    March 2017
    January 2017
    December 2016
    November 2016
    October 2016
    September 2016
    March 2016
    December 2015
    October 2015
    August 2015
    May 2015
    April 2015
    March 2015
    February 2015
    November 2014
    October 2014
    September 2014
    August 2014
    June 2014
    May 2014
    April 2014
    March 2014
    February 2014
    January 2014
    December 2013
    November 2013
    October 2013
    September 2013
    August 2013
    July 2013
    June 2013
    May 2013

    Categories

    All
    1st Day Of School
    1st Grade
    3d
    Abstract Art
    Alcohol Ink Tiles
    Alpacas
    Animal Art
    Animation
    Architecture
    Art Centers
    Art For Kids Hub
    Art History
    Art Hub For Kids
    Art Room
    Art Show
    Art Teacher Conference
    Bell Ringer
    Birds
    Blending
    Bunnies
    Cardboard
    Chalk Pastels
    Chalk Stencil
    Charcoal
    Choice Based
    Christmas
    Chuck Close
    Classroom
    Clay
    Club Day
    Collage
    Color Diffusing Paper
    Colored Pencil
    Colored Pencils
    Construction Paper Crayons
    Contest Art
    Creatures
    Crystal Bridges
    Design
    Dice Games
    Document Camera
    Dot Day
    Drawing
    Early Finishers
    Easter
    Emojis
    Fall
    Field Trip
    Food Art
    Foxes
    Green Screen
    Grid Drawing
    Group Challenge
    Halloween
    Haunted Houses
    Hearts
    Hermit Crab
    High School
    Human Form
    Ice Breaker
    Inspirational Posters
    Ipads
    Jim Dine
    Justand
    Killer Whales
    Kindergarten
    Landscape
    Lesson Plans
    Lettering
    Llamas
    Magazines
    Mandala
    Maori
    Markers
    Masks
    Matisse
    Metal
    Model Magic
    Mona Lisa
    Monster Trucks
    Mother's Day
    Mother's Day Card
    Mummies
    Mural
    Newspaper
    New Zealand
    Notan
    Observational Drawing
    Ocean Art
    Oil Pastel
    Oil Pastels
    Optical Illusions
    Origami
    Owls
    Painting
    Paper Weaving
    Pd
    Pencil Topper
    Perspective
    Pete The Cat
    Picasso
    Polar Bears
    Pop Art
    Portraits
    Printmaking
    Product Review
    Professional Development
    Quiver
    Reflection
    Reflective Teaching
    Room Tour
    Rooster
    Sea Horse
    Seals
    Sea Turtle
    Self Portrait
    Shading
    Shaving Cream Prints
    Shoes
    Sketchbooks
    Sloth
    Solar Eclipse
    Spinners
    Spring Conference
    Star Wars
    Statue Of Liberty
    Step-by-step
    Step By Step Drawing
    Step-by-step Drawing
    Still Life
    Stop Motion
    Story Board
    Sub Plans
    Summer School
    Symmetry
    Tab
    Teacher Appreciation Cards
    Technology
    Tempera Paint
    Tiny Food
    Tissue Paper
    Trees
    Tumbling Blocks
    Valentine's Day
    Warm Ups
    Watercolor
    Wax Resist
    Word Art
    Yellow Submarine
    Zentangle

    RSS Feed

Powered by Create your own unique website with customizable templates.