My middle schoolers love optical illusions. Every year, students request an optical illusion project. Here are a few of my favorites:
Op Art Ornaments
Optical Illusion Heart/Sphere in Chalk
Optical Illusion Sketchbook Covers
For a while, I have wanted to figure out a way to select an optical illusion project that is engaging for all ability levels. At first, I made a smore flyer and allowed my students to choose an optical illusion that they wanted to create from the examples I had provided links to. This did not work well because some students chose things that were too time consuming, or too hard even for me to figure out, OR to easy and not time consuming enough and they finished in one day while everyone else needed weeks. Also, since we had the ipads out, I didn't want to use oil pastels so we were limited to colored pencils or markers.
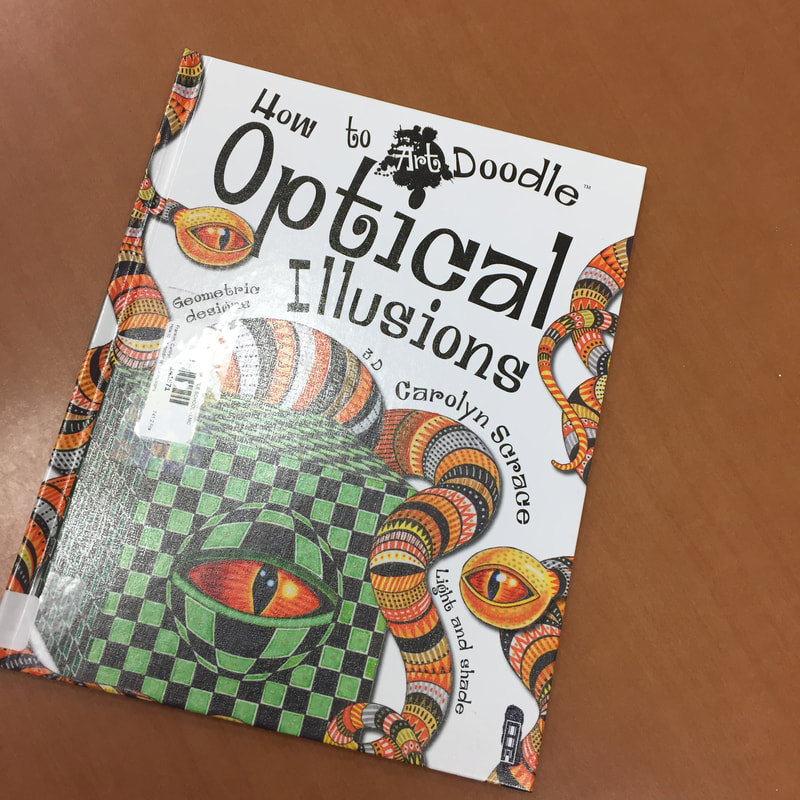
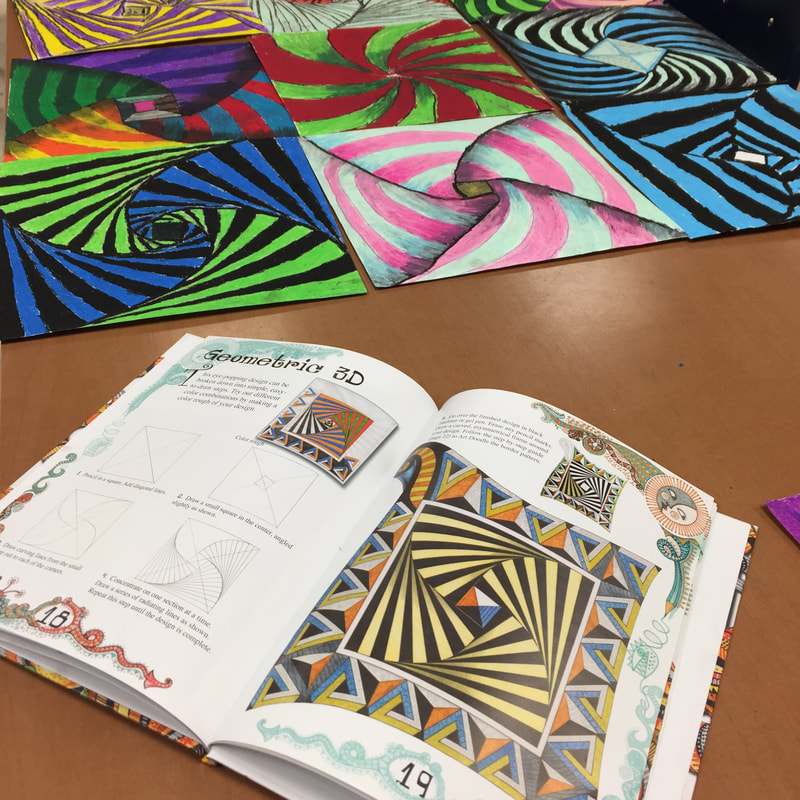
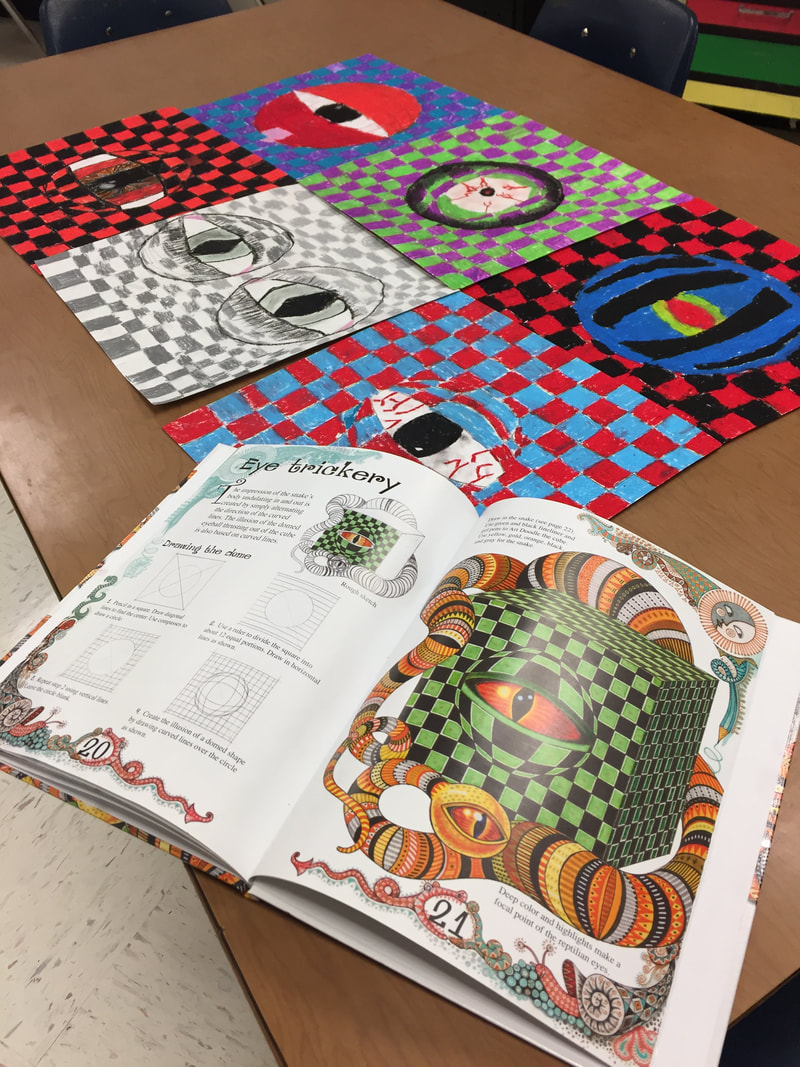
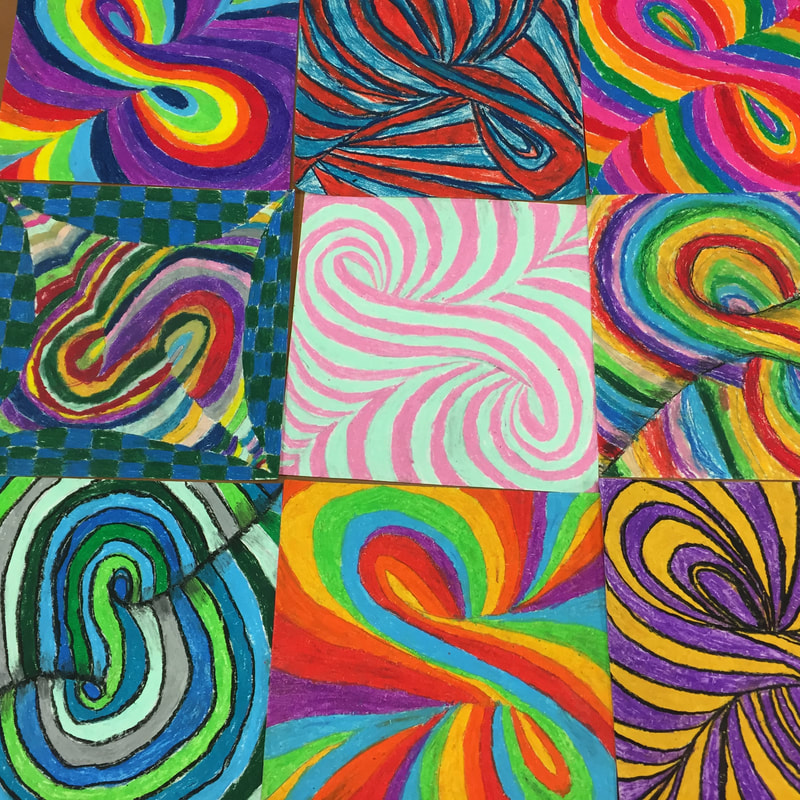
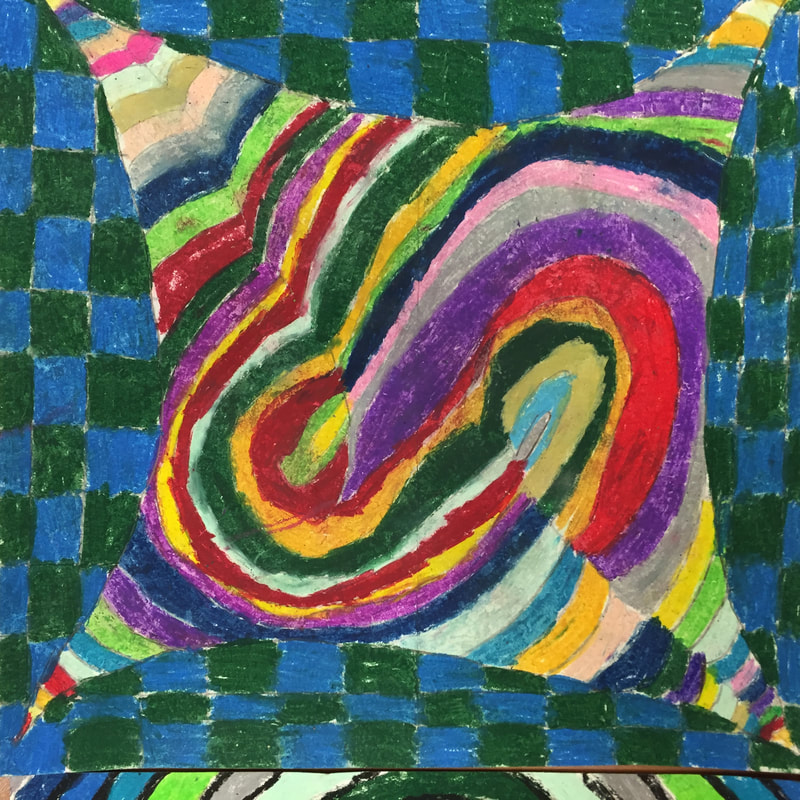
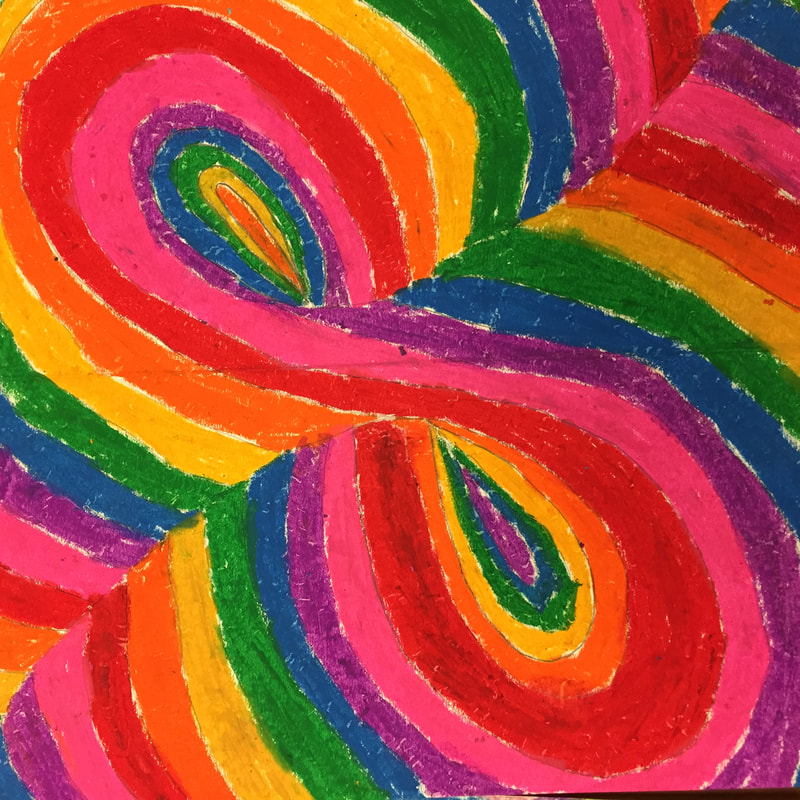
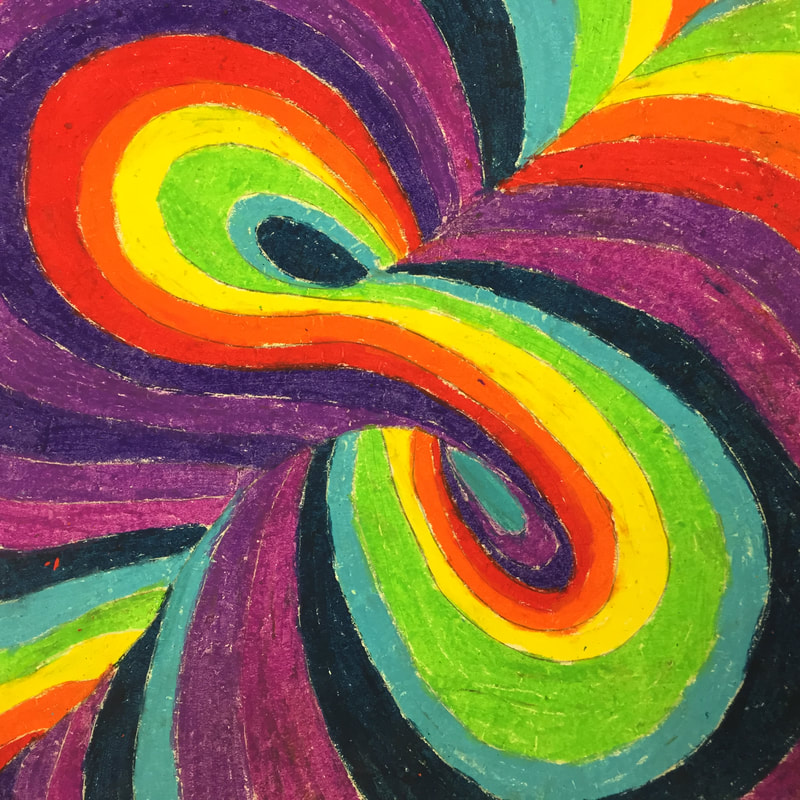
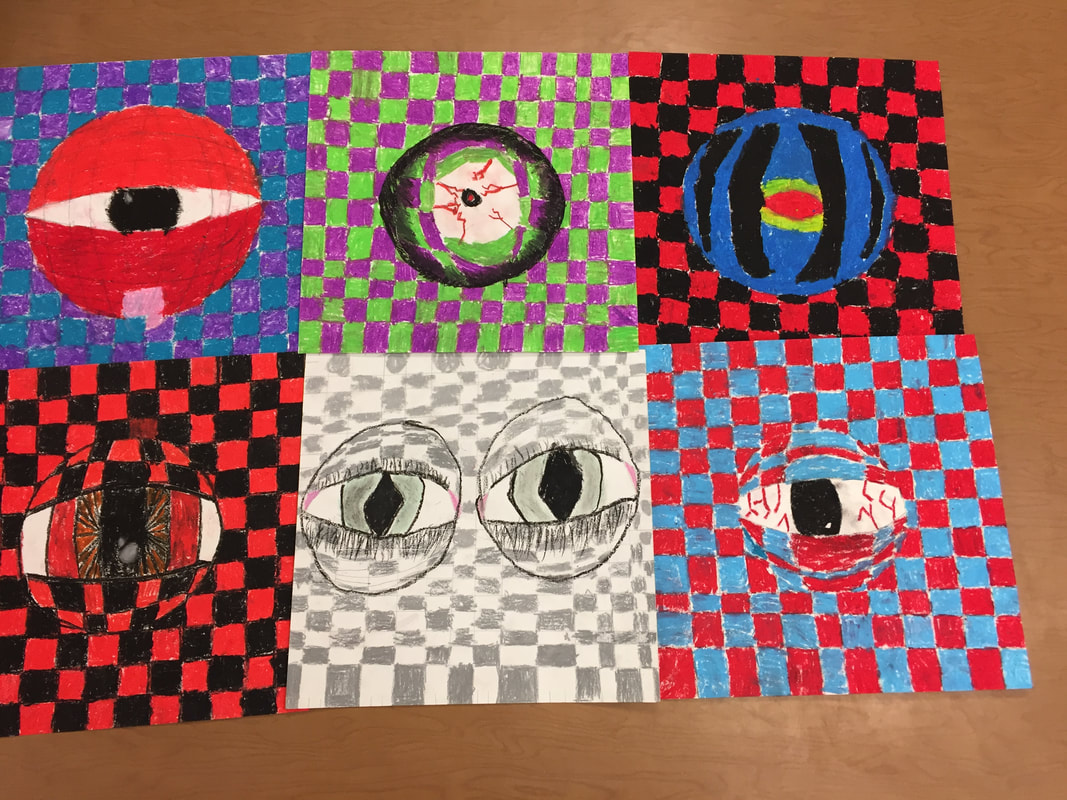
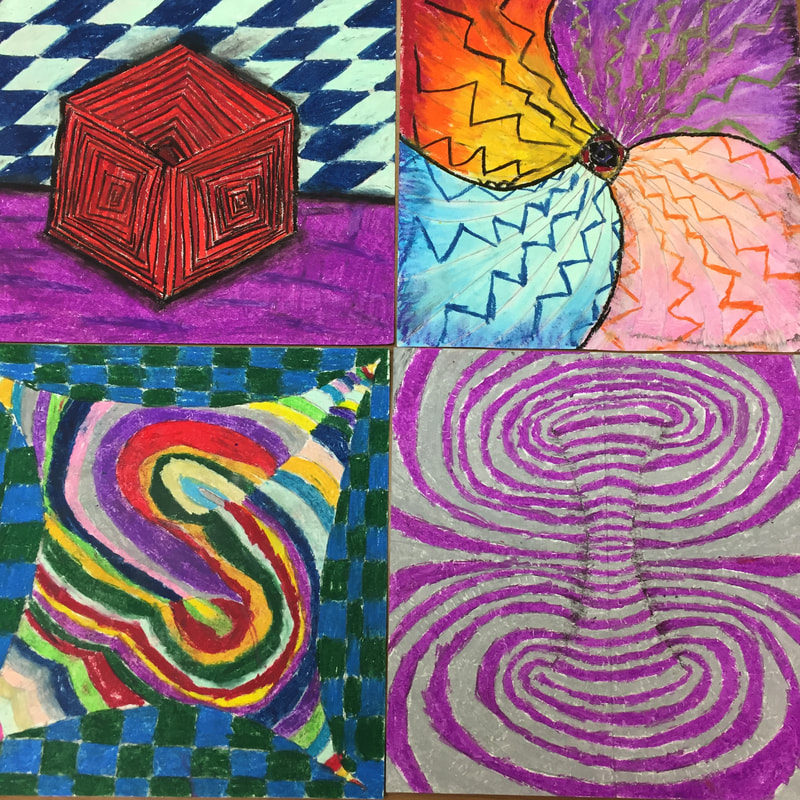
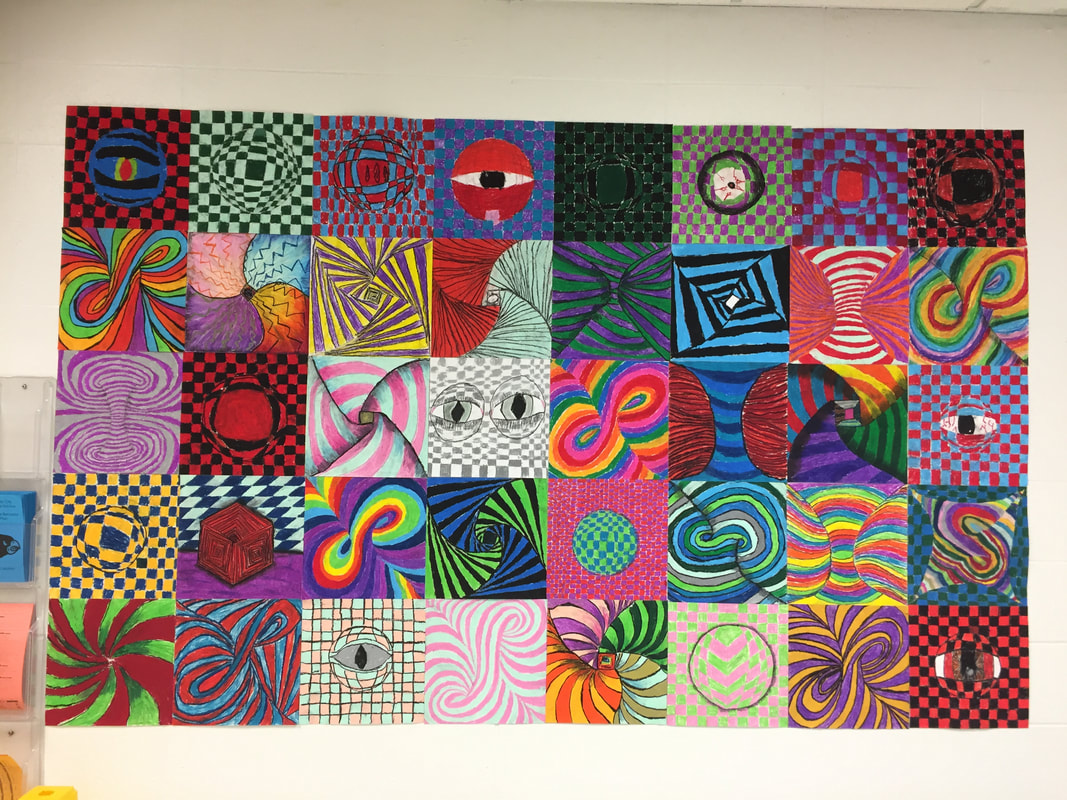
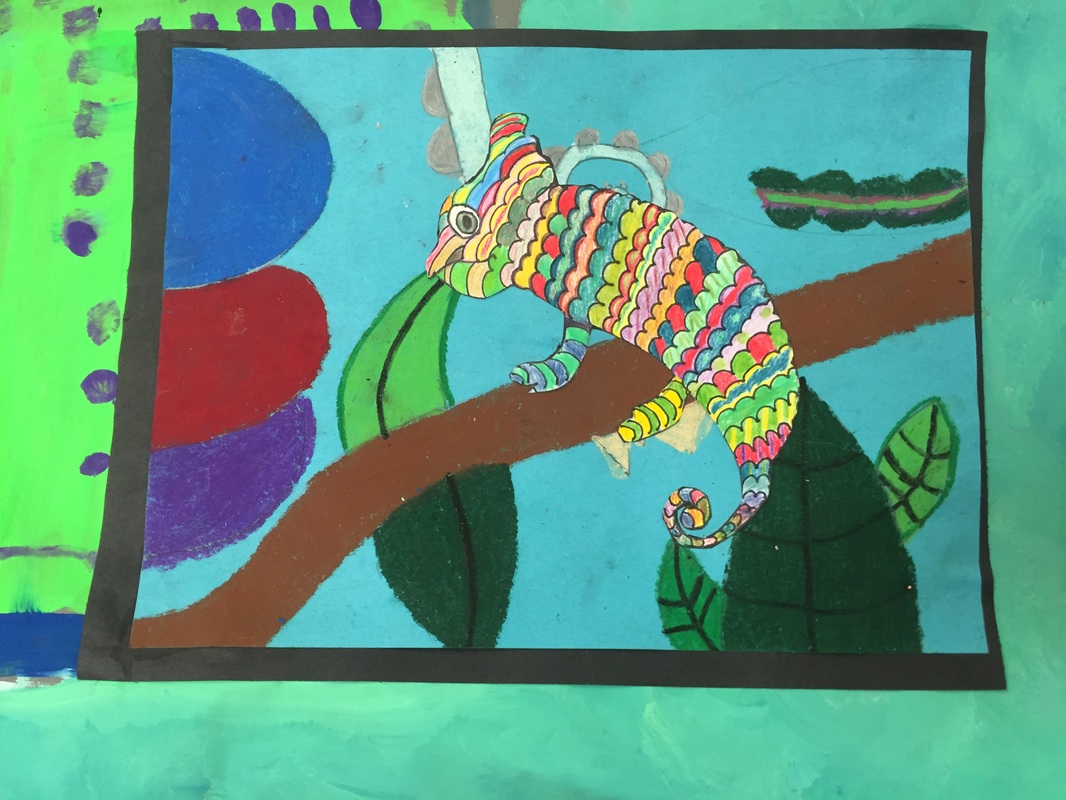
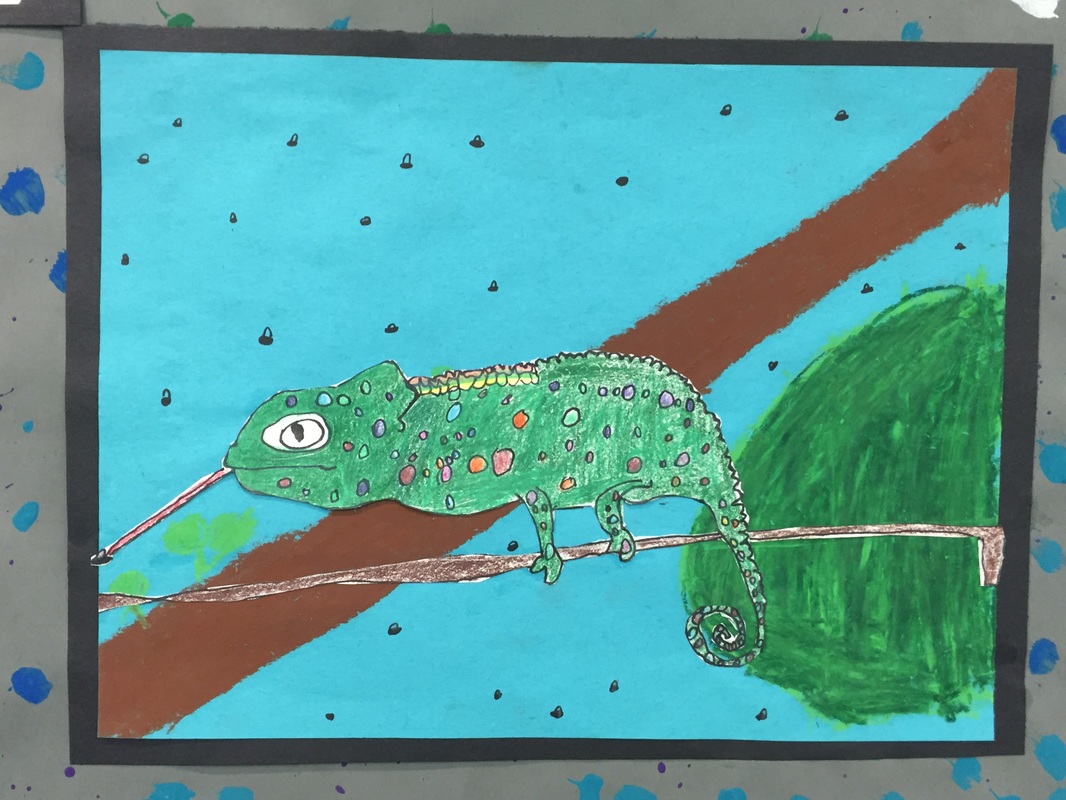
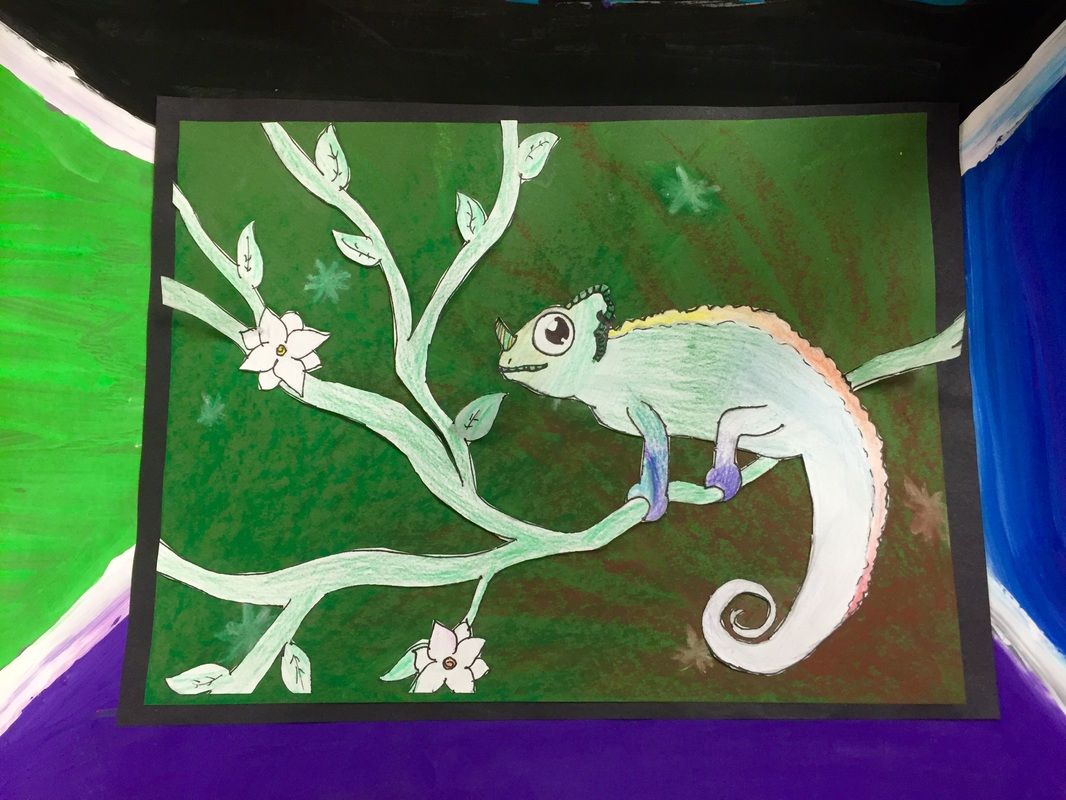
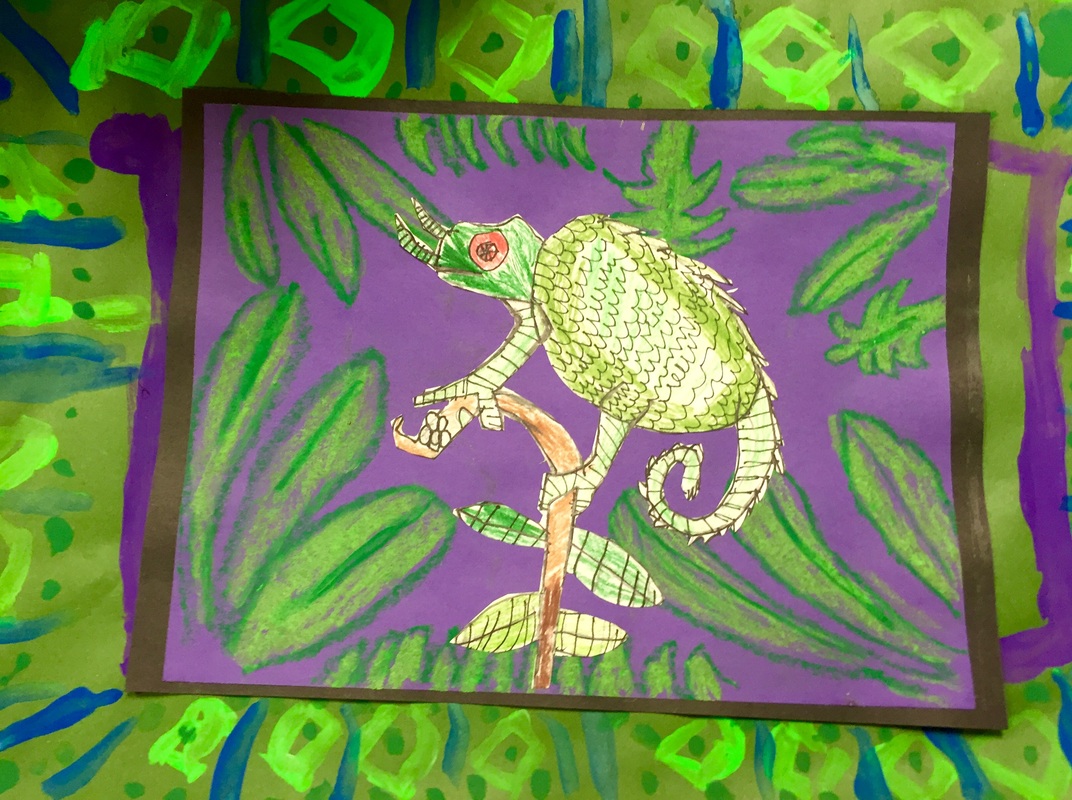
For the examples linked above, everyone basically followed the exact same steps. So there wasn't much variety. When my librarian ordered Optical Illusions (How to Art Doodle) by Carolyn Scrace book, I decided that this year, I would make students choose between 3 designs from the book. All 3 were similar in difficulty level and everyone would make a 12X12 oil pastel design. (I was on a 12X12 design kick this year...students did like 6 projects with 12X12 paper!)
The book has rather low reviews on amazon.com, but I found it very helpful in showing my students the steps and giving them ideas.
This project was really successful as it gave us the opportunity to talk about quality, and I could show examples of really good quality and not so good quality.....but it isn't a lesson that I want to tackle again anytime soon and I am trying to figure out why.....because the results were stunning.
Op Art Ornaments
Optical Illusion Heart/Sphere in Chalk
Optical Illusion Sketchbook Covers
For a while, I have wanted to figure out a way to select an optical illusion project that is engaging for all ability levels. At first, I made a smore flyer and allowed my students to choose an optical illusion that they wanted to create from the examples I had provided links to. This did not work well because some students chose things that were too time consuming, or too hard even for me to figure out, OR to easy and not time consuming enough and they finished in one day while everyone else needed weeks. Also, since we had the ipads out, I didn't want to use oil pastels so we were limited to colored pencils or markers.
For the examples linked above, everyone basically followed the exact same steps. So there wasn't much variety. When my librarian ordered Optical Illusions (How to Art Doodle) by Carolyn Scrace book, I decided that this year, I would make students choose between 3 designs from the book. All 3 were similar in difficulty level and everyone would make a 12X12 oil pastel design. (I was on a 12X12 design kick this year...students did like 6 projects with 12X12 paper!)
The book has rather low reviews on amazon.com, but I found it very helpful in showing my students the steps and giving them ideas.
This project was really successful as it gave us the opportunity to talk about quality, and I could show examples of really good quality and not so good quality.....but it isn't a lesson that I want to tackle again anytime soon and I am trying to figure out why.....because the results were stunning.


Day 1
We looked at some examples of optical illusions and talked about various optical illusion artists. I share a slideshow with examples by Bridget Riley and M.C. Escher and students are happy to see some familiar images they have seen before. I have one copy of the scholastic magazine about optical illusions which has a ton of great info about Bridget Riley, which is what I basically summarize for my students. When I start a new big unit like this, I always have tons of visuals around the room that students can use for inspiration. I would love to find an optical illusion calendar to cut apart because printing stuff on a color printer just isn't as vibrant.
Youtube video list of optical illusion videos.
10 Amazing Optical Illusions---I usually show this the 1st day
Students looked at the examples they could choose from and started practicing in their sketchbooks.
Supplies:
Sketchbooks
pencils
erasers
circle templates
rulers
Day 2
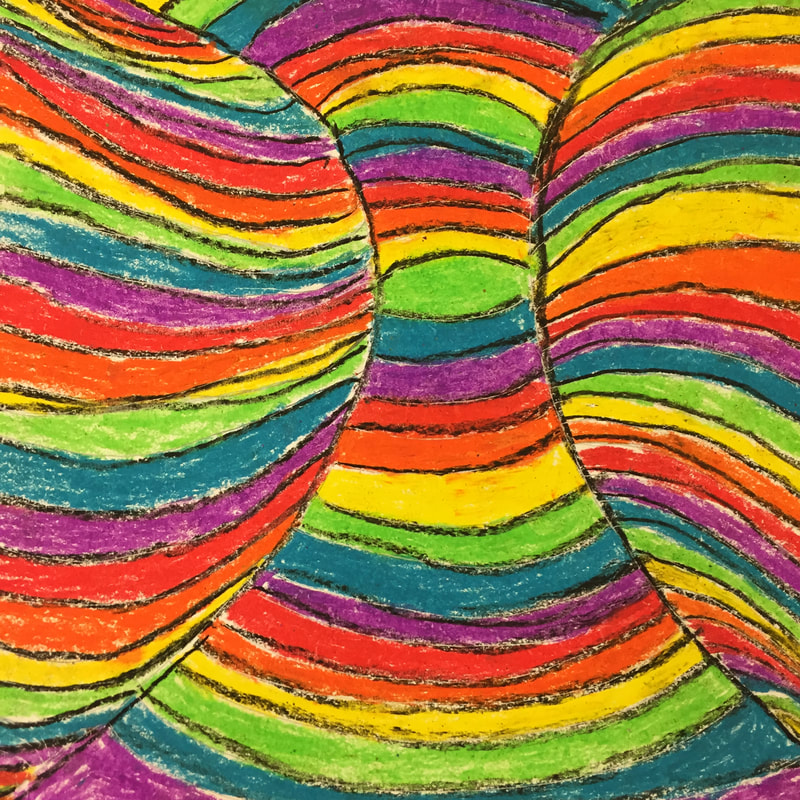
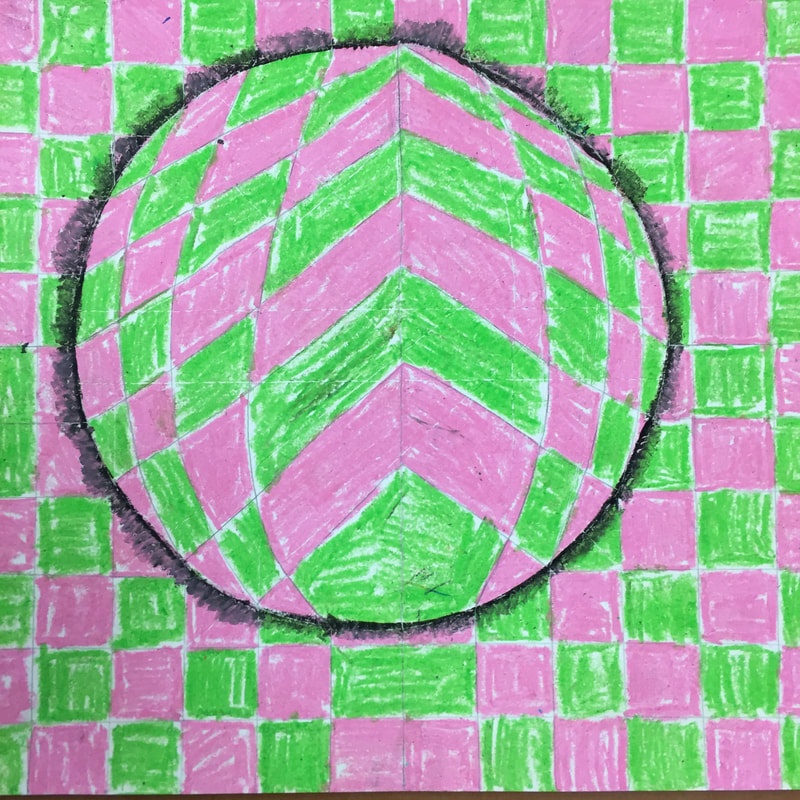
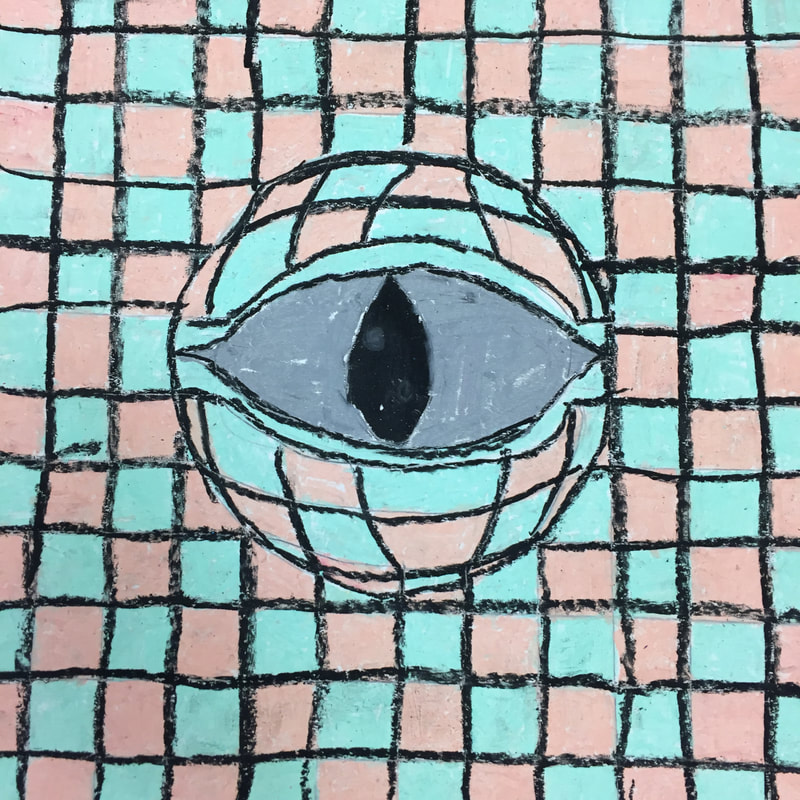
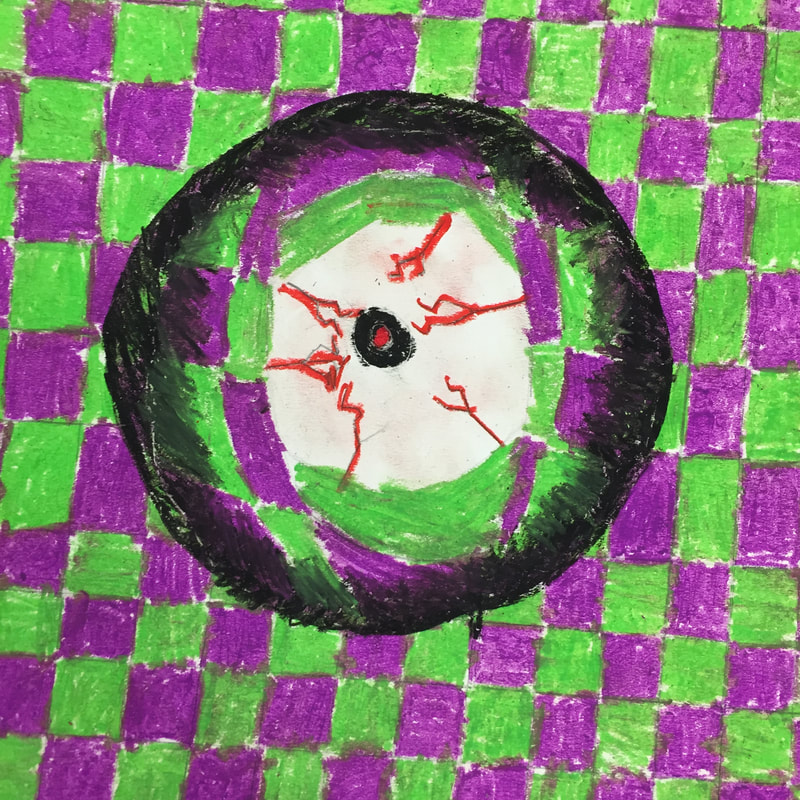
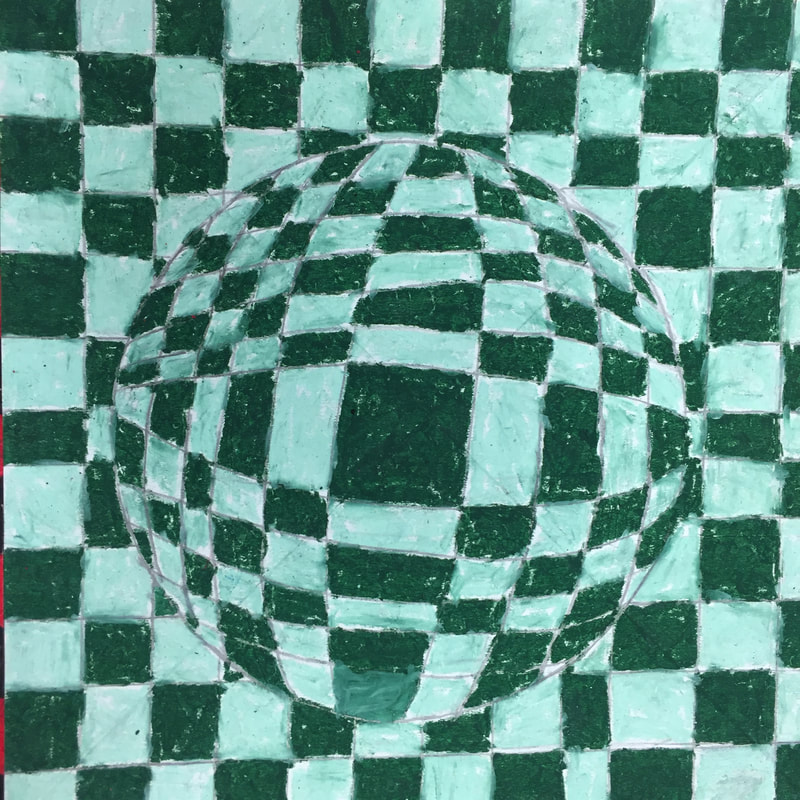
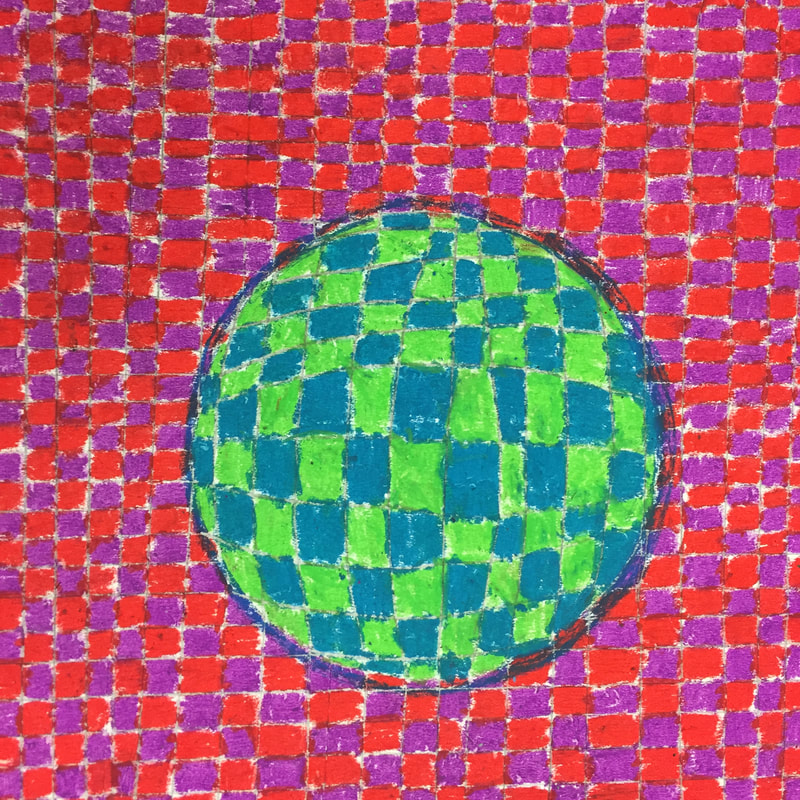
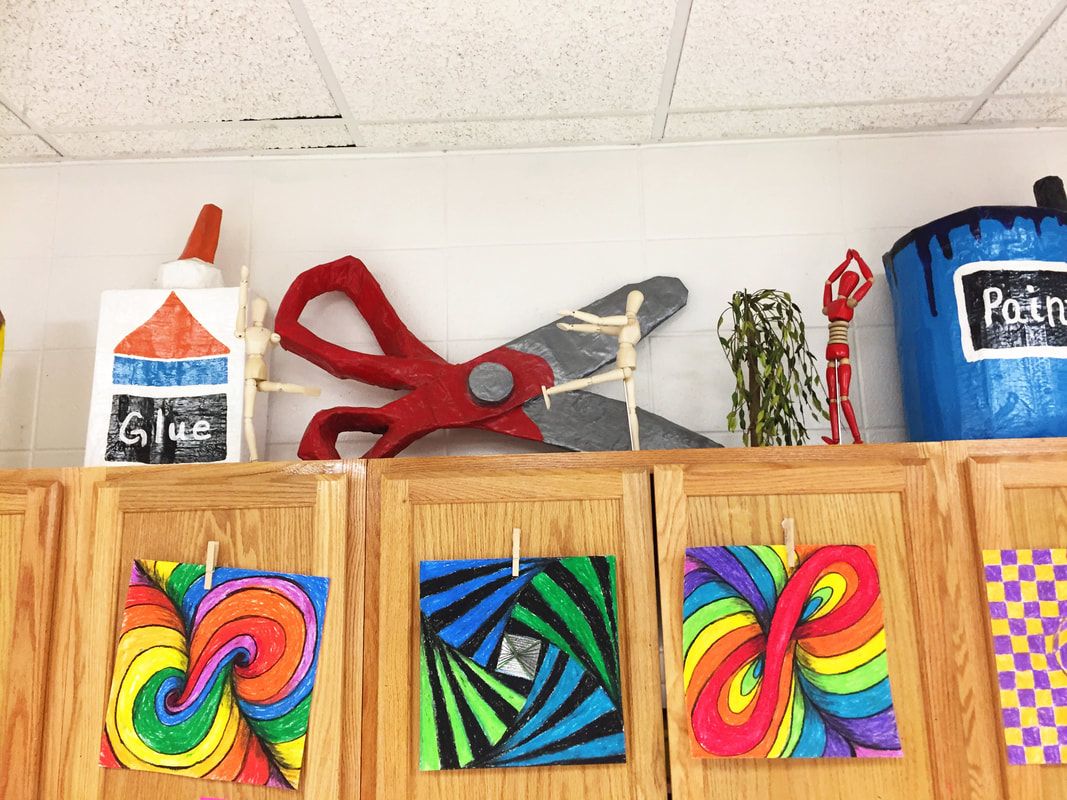
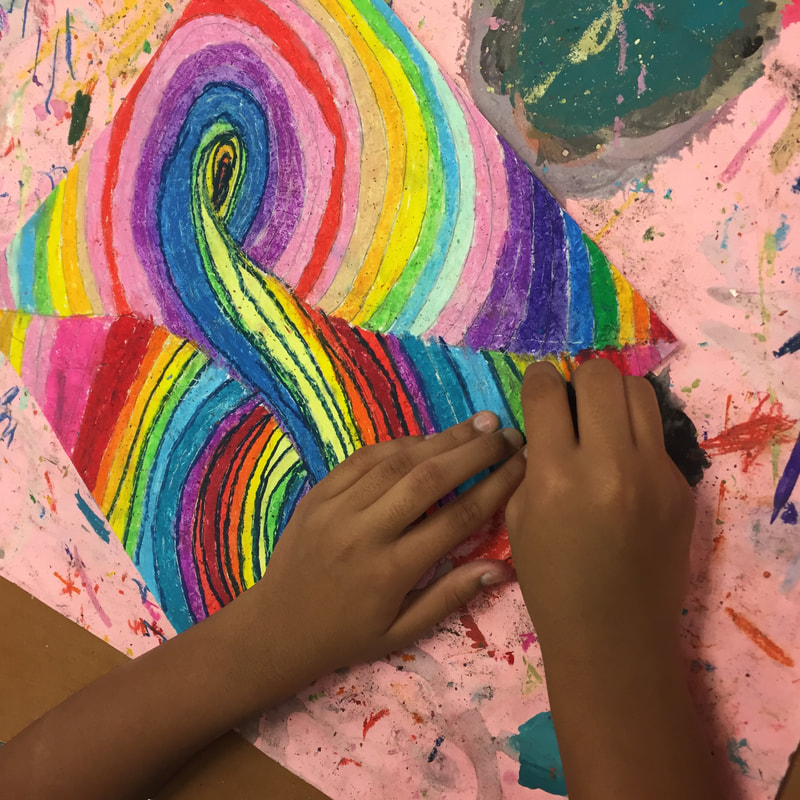
Once students had a small thumbnail sketch of their idea (and many realized it was harder than it looked), we started drawing in pencil on 12X12 white paper. I took some time to demonstrate how to use a ruler to make lines across the paper and then how to make a grid. I also did a few mini demo's on how to make some of the illusions a little easier. Students used oil pastels to start coloring their designs. I highly stressed that they should save black for last, as it smears badly and they should be careful with very light colors and white, as those get dirty easy. I discouraged them from using traditional checkerboard black and white because black is just so messy that I knew the white would get ruined on many of their projects.
Supplies:
Rulers
circle templates
12X12 white paper
oil pastels (no black)
cover sheets for tables
Day 3
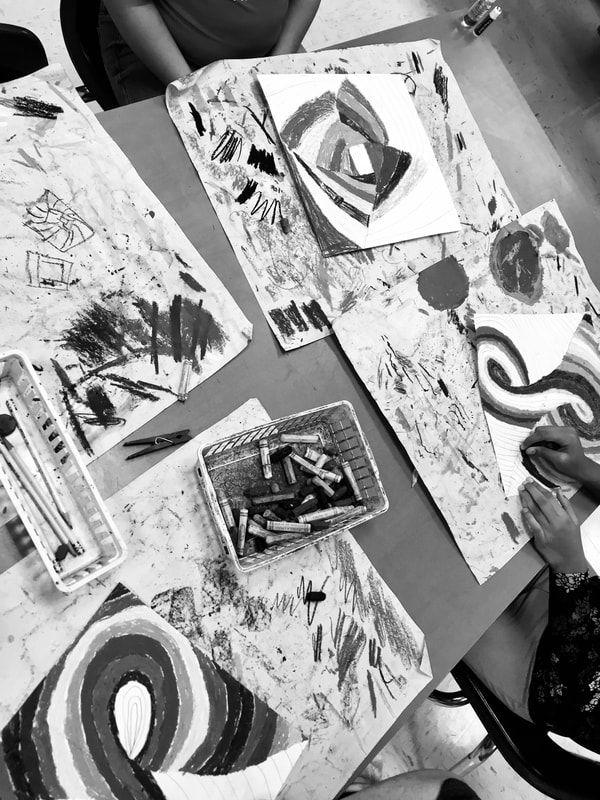
Those checkerboard designs were getting very tedious....even though it is argubly the easiest one to draw, it is pretty hard to color and it is hard to fix mistakes so kids have to be very careful not to mess up their pattern. I showed students how to add black and blend it to make their illusion pop just a little more. I showed examples of good quality and not so good quality and encouraged kids to work towards getting a '3' on their project. We also discussed craftsmanship and scribbling. With oil pastels, you have to color pretty firmly to get good coverage.
This is the video I showed every class to demonstrate the blending. It isn't the greatest video, but I made 6X6 mini versions of the projects so I could demonstrate the blending technique quickly. I didn't want to have to make a sample for every class, so the video was very helpful!
Supplies
Cover sheets
oil pastels plus black
pencils
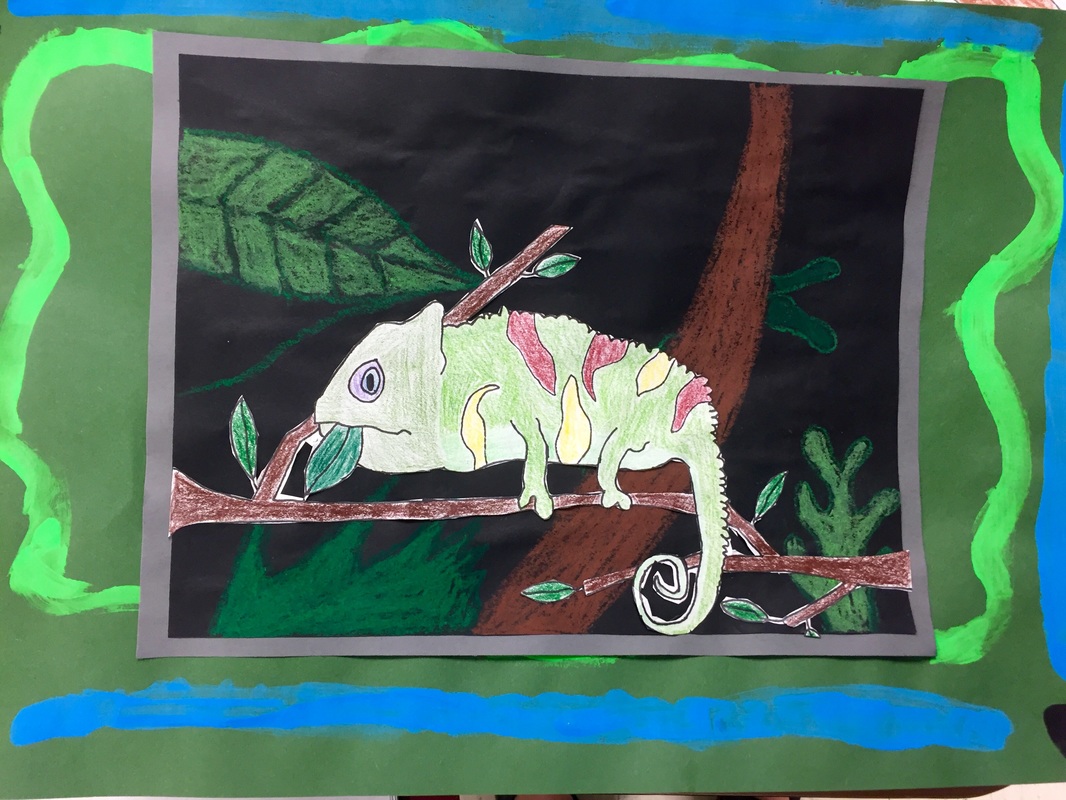
She used navy instead of black to outline and I really like it!

This design idea came from a different book.
Day 4
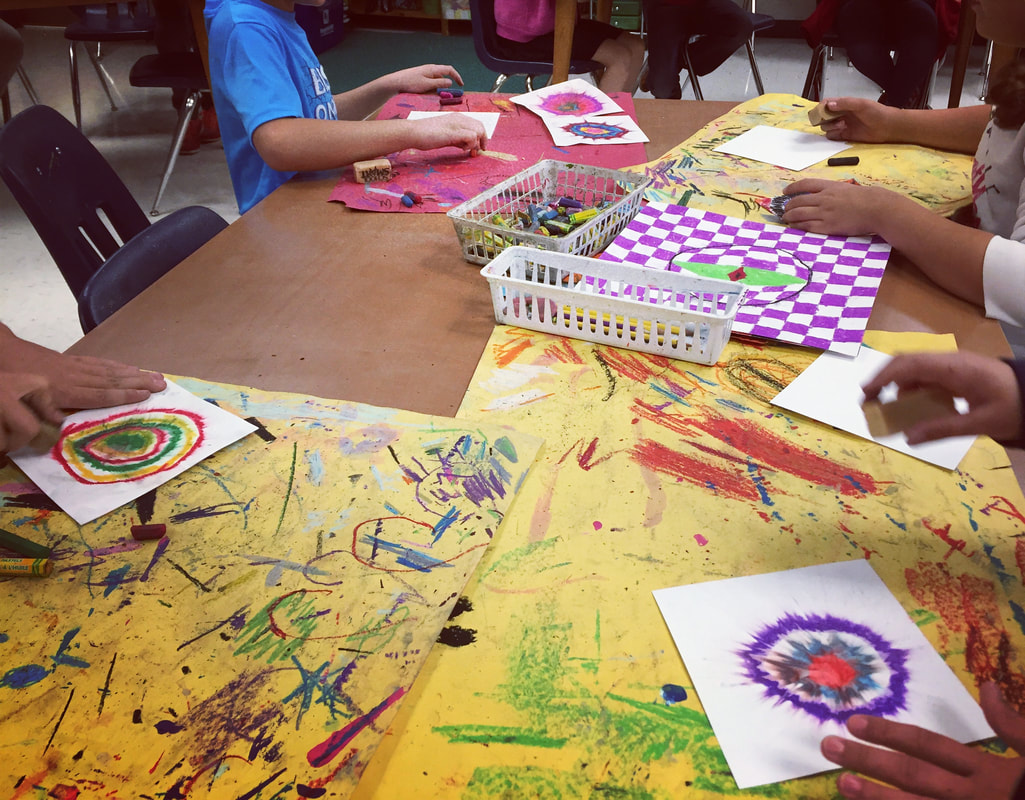
Okay, today many kids were already done or close to being done with their optical illusions. I had a bunch of 6X6 paper ready and I showed them the 'ol oil pastel firework trick with an eraser. They loved it! Thanks art of ed!
Supplies
Oil pastels
Old erasers (we used hard rubber erasers)
cover sheets
6X6 squares
Okay so this project had variety, quality control, a bonus free time extra fun project for early finishers, high level of critical thinking, ruler skills training, and a medium-level-mess-factor.
It wasn't the messiest thing, but it wasn't super clean and boring either.
Why am I not excited to teach this unit the same way again the same way?
Some students did not like the limited options.....they were annoyed that I didn't have MORE variety. Okay, I get that. But as it was, I still had to start each day with instructions specific to each design and tips that would help individual students. If a student had a good idea, I was open to letting them give it a shot.
While the results of the project are visually very beautiful, I will have to think long and about what I would do differently in the future.
One of my professional development goals this year is to focus on critical thinking and how I implement it into student learning. I feel like most art projects require tons of critical thinking. Even if there is an existing 'recipe' like in this project, there is still tons of room for error and each product is different depending on how students used the materials, techniques and executed the process. By giving students tons of opportunities to make decisions about their finished product, they were using critical thinking. This isn't one of those cookie cutter projects where everyone's ended up looking basically the same, there is tons of variety and room for interpretation.
MDQ 1.1 The teacher provides a clearly stated learning goal accompanied by a scale or rubric that describes levels of performance relative to the learning goal
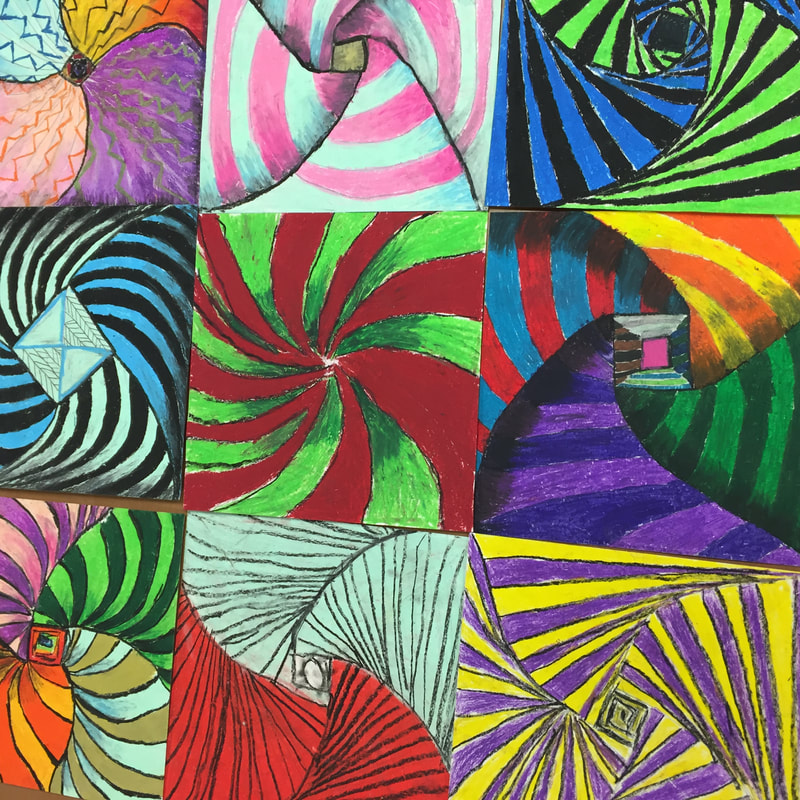
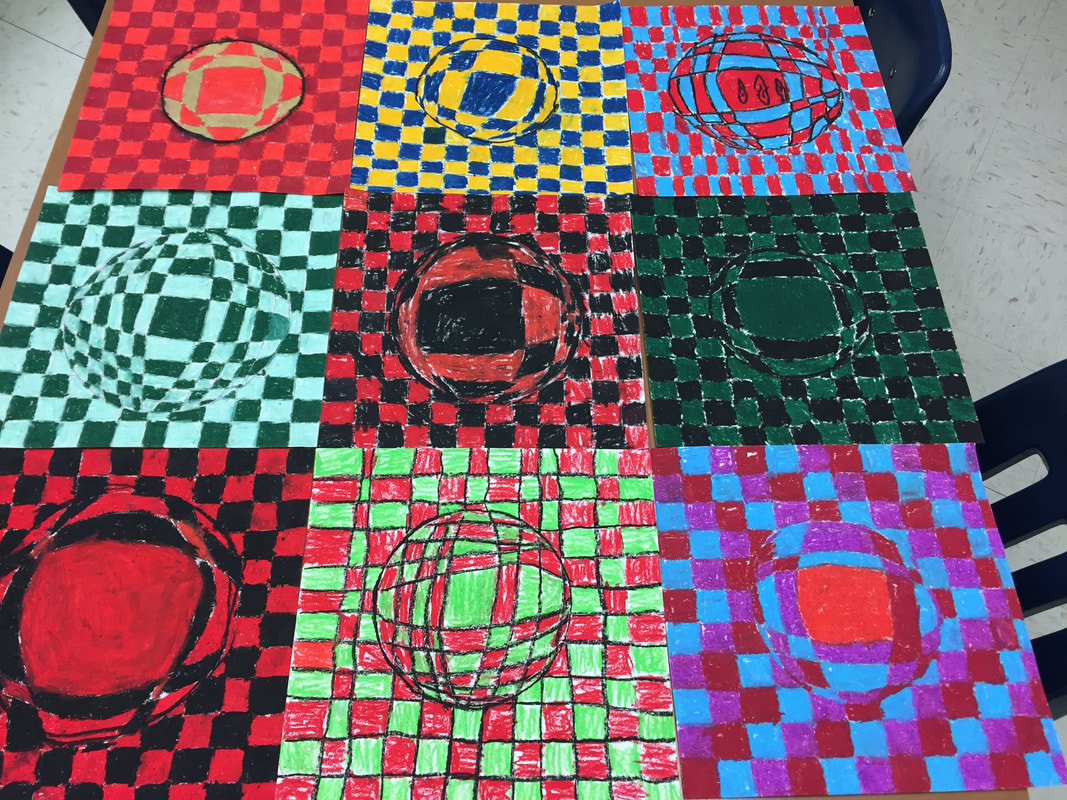
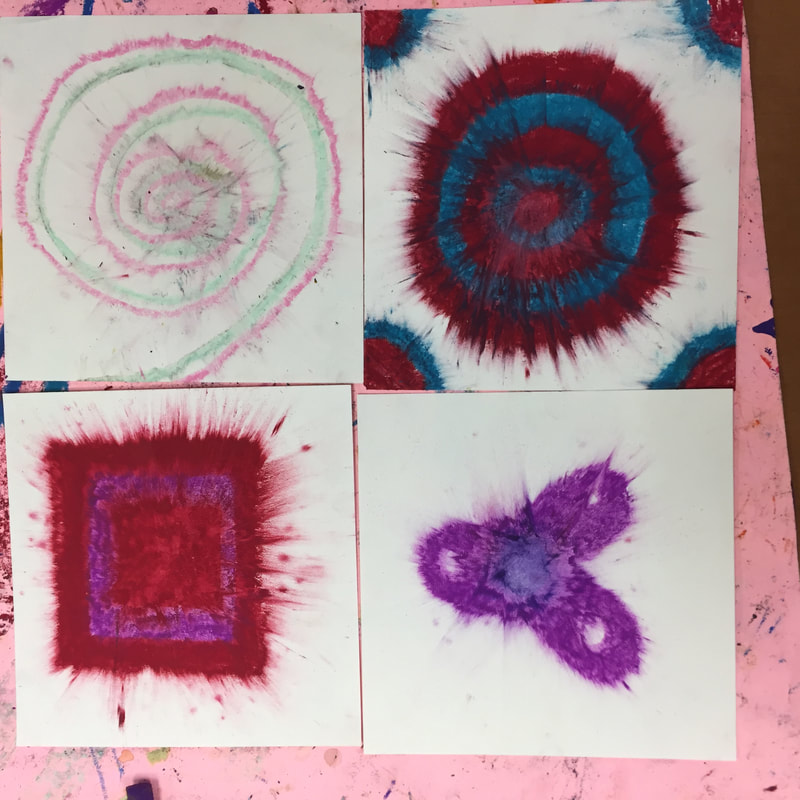
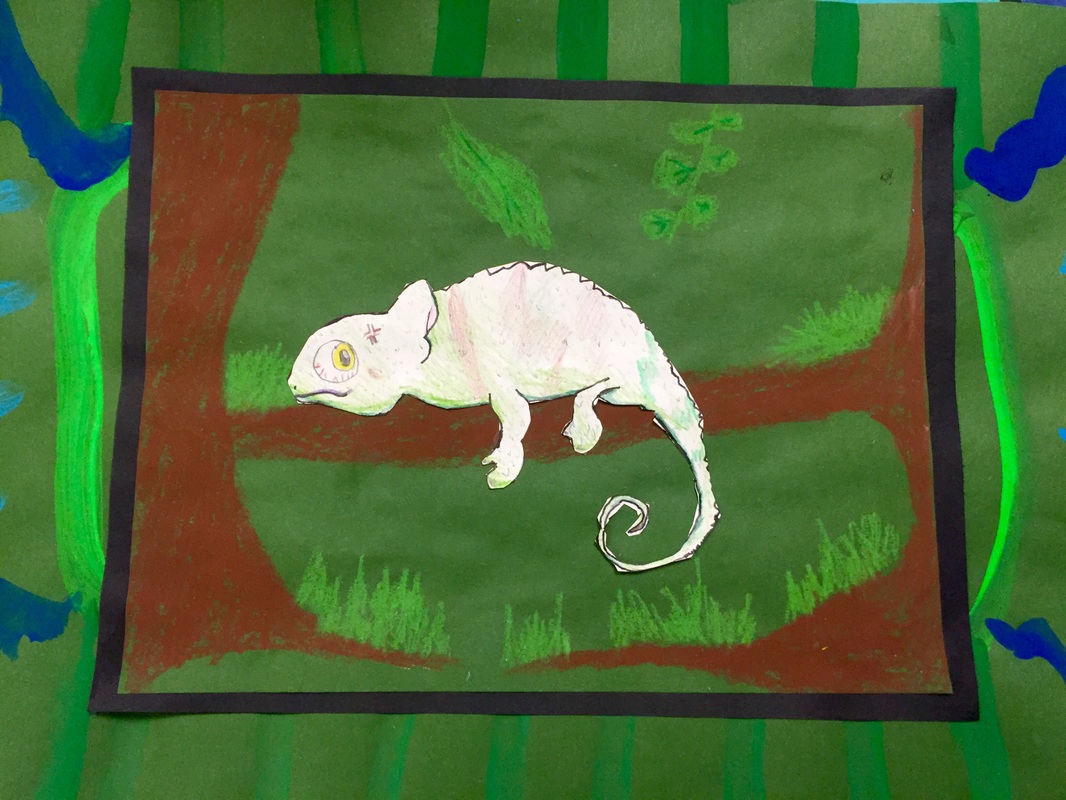
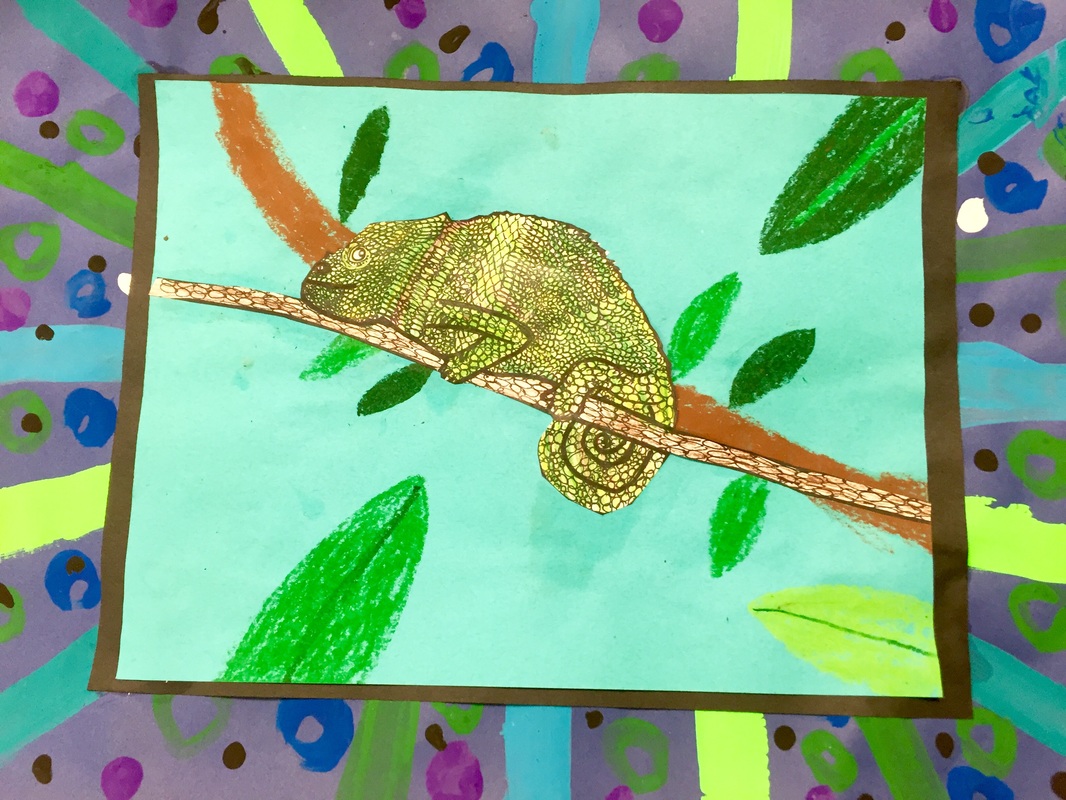
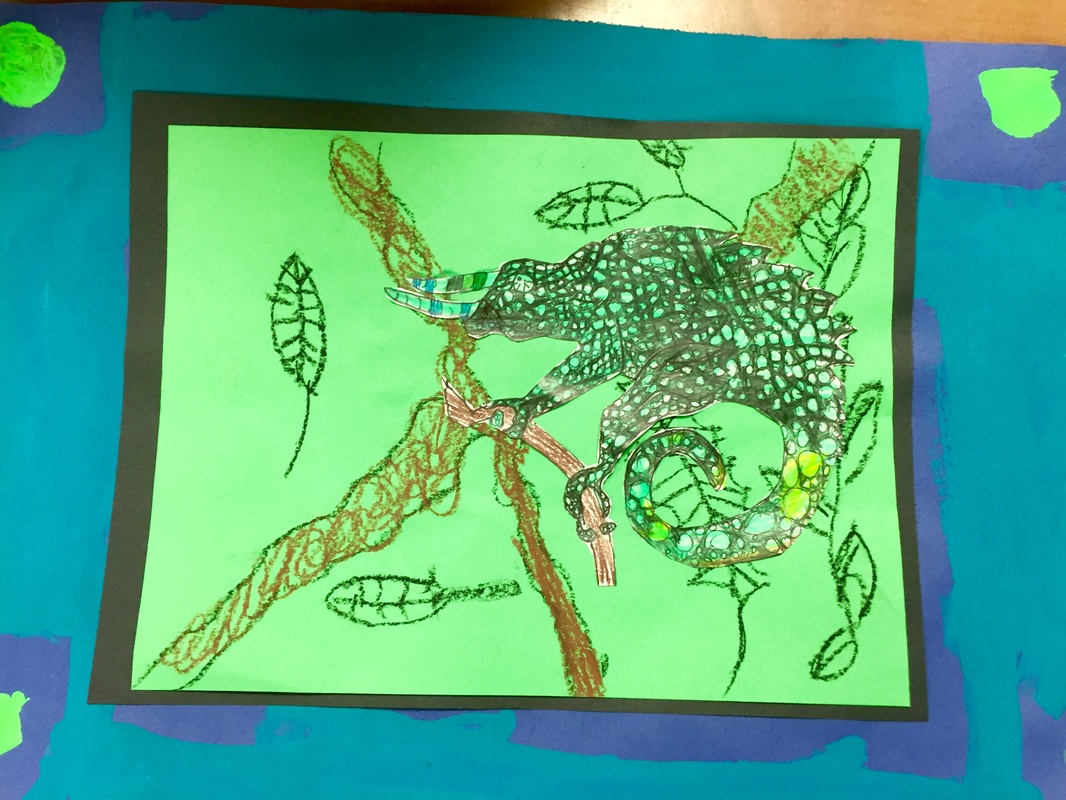
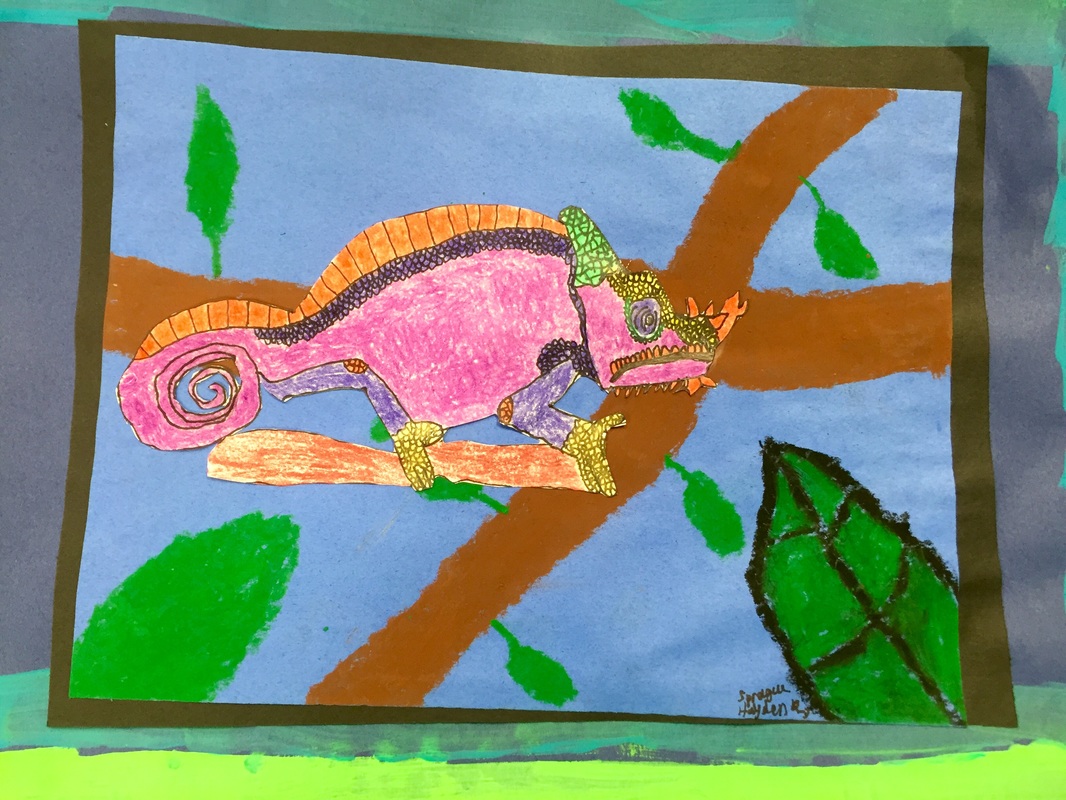
In order to grade this project, I posted a visual 'rubric'. I pointed to the examples that would be considered a '3' and would meet all of the requirements for the objective. Then, we discussed what a '2' and a '1' would look like. The examples of each are in the photo below. It helped some students to see where they could improve their design even if they said it was done, many students were able to set a goal for improvement.
4 examples of a '3' and an example of a '2' and a '1'. Quality control.


 RSS Feed
