THIS LITTLE CLASS OF MINE
  • Home
  • Contact Me
  • Lesson Plans

Statue of Liberty Unit

8/7/2015

0 Comments

 
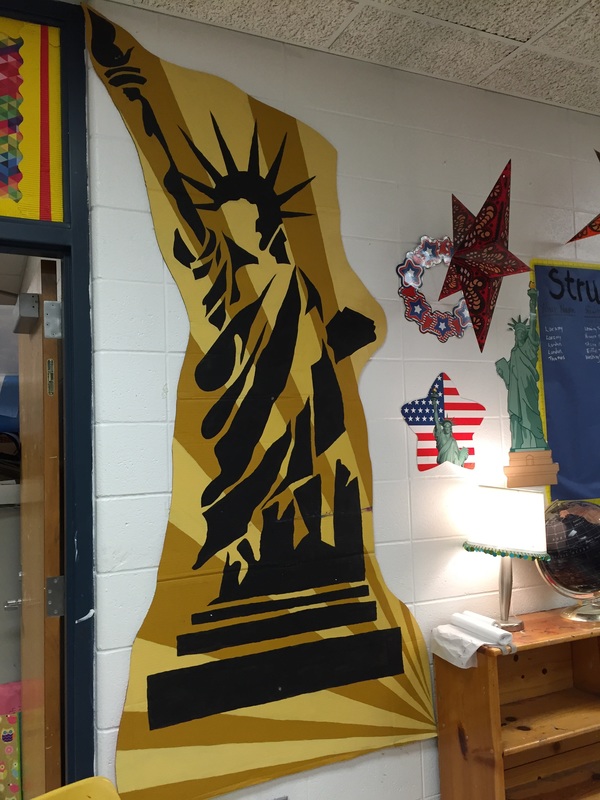
Several years ago at a conference, I was inspired by a Statue of Liberty Unit that another art teacher had done with her middle school students. I had a copy of her visual packet (it did not copy well so I ended up borrowing images and using books to show most of the visuals) but little else for the unit. The theme of our summer school this year is 'History of America' so the Statue of Liberty was a perfect topic. A couple of years ago, we had the same theme and I focused on Abraham Lincoln, this year I wanted to pull out that packet and my notes from the conference and develop it into something really great. 
Picture
Day 1 
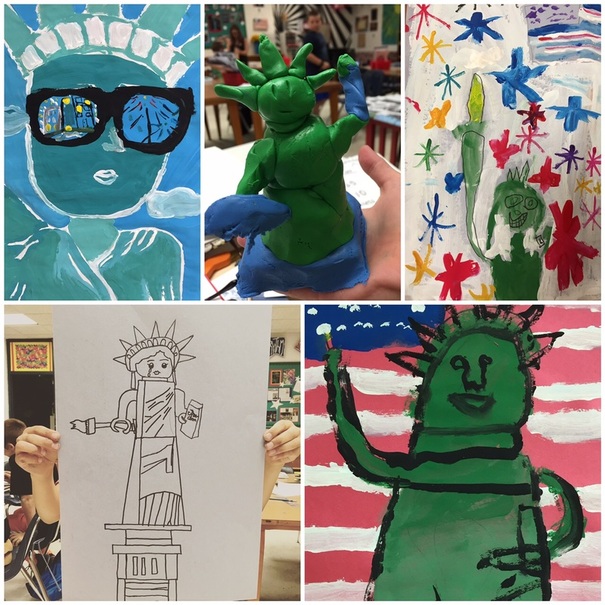
The first day I introduced the project, I told the story of Professor Laboulaye and Bartholdi and the French gift with great symbolism. I told my students how sad it was that Bartholdi is not a household name like Van Gogh and DaVinci, considering he designed one of the most famous statues in the world. We read through the Discover Kids Magazine: Statue of Liberty as a class, and talked about some of the really important photos and key terms about how the Statue was built. Coincidentally, June 17th marks the 130th anniversary of the Statue entering the New York Harbor---it was fun to talk about that date with my classes that week. After reading through the magazine for about 30 minutes, we took a Kahoot quiz over the information using my iPad minis---this helped students retain the information also gave me a chance to go over the rules about using iPads in my art room. Here is a link to the Kahoot Quiz. 
Picture
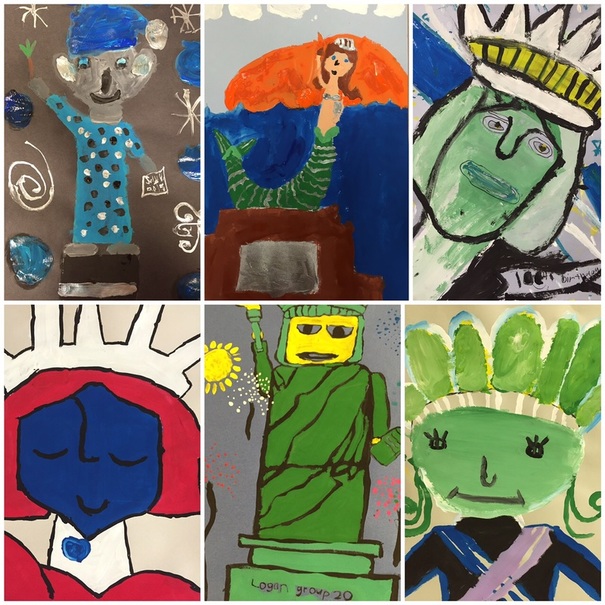
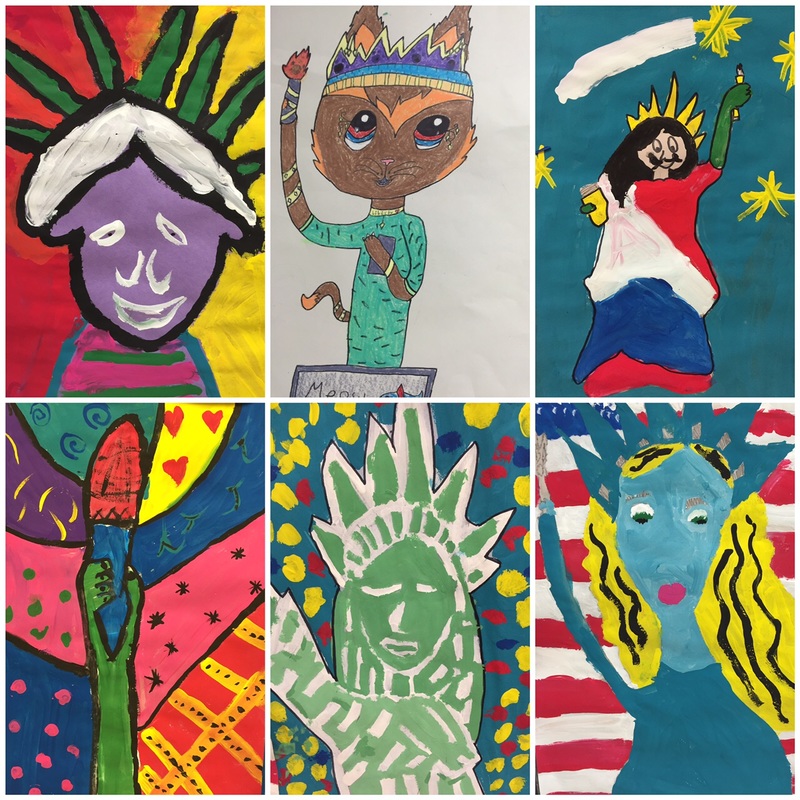
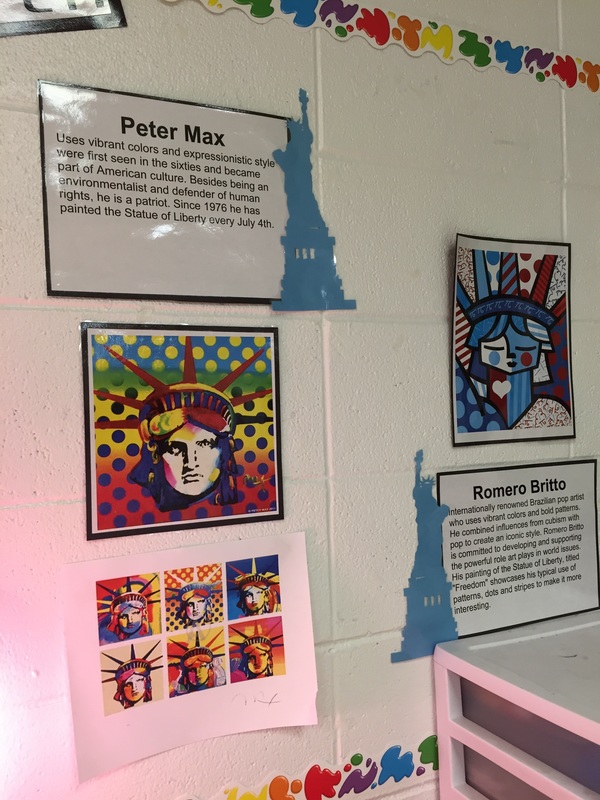
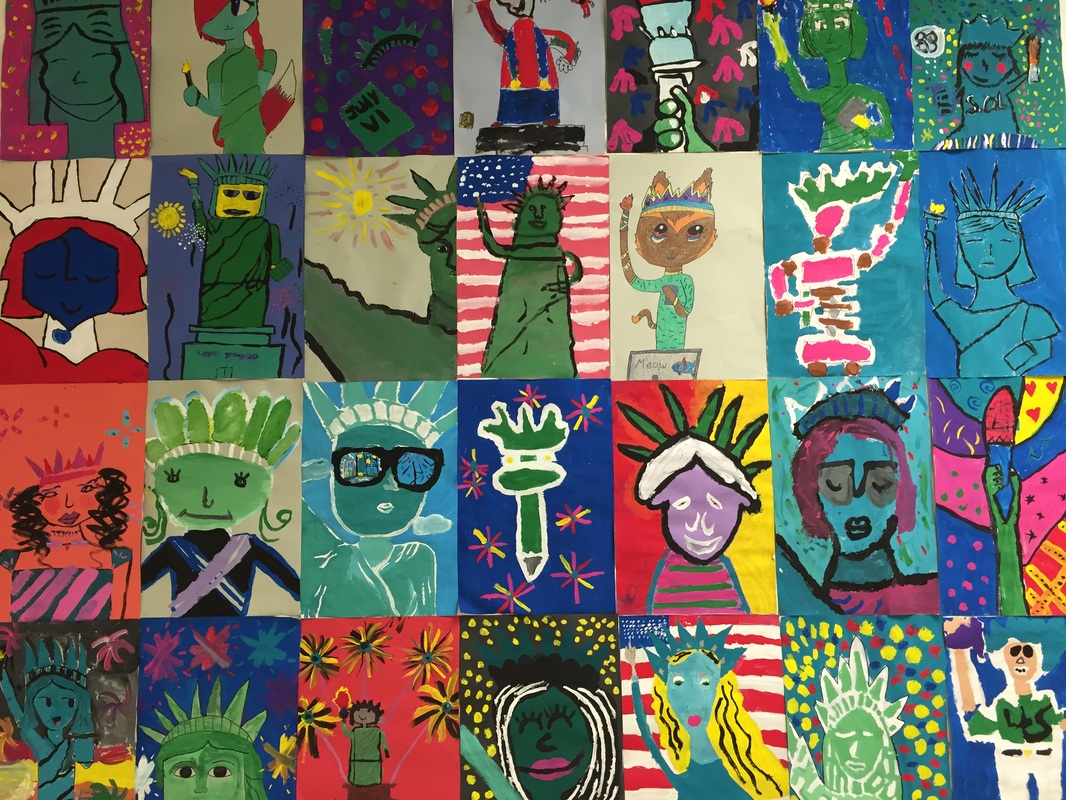
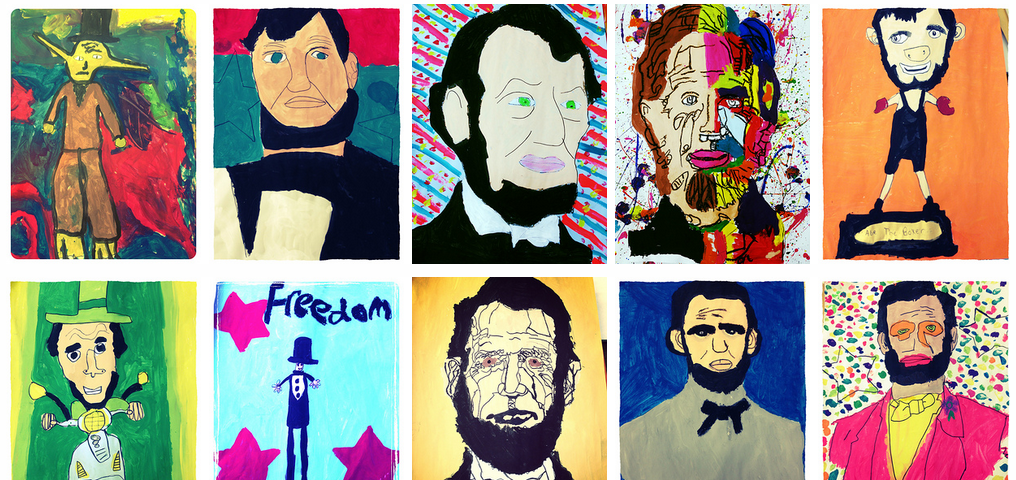
Day 2 Today we started sketching ideas for a Statue of Liberty inspired painting. Students could honor the symbolism of the original artist, or they could inspiration from examples by Peter Max---American pop artist, who paints the Statue of Liberty every 4th of July OR Romearo Britto---and his red-white-blue painting of the lady liberty entitled 'Freedom'. I encouraged students to draw 3-4 versions on a piece of 9X12 paper, we folded it into 4 squares so they would have lots of practice spots. Once they had settled on an idea, they needed to transfer it to 12X18 colored construction paper. This was a great way to use up those faded, old pieces of construction paper. I encouraged them to draw BIG and LIGHTLY and make sure to add a background. Once their drawing was sketched on the big paper, they were ready to paint. Not everyone was ready on day 2, so I encouraged early finishers to use modeling clay to make their own Statue of Liberty for fun! Some students wanted to focus on the torch, instead of drawing the face----I let them do that in this project, but if you were focusing on the portrait you might want to be specific about your expectations. 

Picture
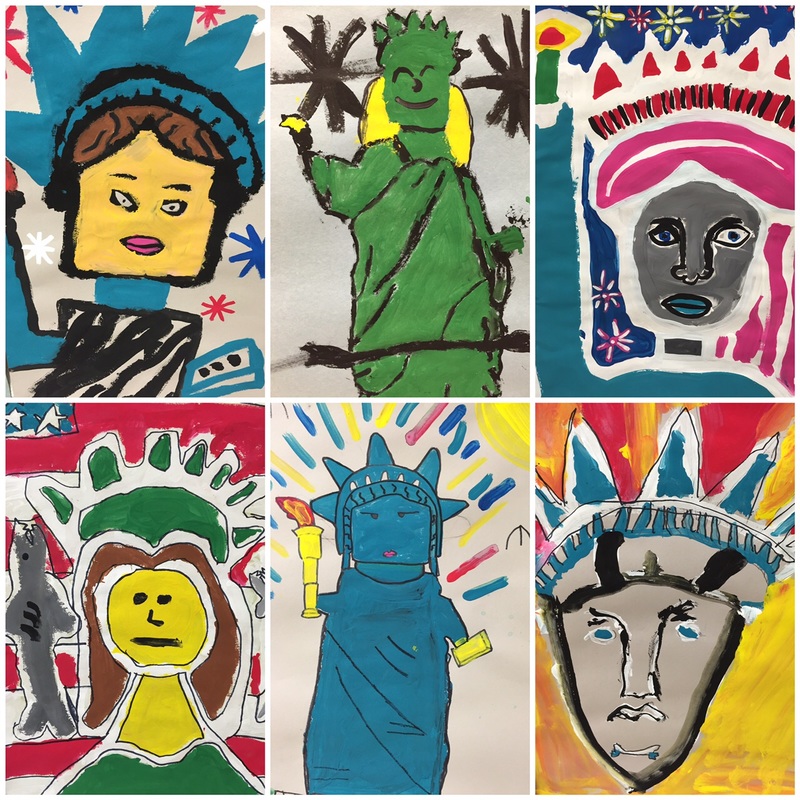
Day 3 For the first day of painting, I encouraged students to paint the background first. I always do this with bigger paintings, because they tend to jump right to the main subject and neglect the background....but by painting the background first, they are forced to plan it out in advance, and it helps them to finish everything on time! One big thing----if they decided to paint fireworks or lots of small stars or something like that, they need to either choose a background color that works (like purple or black), or they need to paint the entire background before starting on the tiny sparks of the fireworks. Several students ran out of time because they started with the fireworks and then tried to paint around each little 'dash'. Once the background base layer is painted, they can mix up a special 'green', or paint the 'skin' of the statue however they want. I encouraged them to save outlining and small details like the eyes, nose, and mouth for the next day so that the base layer could dry properly. 
Picture
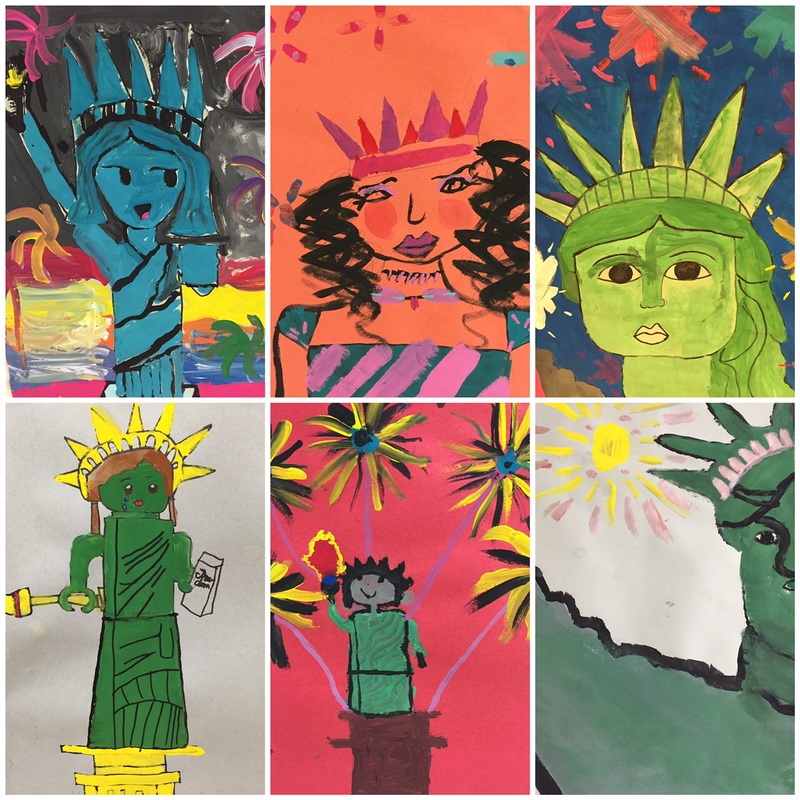
Day 4 Final details! Today was our last day for painting so I brought out the silver, gold, and copper metallic paint so students could give their painting a little sparkle! This was a great chance to jazz up the background with fireworks---I showed an example of how to paint them with a thin brush using lots of dashes and small lines. I also think these paintings look great when they are outlined in black paint---so I encouraged them to either use a small brush with black paint, or at least go back and draw the details on in black sharpie if they painted right over the eyes and nose last time. 

NOTE: One girl who is a GIFTED artist, was struggling with this project. I know that she is really good at animals so I said, 'You could just use the statue's pose as inspiration....and make an animal' instead!' She came up with the OH-SO-CUTE cat below! She spent so long drawing it that she ran out of time for painting---she colored hers with construction paper crayons instead. I LOVE IT!
Picture
If you are considering this unit, check out my PinBoard with lots of visuals and ideas!
Picture
Picture
Picture
Picture
Picture
Picture
Picture
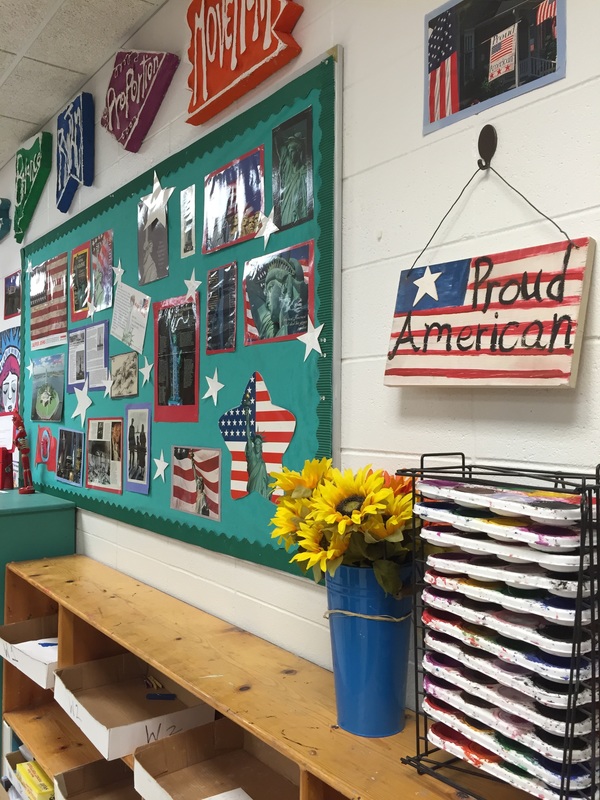
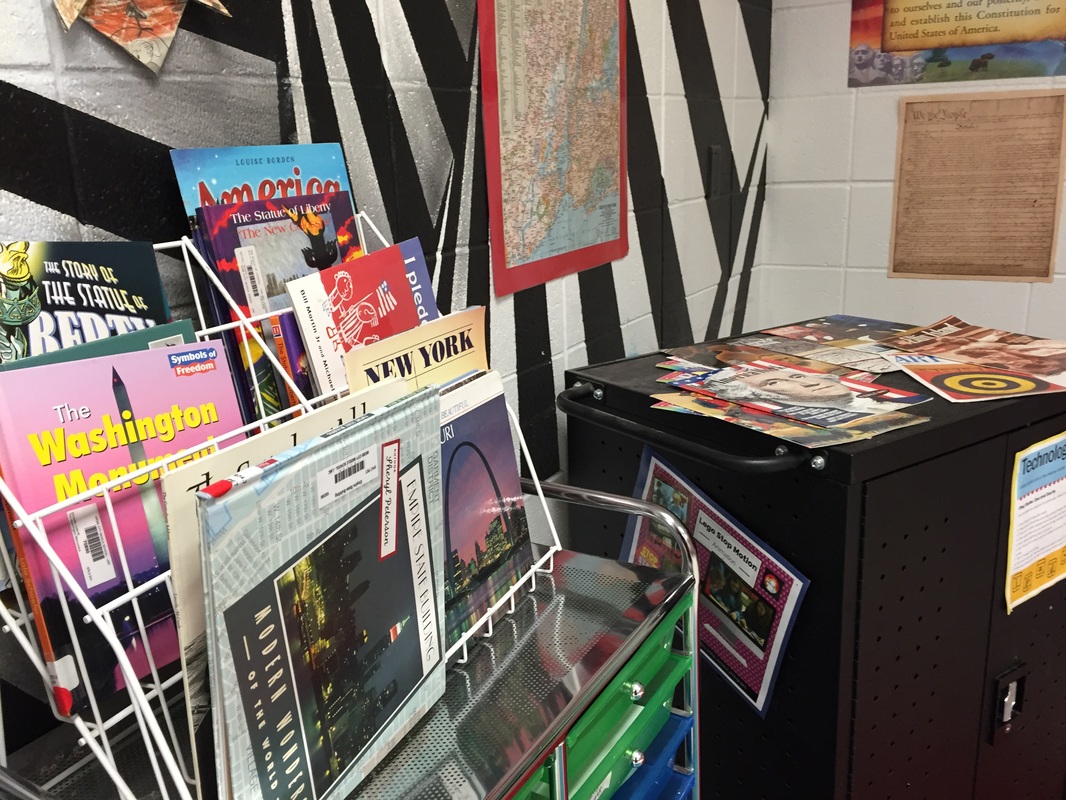
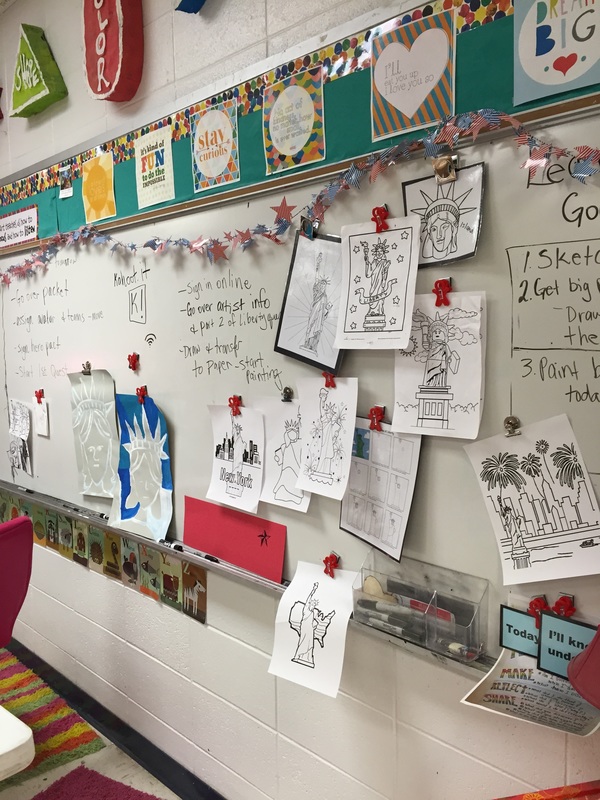
Yes, I do hang up a few 'line' drawings of coloring sheets and even a few step-by-step drawing tools---especially on a project we only have a few days to work on, it helps them stay on track and get done on time so that they aren't spending a lot of class time 'figuring out' what to draw....I also have lots of books, visuals and examples by artists for inspiration. 
Picture
0 Comments

Summer School Edition: New Zealand

6/14/2014

0 Comments

 
Picture
Picture
This year the summer school theme is 'Countries of the World'. It only took me a couple of minutes to decide on New Zealand. When I was in college, I got to visit New Zealand for a couple of days and it was amazing!

Since I have my 4th-6th grade students 4 days in a row for one hour and fifteen minutes each day, I knew that it was important to provide them with a multitude of activities. Also, students aren't always there every day since the program is for enrichment, so I have to develop a unit of study that is flexible if a kid misses one day (or more). I pasted my daily lesson plans for the week below, but I added one addition element to keep things flowing.

Much like my Abraham Lincoln Enrichment Unit from last summer, I knew I wanted to reward the students who completed every single task for the week. I designed a sheet of art badges for my students to keep track of their progress as they completed each activity and mastered each skill for the week. Some activities we did together (like the 1st video on the S'more flyer below) and other activities they had to master on their own: Like learning the New Zealand te ao kori games: hipitoitoi and hei tama tu tama.
On the last day, they could turn in their badge sheet for a reward: for every 3 badges they earned, they got to select a piece of candy or small school supply (like a sticker or eraser) up to five total.

I know, I know, I probably shouldn't give out candy....but it is summer school and I wanted to reward the kids that worked extra hard and provide some incentive to the slackers. ;-)

Overall, I've been really impressed with the results of the 18X24" Kuro paintings which were inspired by this Pinterest pin and this artsonia gallery
. A great coloring page of the Koru can be found here. We've been using neon paints and I gave the students the choice between red, black and white as their base paper color.

I haven't been as impressed with the Crayola air dry clay. I like the texture of it, but it breaks so easily after it dries that it really isn't good for necklaces, it just isn't as tough as real, fired clay, but I opted for it for this project because I needed something that would be ready in a couple of days.

Monday: Introduce the art of New Zealand and demonstrate how to use the S'more flyer. Explain how the badges work. Sketch ideas for clay necklace using handouts and visuals on the S’more flyer. (students watch the video and read about carving on their own.) https://www.smore.com/b5z1m/edit?ref=show_author

Supplies: Pencils, erasers, handouts, copies for free time, iPads, 8X12 white paper

Tuesday: Create clay necklace pendant out of air dry clay. When finished, use S’more flyer to learn about Maori painting designs. Sketch an idea for painting, could be Koru or design inspired by Maori facial tattoos.

Supplies: Air dry clay, needle tools or pencils, iPads, 8X12 white paper for sketching, markers for adding color to sketch a plan for the painting, pencils and erasers, visuals

Wednesday: Field Trip

Thursday: Begin painting (using sketch). Draw on big paper, start with a 2-3 colors, paint the large areas. If desired, paint clay necklace, or put on string and take home.

Supplies: Twine for necklaces, paint, brushes, 18X24" paper for painting

Friday: Finish painting, add details and dots, outline some spots with permanent markers. Use iPads to learn more about New Zealand and play some New Zealand games if desired. Turn in badge sheet for rewards. Paint clay necklace and take home if you didn't yesterday.

Supplies: Paint, permanent markers, brushes, iPads, games for free time, candy for games


Picture
Badge Sheet: designed using Print Shop and embellished with sharpie...not my best work, but I needed to whip something up the last week of school.
Picture
Picture
Picture
The first set of pictures are from the students going into 6th grade next year and the pictures in the slide show are students who just finished 3rd grade. I still have 2 more weeks of summer school, I can't wait to see what the students come up with!
0 Comments

Abraham Lincoln Enrichment Unit

6/10/2013

1 Comment

 
Picture
After attending the technology conference, I was really inspired to incorporate some multimedia technology into my summer school program. Let's face it, I've been scheming about how to approach this enrichment program for months. Summer school in my district is elective, for both teachers and students. Usually, we get to work with students that actually want to be here. And it is 4th-6th graders, my favorite age group. The environment is relaxed, teachers can wear shorts: GASP! And once per week, there is a field trip. 

It is my job to create 4 lessons and I re-teach those all 4 weeks to a new group of kids each week. Since I have each class for one hour and 15 minutes each day, I can accomplish a lot more than on a normal school day. 

The over-all theme of summer school this year is: America! So it was easy to narrow down my topic. I knew I wanted to teach some sort of a painting project. I'm going to share my basic unit plan for this experience with you, so that you can see how easily I was able to incorporate technology into the scope of everything. The main goal at the end of the week was to create a 18X24 painting of Abraham Lincoln. 

Picture
Here is the 'Sticky Note' mural in progress.

Day 1

As soon as students walk in, while taking attendance, I challenge everyone to draw their best Abraham Lincoln on a sticky note. When finished, stick it on the board. (Later this will be part of an installation which will include everyone's preliminary sketches). 
On the SmartBoard, I had a Prezi ready to show them. The very first slide is a Tellagami video. If you have not used Tellagami before, (It was new to me before the conference in May), it is very easy to use, you can record your voice, make the avatar look like you and create a 30 second video. I even used a photo from my real classroom (since I am in a 'borrowed' room for summer school). I plan to use it to teach my classroom procedures and routines in August. 
Picture
In the video, I ask them to read a bit about his life, and highlight one cool fact in pink; most important sentence in blue; significant event in American History in yellow and write their names in green. 

Here is a link to the facts that they read: Facts About Abraham Lincoln.

I call on a few students for each of the highlighted colors to show read what they highlighted, we put this page to the side, and I continue taking them through my Prezi. 

If you would be interested in viewing my entire Prezi, you can find it here. 

Picture
Using this image, I explain that students need to have a lot of resources in order to create a painting that they can defend. They need to get inspiration from somewhere. Today, students will be doing research to help them create their painting. 

Then I say: I have 12 ipad minis for you to use today. And the entire mood of the classroom shifts into elated excitement. 

I explain that there are 8 specific things on the iPads in a folder on the main screen called 'Summer School 2013 . As they complete each of the activities, they need to write their name on a chart at the front of the room. 

For each of the activities that they record their name, they will be earning 'Lincoln Bucks'. Lincoln Bucks is something that I made up to incorporate a little bit of math into the unit. I explain that the more of the Abraham Lincoln activities that they do, the more money they will earn to spend in the 'classroom store' on the last day. I explain each of the activities, the first one is an animated video of the Gettysburg Address, another one is the Abe App, they can earn money on that one if they take the quiz at the end, etc. As they complete each activity, they record their name on a poster at the front of the room, to help track who has done what. 

Here is a list of the apps that I had available to them: 
Animated Gettysburg Address
Abe App
Lincolnize Me!
National Geographic Kids: Abraham Lincoln Video
Bobbleshop - Bobblehead Avatar Maker (must make one to look like Abraham Lincoln to get points; might end up being your inspiration for your painting). 
View Gallery of Lincoln images via Flickr
Skitch app (3 word search photos are in the photo gallery, if students open all 3 and attempt to solve them, they can count it)

*I also have a really great Pinterest board about Lincoln, but the school's new internet filter kept blocking Pinterest on the student devices, so I took the link off the iPads. 

If students spend their entire time on the bobble head app, then they only get credit for one thing...of course, I'm sure they probably would have done some of the other apps without the incentive, but it was a really fun way to give them options. I could have lectured or walked them through each image and video as a whole-group activity, but this is a way that I can give them all of the information, and they get to choose what they view first, they get to be in charge of their own learning within the scope of my boundaries. 


Picture
Picture
After I explain how to earn Lincoln bucks, and give a quick overview of the apps, I go over a few basic rules for how to take care of the iPads. I also explain that students can work in pairs....and both will get credit for each activity. This is helpful if someone is absent, since we only have 4 days, if they miss one, they may not get to finish, but they could help someone else. Also, working in pairs is helpful since I only have 12 iPads...especially if it is a large class. 

Then, I show them a Vuvox collage of images to help explain that the final goal of all the research is to produce a work of art. It can be serious or silly, but they must be able to defend their idea. 


Picture

Day 2

Students have a little bit of time to finish up any of the activities that they may not have done the first day. Then, they MUST do a sketch for their painting. This is a plan. They might need to find the iPad that they had the day before to view images one more time. Here is where I get a little soft....if they are really good at drawing, I have a few Abraham Lincoln books and images around the room, they can look at those for their drawing...OR....I have a little booklet of line drawings (coloring pages) that they can use. 

Once they have a sketch, they transfer their drawing (or the image they have selected from the booklet) onto a transparency with a sharpie. I show them how to use the overhead projector to 'blow it up big'. I explain that this is often how images are transfered to murals, including many of the murals in our school have been done this same way. They tape their big painting paper to the wall, trace back over their lines and VIOLA! they have a nice big drawing that is ready to be painted. If they finish early, they might have some free time today. I let them play games, draw, or use the ipads. I showed them the Tellegami app, so they could make their own Avatar videos if they wish. 
Picture
Abe Lincoln Bobble head

Day 3

Since we have two days to paint, I have a certain order to follow so that some areas will be dry enough the 2nd day to touch up and add details. We use tempera paint for this project. 

1. Paint the skin (if hands are showing, or ears, make sure to paint all of those areas). This is especially important if you are doing a realistic representation, to paint the skin so that it can start to dry. 
2. Paint the background. At least get a base coat, if you are going to paint a pattern or a flag or stars or something patriotic on top. 
3. Paint the hair and beard. (Let the background and skin dry a little bit before doing this if you have time).
4. Save details for tomorrow. 

Day 3 is pretty easy, as long as they clean up and put everything away. 
You can view more pictures from our flickr gallery here. 
Picture

Day 4

TODAYS GOAL: FINISH ALL PAINTINGS.
At the end, we will shop in the store with our Lincoln Bucks. 

I explain that their main goal should be to finish their paintings. I show them examples from other classes to get them motivated on how to finish up the background or add details. 

Lincoln Bucks
On the first day, they had an opportunity to earn $$ for completing certain activities. Today, they can cash in that money and do some shopping. I explain that in the South, during the Civil War, money was not the same as it is today. Sometimes banks would print their own money, but if the bank went out of business, that money would become worthless. The value of money and goods fluctuated depending on demand. In our classroom store, we are going to simulate that idea. Things are not the same price they would be if you went to a real store and bought them. If students completed every activity and wrote their name on the chart, they would have $50 to spend in the store. If they only did a few of the activities, they have less money. 

I found some little paper $5 bills at a party store. Students write their name on the back, and the value of the money they earned. Once their name is on it, they place the fake bill in a plastic Abraham Lincoln hat I found at a party store. Close to the end (after I have assisted everyone in finishing up their paintings), I draw their name out of the hat to come up and shop at the store. 

In the store, we have notebooks for $40, pencils, crayon boxes, protractors, rulers for $30, trinket toys for $20, candy for $10. Students can leave with something tangible or edible once they cash in their money. 

Day 5 Field TRIP

We are so lucky, for our field trip, I was able to get us into a local art center and the current show is called Artworkers Creativity in America. It is a very interactive exhibit. I created a gallery guide for students to complete while they are visiting the show, and the staff is very helpful, taking the students through a very special Abraham Lincoln exhibit. You can read more about the exhibit on the wordpress blog here. You can also view images from the exhibit on their flickr page here. 
1 Comment
    PictureWelcome!

    Mrs. Mitchell

    Art teacher from Missouri. 

    Instagram
    Add to Flipboard Magazine.

    Archives

    March 2021
    April 2020
    November 2019
    July 2019
    April 2019
    January 2019
    October 2018
    July 2018
    June 2018
    May 2018
    April 2018
    March 2018
    January 2018
    September 2017
    May 2017
    April 2017
    March 2017
    January 2017
    December 2016
    November 2016
    October 2016
    September 2016
    March 2016
    December 2015
    October 2015
    August 2015
    May 2015
    April 2015
    March 2015
    February 2015
    November 2014
    October 2014
    September 2014
    August 2014
    June 2014
    May 2014
    April 2014
    March 2014
    February 2014
    January 2014
    December 2013
    November 2013
    October 2013
    September 2013
    August 2013
    July 2013
    June 2013
    May 2013

    Categories

    All
    1st Day Of School
    1st Grade
    3d
    Abstract Art
    Alcohol Ink Tiles
    Alpacas
    Animal Art
    Animation
    Architecture
    Art Centers
    Art For Kids Hub
    Art History
    Art Hub For Kids
    Art Room
    Art Show
    Art Teacher Conference
    Bell Ringer
    Birds
    Blending
    Bunnies
    Cardboard
    Chalk Pastels
    Chalk Stencil
    Charcoal
    Choice Based
    Christmas
    Chuck Close
    Classroom
    Clay
    Club Day
    Collage
    Color Diffusing Paper
    Colored Pencil
    Colored Pencils
    Construction Paper Crayons
    Contest Art
    Creatures
    Crystal Bridges
    Design
    Dice Games
    Document Camera
    Dot Day
    Drawing
    Early Finishers
    Easter
    Emojis
    Fall
    Field Trip
    Food Art
    Foxes
    Green Screen
    Grid Drawing
    Group Challenge
    Halloween
    Haunted Houses
    Hearts
    Hermit Crab
    High School
    Human Form
    Ice Breaker
    Inspirational Posters
    Ipads
    Jim Dine
    Justand
    Killer Whales
    Kindergarten
    Landscape
    Lesson Plans
    Lettering
    Llamas
    Magazines
    Mandala
    Maori
    Markers
    Masks
    Matisse
    Metal
    Model Magic
    Mona Lisa
    Monster Trucks
    Mother's Day
    Mother's Day Card
    Mummies
    Mural
    Newspaper
    New Zealand
    Notan
    Observational Drawing
    Ocean Art
    Oil Pastel
    Oil Pastels
    Optical Illusions
    Origami
    Owls
    Painting
    Paper Weaving
    Pd
    Pencil Topper
    Perspective
    Pete The Cat
    Picasso
    Polar Bears
    Pop Art
    Portraits
    Printmaking
    Product Review
    Professional Development
    Quiver
    Reflection
    Reflective Teaching
    Room Tour
    Rooster
    Sea Horse
    Seals
    Sea Turtle
    Self Portrait
    Shading
    Shaving Cream Prints
    Shoes
    Sketchbooks
    Sloth
    Solar Eclipse
    Spinners
    Spring Conference
    Star Wars
    Statue Of Liberty
    Step-by-step
    Step By Step Drawing
    Step-by-step Drawing
    Still Life
    Stop Motion
    Story Board
    Sub Plans
    Summer School
    Symmetry
    Tab
    Teacher Appreciation Cards
    Technology
    Tempera Paint
    Tiny Food
    Tissue Paper
    Trees
    Tumbling Blocks
    Valentine's Day
    Warm Ups
    Watercolor
    Wax Resist
    Word Art
    Yellow Submarine
    Zentangle

    RSS Feed

Powered by Create your own unique website with customizable templates.